BitLocker provides extra security to your data and drive files against malware and firmware. However, you may opt to disable it any time you want. In this article, we are going to discuss easy and straightforward methods on how to disable Bitlocker in Windows 10. So, without further ado, let’s get started!
Part 1: What Happens If I Disable Bitlocker?
Ideally speaking, it’s not advisable to disable your Bitlocker in any situation. Bitlocker Drive Encryption encrypts your drive and saves it against unauthorized access or security threats. For maximum security, it is best to keep your Bitlocker on at all times. However, one may be facing a situation where the only solution is to disable the drive encryption. When you disable it, your system will eliminate all the essential protective measures that were running on your PC. This means your data can easily be decrypted and accessed by unauthorized visitors. This will weaken the overall security of your computer system. Now, if you are faced with a situation where you desperately want to disable Bitlocker on Windows 10, then this article is for you. We have comprised a complete list of methods that you can try to disable Bitlocker in your Microsoft Windows.
Part 2: How to Disable Windows Bitlocker?
How do I disable BitLocker in Windows 10? The process is pretty straightforward and easy to understand. You don’t need an expert level of technical mumbo-jumbo to get it. Each method works for different situations, so if one doesn’t work for you, the other might. So, simply try out all the methods in the given order until you find the one that suits you the best.
- Method 1: Turn off Bitlocker Windows 10 in Control Panel
- Method 2: Disable Bitlocker Windows 10 in PowerShell
- Method 3: Disable Bitlocker Windows 10 in CMD
- Method 4: Turn off Bitlocker through Bitlocker Service
- Method 5: Disable Bitlocker in the Settings App
Method 1: Turn off Bitlocker Windows 10 in Control Panel
Control Panel is the hub of activities taking place on your computer system. To turn off Bitlocker in the Control Panel, you have to follow these steps:
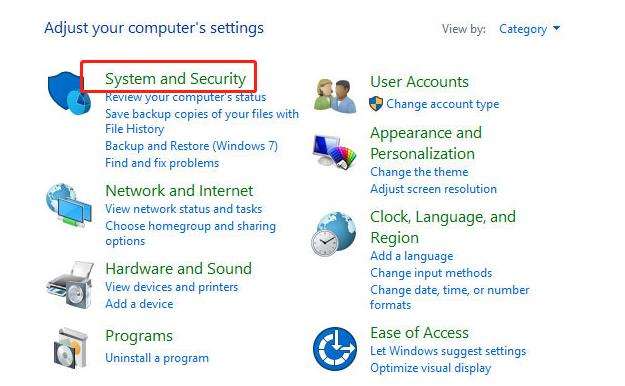
1. The first step is to go to Control Panel and select System and Security.
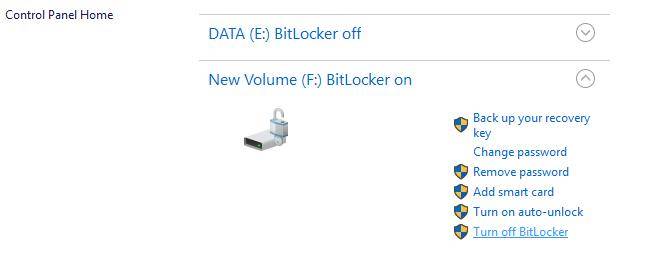
2. Now, choose BitLocker Drive Encryption and select Manage BitLocker. When the new interface is opened, tap on Turn off BitLocker. This will disable your Bitlocker.
Method 2: Disable Bitlocker Windows 10 in PowerShell
You can disable BitLocker in windows 10 by using PowerShell as well. Some users prefer the use of command-line tools, so if you one of them, this method will work the best for you. To do this, you have to:
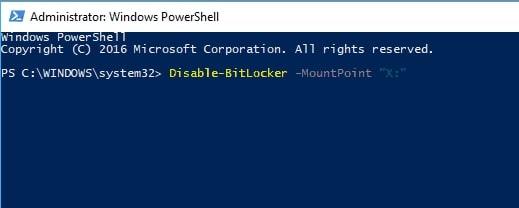
1. Press Windows and search for PowerShell. You will see Windows PowerShell on the list. Right-click on it and select Run as Administrator.
2. A blue box will appear in front of you, and this means PowerShell is opened. Type Disable-BitLocker -MountPoint X: (replace letter X with whichever letter your Hard Drive represents) on it and click Enter to run the program.
Method 3: Disable Bitlocker Windows 10 in CMD
One of the simplest methods to disable Windows BitLocker is through Command Prompt. Follow these steps:
1. Firstly, press Windows + X to open the Start toggle menu. Now, select Command Prompt and run it as an administrator. Type the following command manage-bde -unlock F: -RecoveryPassword YOUR-BitLocker-RECOVERY-KEY.
2. Now, type the command manage-bde-off X: (replace letter X with whichever letter your Hard Drive represents) and press Enter.
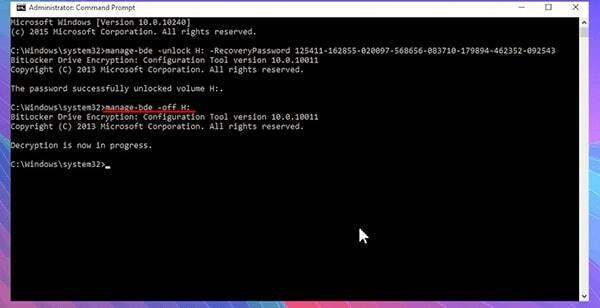
3. It will automatically disable your Bitlocker.
Method 4: Turn off Bitlocker through Bitlocker Service
If none of the above methods worked for you, you could try to disable your Windows Bitlocker through the Bitlocker service. To do this, you simply have to:
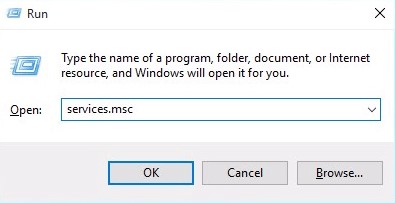
1. Press Windows + R to open the run command. Now, type services.msc. Press Enter.
2. A service window will appear in front of you. Now double click on the option that says BitLocker Drive Encryption Service.
3. You need to set a startup type now. Set it to Disable. Now, click on Apply.
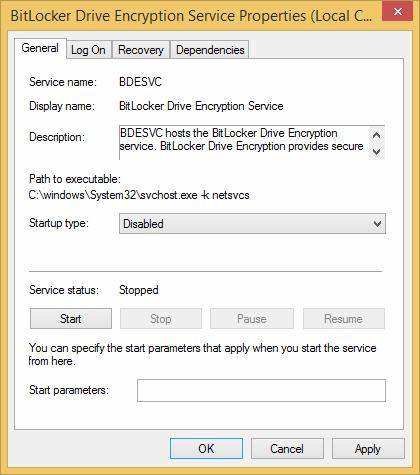
4. Now that the BitLocker service is disabled, BitLocker will successfully be turned off.
Method 5: Disable Bitlocker in the Settings App
You can also use the settings application to disable Bitlocker in Windows 10. This is probably the easiest method among all. To do this, simply follow these steps:
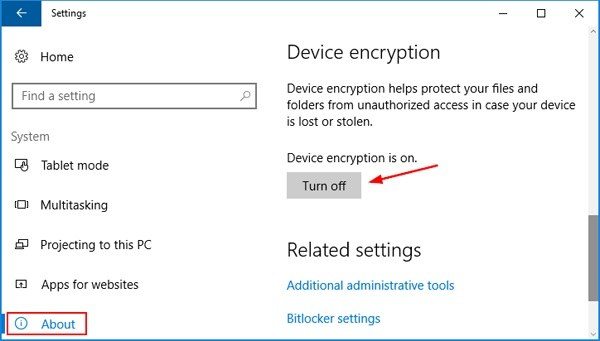
1. Open Settings App.
2. Now, click on the System feature.
3. Select About and look for Device Encryption. If your Bitlocker is running, it will show open. Click on Turn off to disable it.
Summary
Bitlocker is an in-built security feature in Microsoft Windows that encrypts your drives and saves it from any form of unauthorized access. If you disable this feature, you will be risking your drive to unauthorized access and security threats. However, if you still want to disable Bitlocker, this article provides you with a complete on how to do so. You can disable the Bitlocker feature through the control panel, Powershell, command prompt, Bitlocker service, or simply the settings application. You can try either of these methods to disable Bitlocker on your Windows 10. During the process, your computer may ask you for your Windows login password for security verification. In case you forgot it, you can easily restrive it through PassFab 4WinKey in no time. Cheers to you guys and Good Luck!