We all know how data and its theft are one of the prime concerns in the modern digital age. Thus, it is customary to password protect Excel workbook to keep your documents safe from prying eyes. Microsoft Excel comes with the wonderful Excel protect workbook option to ensure that your Excel 2013 data is secure and out of harm's way. If you haven’t used this option yet, we recommend you to make sure that your data remains in safe hands by password protecting your Excel workbooks.
Microsoft Excel introduced the Encrypt with Password option back in 2003 and since then it has become a regular feature of the new Excel versions. The feature is not only used to protect workbooks on shared workstations but is also very popular among those working in collaboration on shared documents. With each new version of Excel release, Microsoft has made slight changes the method of encrypting a workbook using a password. Here’s a detailed guide on how to protect Excel workbook in Excel 2003, Excel 2013, and Excel 2016 versions.
There are essentially three methods to protect your workbook in Excel.
- 1. Encrypting Workbook using Password Protect option in Microsoft Excel
- 2. Converting Excel workbook into .pdf format
- 3. Protecting Workbook with Structure Password in Microsoft Excel
1. Encrypting Workbook using Password Protect in Microsoft Excel
Password Protect Excel 2003 Workbook
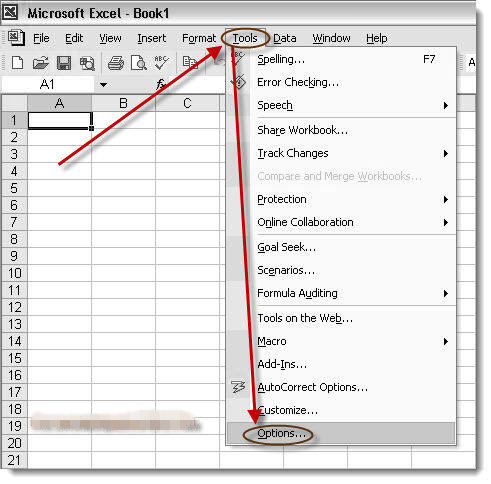
Step 1: Start Microsoft Excel 2003 and open the workbook that you want to secure. Next, in the ribbon bar, click on Tools and select ‘Options’ from the drop-down list.
Step 2: Options window will appear. Select the ‘Security’ tab.
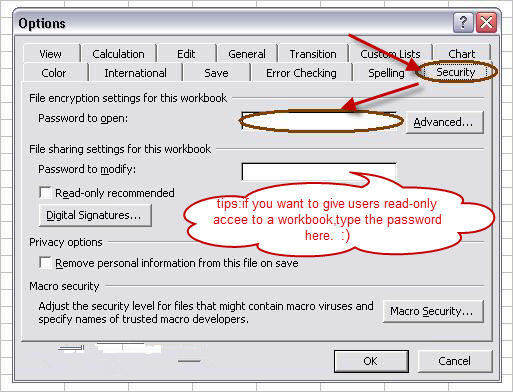
Additional Tip: You can choose your preferred Encryption type, including Key Length and encrypting document properties using the Advanced button on the Security tab.
Two password options will appear in the tab; ‘Password to Open’ and ‘Password to Modify.’ A person having password to open can only open workbook in the Read-Only mode while the one having the Password to Modify can also edit the workbook. Type a password to password protect Excel workbook and click ‘OK’ button.
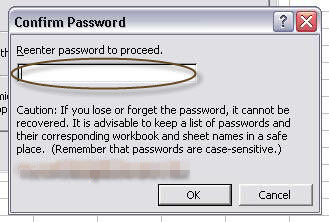
The confirmation dialogue box will appear, type your Password to Open, and then Password to Modify when the next dialogue box appears.
Step 3: Select File> Save As from the ribbon bar and close your workbook after changing its name. On reopening the workbook, you will be prompted to enter the password first.
Password Protect Excel 2016 Workbook
Step 1: Start Microsoft Excel 2016 and open the workbook that you want to secure. Next, in the ribbon bar, click on File and select ‘Info’ from the left hand panel.
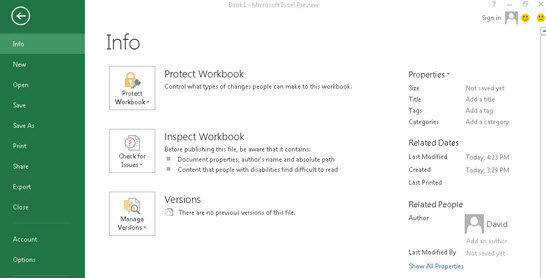
Step 2. Click on the Protect Workbook option in the main window and select Encrypt with Password.
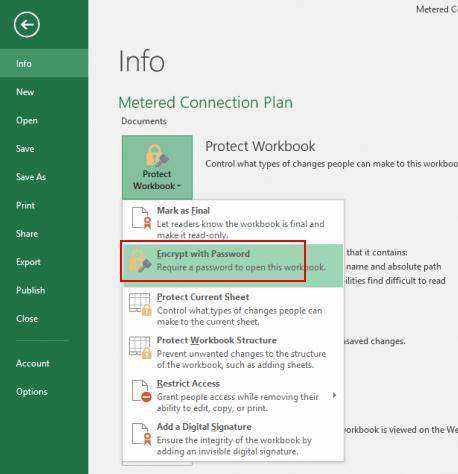
Step 3: A dialogue box will prompt you to enter the Password. Type your password and click OK. The confirmation dialogue box will appear, re-enter your password and enter Ctrl+S from the keyboard. On reopening this workbook, you will be required to enter a password to open this Excel sheet.
Bonus Tip: You can also protect all cells in an Excel 2016 worksheet by going to Review>Protect Sheet.
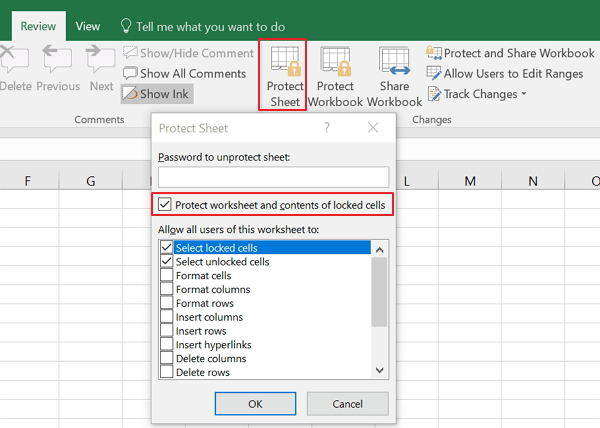
Step 4. Check the options Protect worksheet and contents of locked cells checked, and select the editing options you want to allow for the users of this worksheet and click OK.
2.Converting the Excel workbook into .pdf format
If you are afraid that someone might be offended by setting up a password for an Excel workbook, you can always opt for saving the file in .pdf format. You can make it look very professional by using the appropriate styling options. Once you are done formatting, here’s how to print the Excel workbook as a PDF file.
Step 1: Go to the File and select Print option from the left-side panel.
Step 2. To ensure that all the rows and columns of the workbook are printed on one-page to make it an easy read, go to the Scaling option in the drop down menu and select Fit Sheet On One Page.

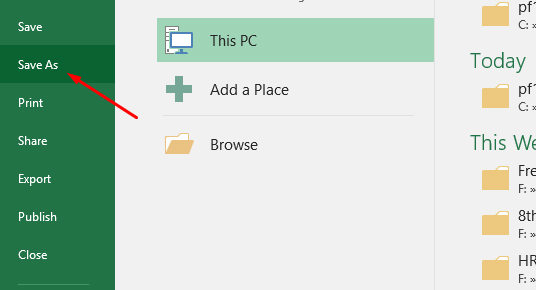
Step 3: Go to the Save As option in the left side panel and when the dialogue box appears, type the name and select the file type as .pdf from the drop down menu.
3.Protecting the Workbook with Structure Password in Microsoft Excel
Structure Password comes in handy when you want to limit the add, delete, rename, and hide permissions in a worksheet. To secure an Excel 2013 or Excel 2016 workbook with a structure password, follow the following steps:
Step 1: Open the Microsoft Excel workbook that you want to protect with a Structure Password. Go to Review tab> Protect Workbook.

Step 2: The Protect Structure and Windows dialog box will appear. Type in the new Structure Password and click OK. When prompted, re-enter the password and confirm.

Step 3: Go to the Save As option in the left side panel and when the dialogue box appears, type the name of the file and click Save.
Bonus Tips: How to Unlock Password from Excel?
Viola, in three easy steps, you have protected your Excel worksheet against unauthorized changes. But now comes the hard part, what if you forgot Excel Password? Or, in case of a shared worksheet, what if the person who encrypted it has since left the workplace and now you face the enigma of trying to crack the Excel Password Protect?
Don't worry, we got you covered with a strong Excel password recovery tool called PassFab for Excel. This tool works equally well to unlock or break the Excel workbook Password Protect on all versions of Windows software, including Windows 10, XP, and Windows Vista.
Step-by-Step Guide to Recover Excel Password:
Step 1: First of all, download the Excel password recovery tool to break the Excel XLS/XLXS password.
Step 2: once installation is done, launch the Excel Password Recovery program and use the ‘Add’ button to import the Excel file that you want to unlock.
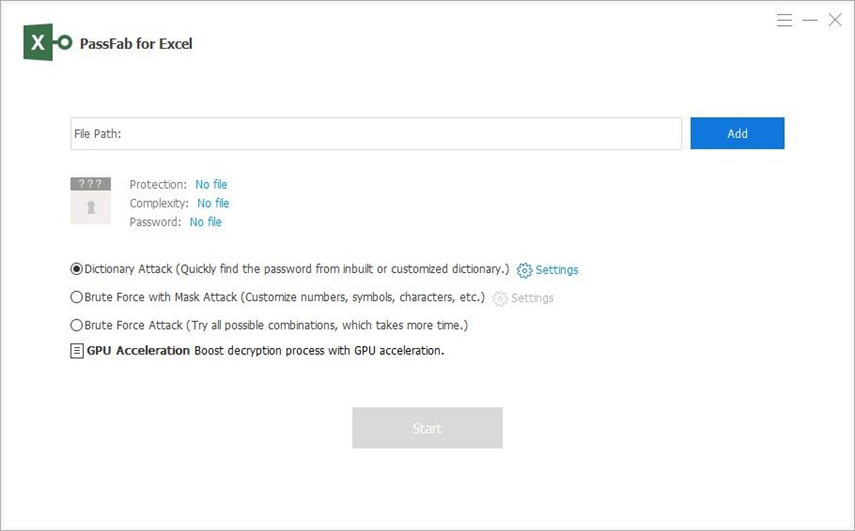
Step 3: The PassFab Excel Password Recovery tool comes with three types of attack modes.
- Brute-force Attack,
- Brute-force with Mask
- Dictionary Attack
Select your preferred mode and set the requisite parameters as per your needs.

Step 4: Click ‘Start’ to kick off unlocking the password protected Excel sheet with the brute force technique.

Summary
Password protect Excel workbook allows protection from data theft. There are three main techniques to protect an Excel sheet from theft, or to limit the editing options; encrypting the workbook using password protect option in Microsoft Excel, converting the Excel workbook into .pdf format, and protecting the workbook with structure password in Microsoft Excel. However, for password protected Excel files, it is necessary to remember the password. If the password is lost, the password protected Excel sheet can be unlocked or cracked using PassFab for Excel.