Watching a movie with no sounds or playing a video game with no music is not the kind of experience one would hope for. Sound issues can create major disturbances in your user experience. In this article, we are going to discuss a common sound issue in Microsoft Windows, No Audio Output Device is Installed. Firstly, we will see why this error occurs on your computer system. After that, we will talk about some easy and straightforward methods to fix this error in no time.
What is No Audio Output Device is Installed Error?
If you hover your mouse on the audio icon in the bottom-right corner of your computer screen, it will say "No Audio Output Device is installed”. This can happen if:
- Your Audio Device is disabled.
- Your Audio Device Drivers are either out-dated or corrupted.
- Your Audio settings is not correctly configured.
If this happens, your Windows is not able to produce sound for any thing.
How Do I Fix No Audio Output is Installed?
Here, we have gathered a list of 4 easy methods on how to fix your No Audio Output Device Is Installed error in Windows 10. The type of method that works for you will depend on the cause of your problem. So don't be dishearted if a certain method doesn't work for you, simply move over to the next one until you find the one that does.
Note: Restart your computer after every method to see if the error is fixed or not.
- Method 1: Restart Your PC
- Method 2: Re-enable Your Audio Device in Device Manager
- Method 3: Update Your Audio Device Driver
- Method 4: Run Windows 10 Audio Troubleshooter
Method 1: Restart Your PC
Your computer system is a machine working through a set of commands and operations. Often, it fails to boots properly which can cause operations errors, such as "No Audio Output Device is Installed." In this case, rebooting your PC can fix the problem and make the operation successful. To do this, you have to:
1. Click the Windows icon on the bottom-left corner of your computer screen to open the Start menu.
2. Click on the "Power" button. A menu will open.
3. From here, select Restart to reboot your Computer system.
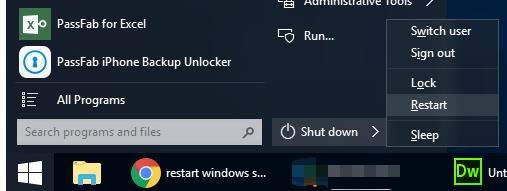
4. You can also do this by pressing Windows logo key. Simply choose Restart from the drop-down menu. Your computer will begin to restart.
In case your error is still there, you can simply try the next method on this list.
Method 2: Re-enable Your Audio Device in Device Manager
Device Manager is a Control Panel applet that allows us to view and control the different hardware installed in our computer system. When you open the device manager, it gives you a list of all the device drivers on your PC. Often, a certain operation can automatically disable the audio device. If this happens, you can simply re-enable it by:
1. Click on the Windows icon present on the bottom-left of your computer screen. This will open the Start Menu.
2. From here, type Device Manager in the search bar. Select the Device Manager from the results list to open it.
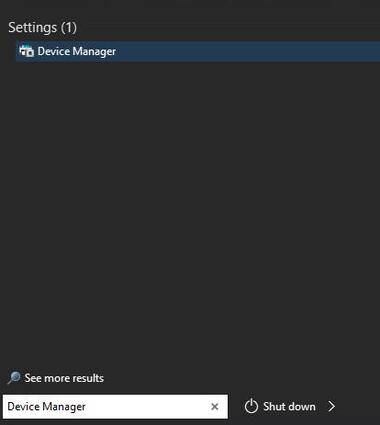
3. A list of Device Drivers will appear on your computer screen. From this list, locate Sound, Video and Game Controllers. Click this to expand the list of associated drivers.
4. From here, right-click on the audio device and click on Enable from the pop-up menu.
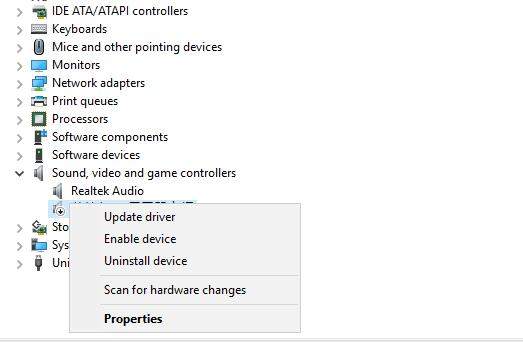
If you do not see the Sound, Video and Game Controllers option in your Device Manager, then follow these steps:
1. From the Menu bar, select Action.
2. Select Add Legacy Hardware.
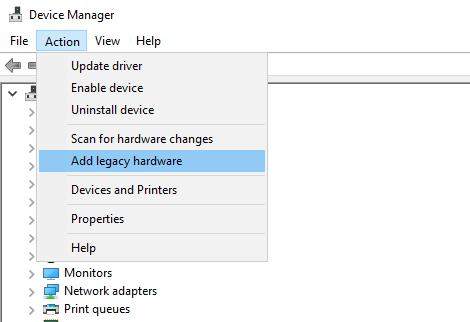
3. Add Hardware window will appear. Click Next to start the wizard.
4. Select "Search for and install hardware automatically (Recommended) and press Next.
5. The wizard will tell you that it can't find any new hardware. After that, click Next again.
6. A list of Common hardware types will appear. Scroll down to find Sound, Video and Game Controllers from this list. Select it and press Next.
7. Select the model and manufacturer of your sound card and press Next again.
8. After that, click Next again to begin the installation process.
9. After it is complete, click on Finish.
10. Now go to the Device Manager list and select Sound, Video and Game Controllers. Double-click the audio device and click Enable.
Method 3: Update Your Audio Device Driver
Your computer system needs Device Drivers to smoothly interact with your Hardware Devices. Microsoft Windows and hardware companies are constantly upgrading these drivers to improve user experience. That is why it is very important to update your device drivers on a regular basis. Often, outdated audio device drivers can cause functioning errors, such as "No Audio Output Device is Installed." In this case, updating your device drivers can fix the problem in no time. To do this, you have to:
1. Click on the Windows icon present on the bottom-left of your computer screen. This will open the Start Menu.
2. From here, type Device Manager in the search bar. Select the Device Manager from the results list to open it.

3. The device manager will give you a list of all the drivers that are installed on your PC. From this list, locate Sound, Video and Game Controllers. Click on it to expand it.
4. Select the audio device and right-click on it. Click on Update driver to update them.

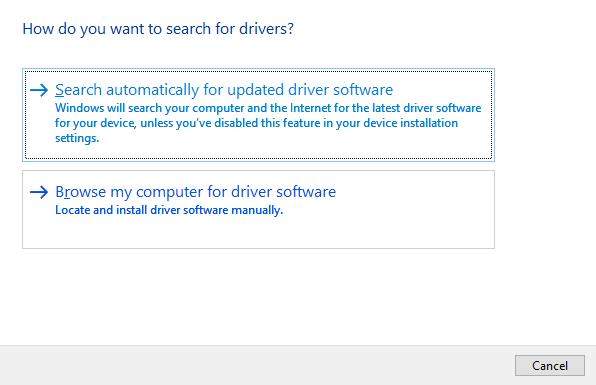
5. The Device Manager will ask you how you want to search for new driver update. You can either search for them automatically. That way your computer will search for the latest driver update and install it automatically. On the other hand, you can also download the update file from the manufacturer's official website. For that, select "Browse my computer for driver software." Locate the driver file from the saved location and hit Enter.
6. Once the new driver is installed, restart your computer to let the effects take place.
Hopefully, updating your audio drivers will fix No Audio Output Device is Installed. If not, simply jump to the last method to do so.
Method 4: Run Windows 10 Audio Troubleshooter
If you are seeing the "No Audio Output Device is Installed" error in Windows 10, then there is no need to worry. Your Windows 10 comes with an in-built troubleshooter that allows you to scan for problems and resolve issues on your computer. To fix your audio problem with the Windows Troubleshooter, follow these simple steps:
1. Open the Start menu by pressing the Windows icon in the bottom-left corner of your computer screen.
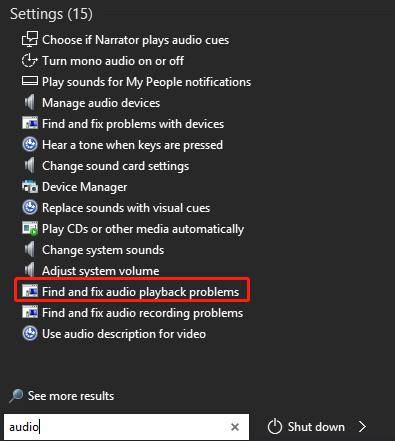
2. Type Audio in the search bar and hit Enter.
3. Select the "Find and fix audio playback problems" option from the search results.
4. The audio troubleshooter will open in the Control Panel. It will display a list of audio devices after scanning your computer.
5. Select the device that you want to troubleshoot and press Next.
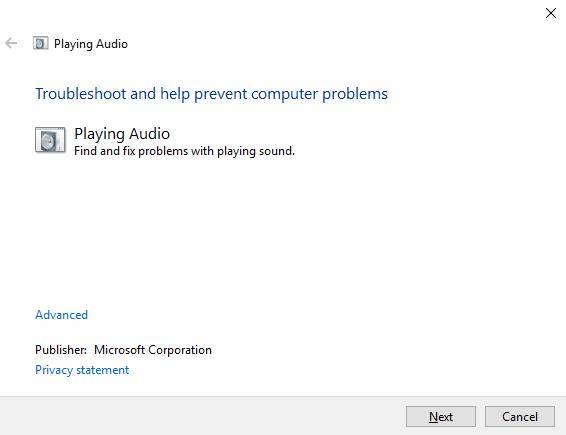
6. After that, Windows will start scanning for potential problems. If any, follow the on-screen instruction to fix them.
Summary
Congratulations! You have successfully fixed the No Audio Output Device is Installed error in your Microsoft Windows. If you see this error, it probably means that either your audio device is disabled or audio device drivers are outdated. You can easily try these simple and straightforward step-by-step methods to fix your audio issues in no time. During the process, you may have to give the Windows password for security purposes. In case you have forgotten, you can easily restore it with PassFab 4WinKey in no time. On that note, I bid you a farewell, and Good luck!