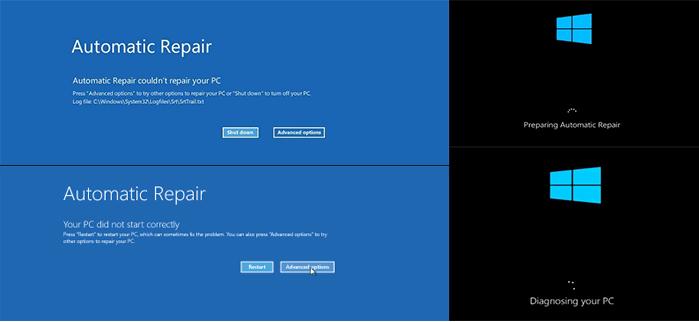
A blue or black screen of death followed by a message saying “Preparing Automatic Repair” is a common error that occurs due to missing startup/ boot files or corrupt registry information. The simplest solution to boot problems is running the automatic repair utility, but what if you get stuck on Windows preparing automatic repair boot loop of death?
This article will discuss the best solutions to fix the Automatic Repair loop Windows 10.
Part 1: Why does my computer keep saying preparing automatic Repair?
Part 2: What does preparing automatic Repair mean?
Part 3: How to Fix Preparing Automatic Repair Loop Windows 10?
- Method 1: Hard Reboot your computer
- Method 2: Smart Repair by PassFab FixUWinHot
- Method 3: Boot in Safe Mode
- Method 4: Rebuild BCD with Command Prompt
- Method 5: Disable Automatic Repair at Boot
- Method 6: Repair Corrupted System Files with Command Prompt
- Method 7: Perform System Restore
- Method 8: Refresh or Reset PC
- Method 9: Restore Windows Registry
Part 4: How to Restore Windows Data from Preparing Automatic Repair Loop?
Part 5: FAQs about Windows 10 preparing automatic repair loop
Part 1: Why does my computer keep saying preparing automatic Repair?
Windows 10 stuck on preparing automatic repair loop usually happens when your computer gets shut down unexpectedly due to an error. Usually, the missing or corrupt system files prevent the Windows kernel, i.e., ntoskrnl.exe and other boot files, from loading completely. There could be various reasons behind the issue, missing system files or corrupt registry being the most common ones. Here is the list of other common reasons:
- Incompatible hardware
- Damaged System Files or Windows Boot Manager
- Outdated device drivers
- Missing Windows updates
- Virus or malware
Whatever the reason, you can resolve the problem before spending any money repairing your computer.
Part 2: What does preparing automatic Repair mean?
The Automatic Repair tool in Windows is designated to resolve errors that occur while you are using your computer or starting it up. It usually resolves almost all the problems you might face, but sometimes it fails, and you get stuck on Windows 10 preparing automatic repair loop. Here are some symptoms that you will see when you face the said issue:
- A blue or black screen with a message stating “Repairing Automatic Repair”.
- “Preparing Automatic Repair” message followed by a blank black screen.
- A blue screen stating that your PC did not start correctly or Automatic Repair could not repair your PC. Your PC will enter into the repairing loop on restart.
Part 3: How to Fix Preparing Automatic Repair Loop Windows 10?
You can fix various Windows problems on your own without spending a single penny. Here are the best ways to fix Windows 10 preparing automatic repair black screen:
Method 1: Hard Reboot your computer
The first thing that you should try whenever you get stuck on errors like Windows 10 preparing automatic repair freeze. First, press the power button on your computer unless it shuts down completely. Then, unplug all the peripheral devices and leave your PC as is for a minute. Now, plug in all the devices and restart your computer to check if the hard reboot resolved the problem.

Method 2: Smart Repair by PassFab FixUWinHot
Another best yet most convenient solution for Windows preparing automatic repair boot loop of death is PassFab FixUWin. It is an incredible tool designed to rescue you from Windows problems such as blue/black screen of death, boot loop, PC crash, etc. This amazing tool scans your PC, looks for the missing/damaged files causing the problem and tries to fix it on its own within the minimum time and with less effort. Here is how you can use PassFab FixUWin to PC preparing automatic repair Windows 10.
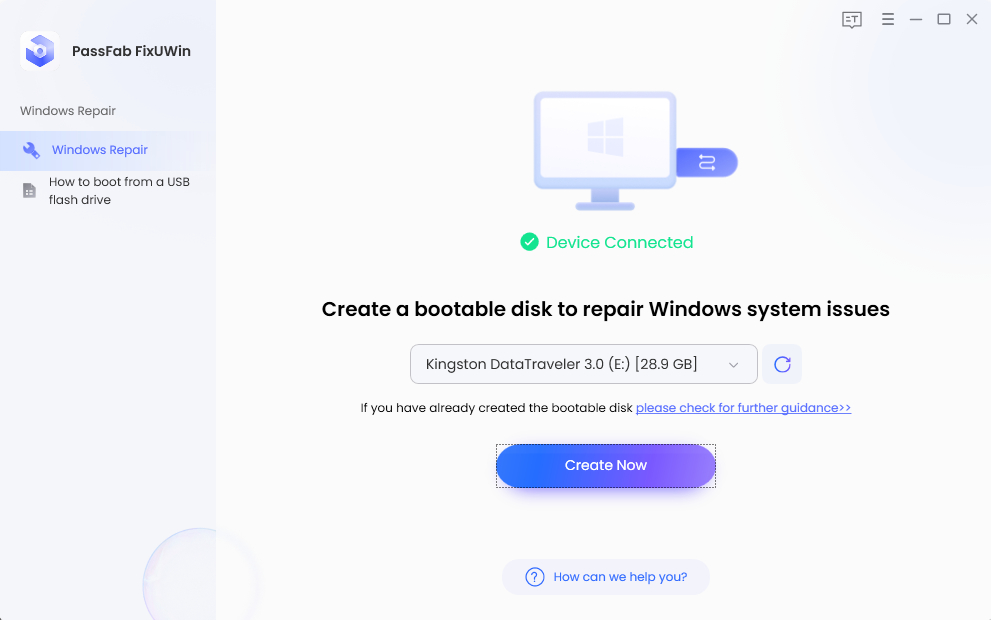
- Install and launch PassFab FixUWin on any other accessible PC.
- Plug a USB drive and click Create boot disk now.

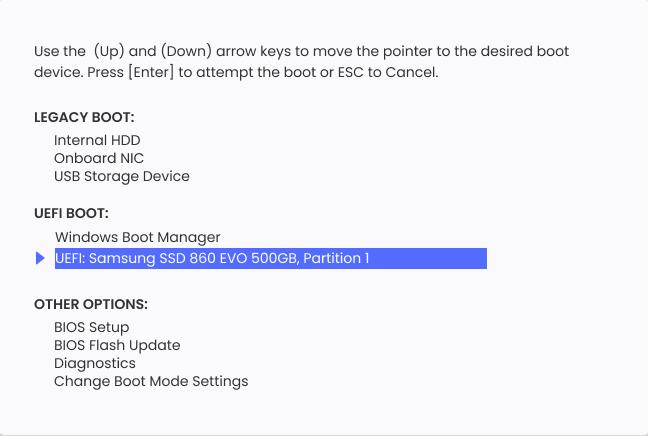
- Once the boot disk is created successfully, switch to the problematic PC, plug in the boot disk, and restart the computer.
- Press the boot key to enter the boot menu, set your boot disk on priority, and exit the boot menu.

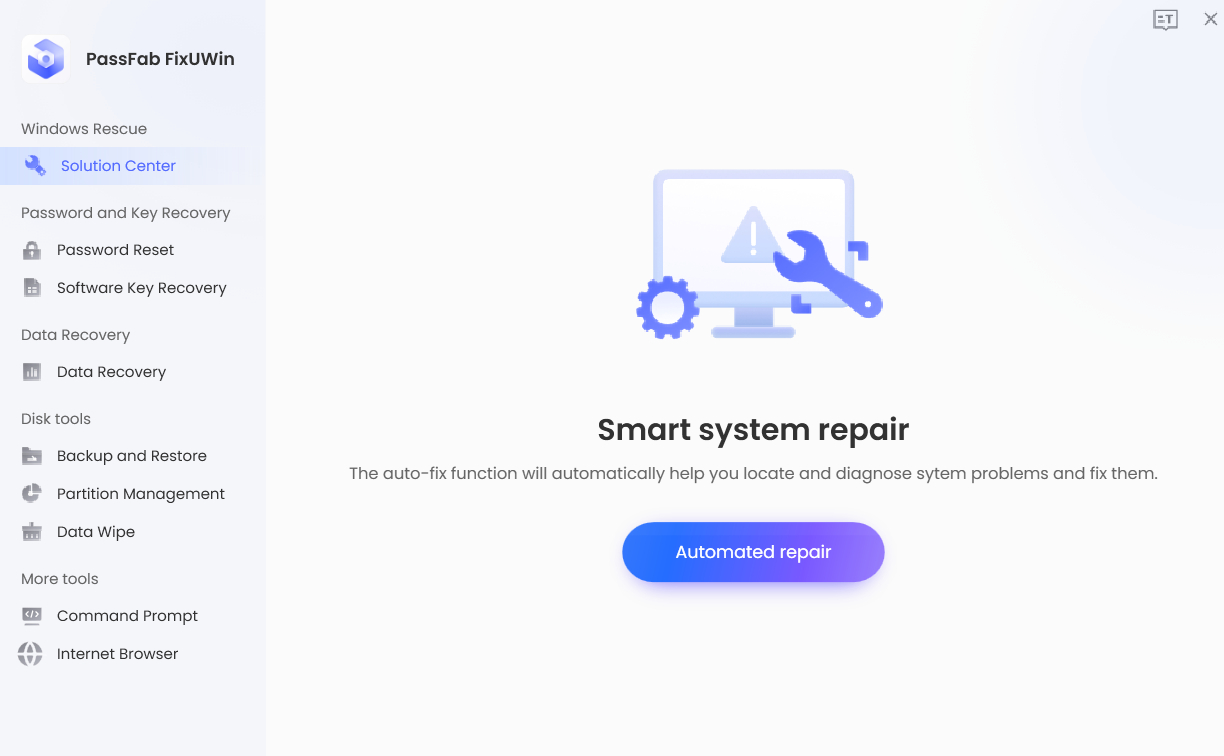
- Click Automated Repair.

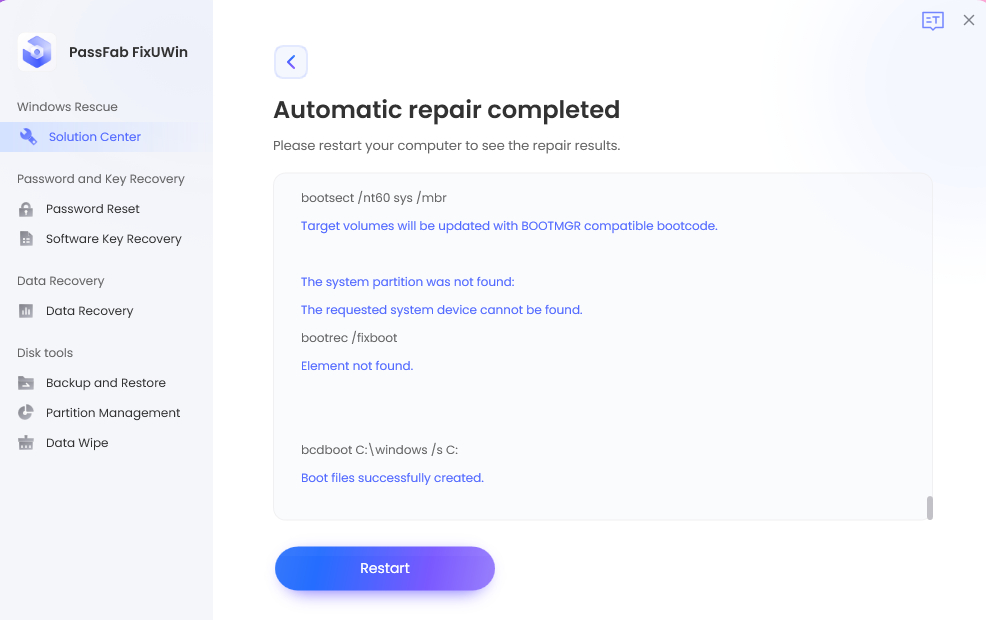
- Click Restart to reboot your pc after the repair complete successfully.

This time you will land on PassFab FixUWin’s interface.
This time when your computer starts, hopefully, you will no longer get stuck on Windows 10 automatic repair loop.
Method 3: Boot in Safe Mode
Suppose you cannot access your PC’s settings or troubleshooting options due to preparing an automatic repair boot loop, and your PC crashes before you get into it. In that case, you can try booting into safe mode. Usually, the problem that you face in normal mode does not recur in safe mode, so to troubleshoot the issue, it is better to start your computer in Safe mode as follows.
- Restart your computer while holding the F8 to enter the Windows Recovery Environment (WinRE).
- Now click on See advanced repair options and choose Troubleshoot -> Advanced Options -> Startup Settings -> Restart.
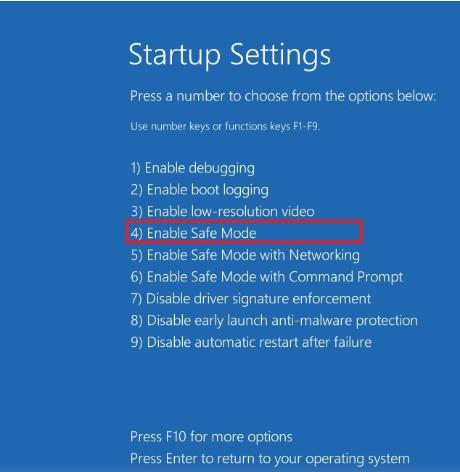
- Now, from the following list of options, press F5 to boot your computer in Safe Mode.

Method 4: Rebuild BCD with Command Prompt
The most common reason behind the boot problems is damaged or missing BCD files which are responsible for starting your computer. However, you can rebuild BCD via the command prompt as follows.
- Restart your computer while pressing the F8 key.
- When you see the WinRE, click on Repair your computer and then Troubleshoot.
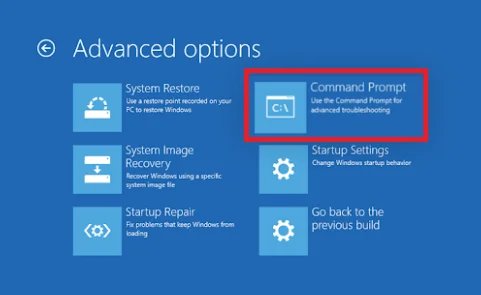
- Click on Command Prompt and let it load.

- Now type bootrec /fixmbr and hit Enter.
- Now type bootrec /fixmbr and hit Enter.
- Type bootrec /scanos, hit Enter.
- Now type bootrec /rebuildbcd and press Enter.
- Now, type Exit, hit Enter, and restart your computer.
Let the scan complete. Once done, you will see a message that says, “Successfully Scanned Windows Installations”.
When your computer starts, check whether or not Windows 10 preparing automatic repair black screen is gone.
Method 5: Disable Automatic Repair at Boot
You can skip the repair cycle on startup by disabling the automatic repair feature at boot.
Tips:
This method is applicable only if your system is functional, but if you face a real error, this method will not be helpful to you.
- Reboot your computer while pressing the F8 key.
- Click on Repair your computer on Windows Recovery Environment (WinRE).
- Click on Troubleshoot and choose Command Prompt from the list of options:

- Type bcdedit /set {default} recoveryenabled no and press Enter.

- If the above command fails, try running bcdedit /set {current} recoveryenabled no.

Now restart your computer to check whether disabling the Automatic Repair at boot resolved the problem.
Method 6: Repair Corrupted System Files with Command Prompt
The Windows 10 preparing automatic repair loop can result from corrupt system files. You can always repair corrupted system files by using the System File Check (SFC) commands via the command prompt.
- Enter the Windows Recovery Environment (WinRE) by holding the F8 key while your computer restarts.
- Choose Troubleshoot, Advanced options followed by Command Prompt.
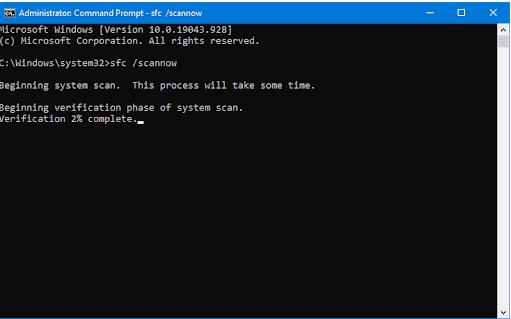
- Type SFC/scannow. Press Enter.

Let the system scan the files and replace any damaged files. After the scan completes, restart your computer.
Method 7: Perform System Restore
If you recently installed any Windows update or software after which you started encountering preparing a restart loop problem, you can try restoring your system to the last version.
Tips:
This method is only applicable if you create a Windows Restore point before installing the new updates or making changes to the system.
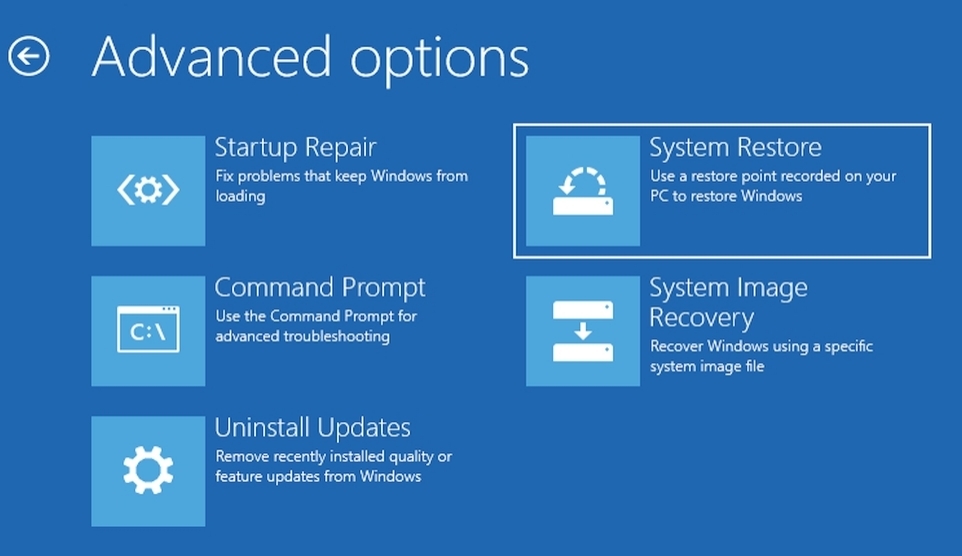
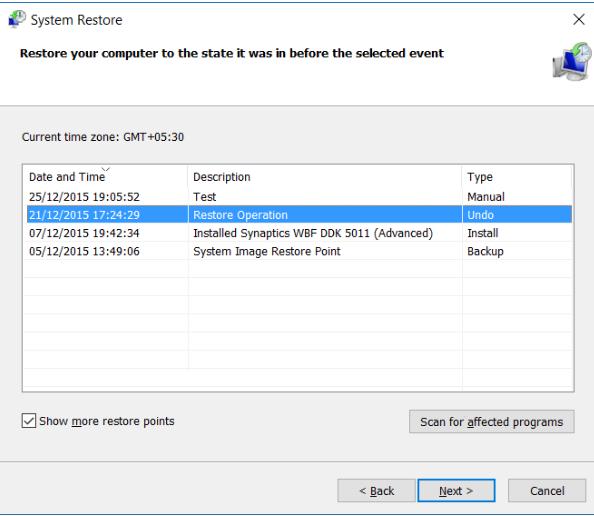
- In the Automatic Repair screen, go to Advanced options and then Troubleshoot -> Advanced Options -> System Restore.

- Choose the restore point you want your Windows system to revert and click Next.
You may lose any data or new programs installed after creating the chosen restore point.

- Wait for the restoration to complete. Restart your computer.
Method 8: Refresh or Reset PC
Microsoft’s official solution to Preparing the Automatic Repair loop is refreshing or resetting the PC. Although it is a straightforward solution, it has a major drawback: it causes data loss. We would recommend that you back up all your data before moving to the following steps.
- In the Preparing Automatic Repair screen, press the power button three times to force shut down the computer.
You will see the boot repair screen after 2-3 unsuccessful booting attempts.
- Click Troubleshoot and choose the Refresh PC or Reset PC option.
Follow the instructions to complete the process and restart your computer after it. Now, you can get into your computer without facing any startup issues.
Method 9: Restore Windows Registry
Windows Registry usually gets corrupted when you install faulty files on your computer. You can restore Windows Registry with Command Prompt
- Open the Command Prompt from Windows Recovery Environment (WinRE).
- Type C:\Windows\System32\config\regback*, and press Enter.
- Now type C:\Windows\System32\config, and hit Enter.
- Type All and press Enter to restore the Windows registry to defaults.
After completing the steps above, restart the computer.
Part 4: How to Restore Windows Data from Preparing Automatic Repair Loop?
If you are afraid of losing your data due to the Automatic Repair loop, there’s nothing to worry about when you have PassFab FixUWin. Besides repairing your Windows PC, this amazing tool can also help you recover your data using its Data Recovery feature.

Part 5: FAQs about Windows 10 preparing automatic repair loop
Q1: How long does preparing automatic repair take in Windows 10?
Depending on your hard drive specifications, the automatic repair can take anywhere between 5 minutes to 1 hour.
Q2: How do I Fix the Automatic Repair Loop without Safe Mode in Windows 10?
You can Hard boot your computer three times to bypass the loop error and go directly to the Windows Recovery Environment (WinRE).
Q3: Why does Automatic Repair Sometimes Cause the stuck on preparing automatic repair error?
Whenever the automatic repair fails to fix an error caused by an external factor such as faulty hardware, it causes the stuck on preparing automatic repair error.
Conclusion
Out of many frustrating situations, getting stuck on Windows 10 preparing automatic repair loop is one. This problem can be caused by many factors, which have been listed in this article. We have also described various ways of resolving the issue.Among them PassFab FixUWin is one of the best solutions as its powerful function and easy to use.
