As someone who has personally encountered the frustrating Your PC Did Not Start Correctly error, I understand the stress and anxiety it can cause. After tirelessly exploring a multitude of solutions, I have gained invaluable insights to help you tackle this issue head-on. In this article, we'll delve into the causes of this error and provide tried-and-tested remedies to get your computer back on its feet.
Part 1. Overview about Your PC Did Not Start Correctly
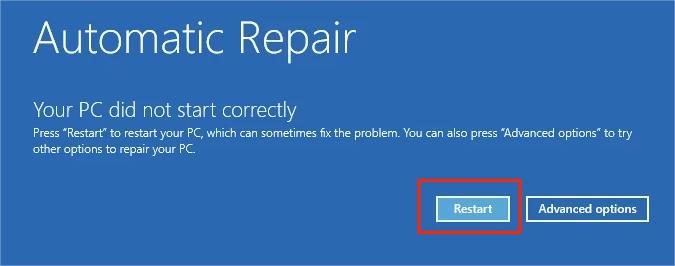
The your PC did not start correctly error, often associated with Windows 10 (recently Windows 11 users also reported this error), is displayed on a blue screen when your computer fails to boot properly. It may say Automatic Repair: your PC did not start correctly and put your computer into a loop where it repeatedly tries to boot, only to return to the error screen each time.
So what causes your pc did not start correctly? Some of the underlying causes are corrupted system files, any essential system files that become corrupt or are missing will lead to your PC did not start correctly error. Corruption can occur for various reasons, such as improper system shutdowns, power outages, or even malware infections. Other causes include hardware issues, recent software updates or installations, Boot Configuration Data (BCD) problems, Master Boot Record (MBR) issues, etc.
Part 2. What To Do If Your PC Did Not Start Correctly?
You must wonder how to fix your pc did not start correctly. Here we list some proven solutions. The following table is a quick understanding of each solution:
| Method | Pros | Limitations | Rating (out of 5) |
|---|---|---|---|
| Restart Your Computer | Quick and simple | Limited effectiveness without addressing underlying issues | 3.5 |
| PassFab FixUWin | Comprehensive solution, user-friendly | Requires another working pc | 4.8 |
| SFC (System File Checker) | Built-in utility, addresses file corruption | Limited scope, may not fix other causes | 4 |
| Rebuild BCD File | Targets boot-related issues | Technical process, limited scope | 3.5 |
| Perform System Restore | Easy to use, reverts system to previous state | Limited availability of restore points | 4 |
| Uninstall Recent Updates | Targeted solution for update-related issues | Temporary solution, updates may automatically reinstall | 3.5 |
| Reset MBR | Addresses MBR corruption | Technical process, limited scope | 4 |
| Reset Your Computer | Comprehensive solution, customizable | Time-consuming, potential data loss | 4.5 |
Note: The ratings are based on an overall evaluation of effectiveness, ease of use, and user satisfaction.
1. Restart Your Computer
In some cases, your pc did not start correctly in windows 10 might be a result of a temporary glitch or an interrupted boot sequence. A fresh start allows it to reinitialize all the necessary components, clear temporary configurations, and load the correct settings during the boot process.
It may not address deeper underlying causes but as it is a quick and easy troubleshooting steps we recommend you take this action first before taking further advanced actions.
By doing this, press the Restart button showing on the screen right next to the sentence " Your PC did not start correctly."
2. Smart Repair by PassFab FixUWinHot
PassFab FixUWin is a third-party software designed to address various Windows boot issues, including the automatic repair your pc did not start correctly in Windows 10. It meticulously scans your PC to detect and rectify numerous issues, including critical system files, registry errors, and even residual damage from malware attacks. Utilizing advanced algorithms and an intuitive user interface, the program optimizes disk space usage and reverts compromised Windows settings to their original values with minimal user intervention.
Step 1. Download and install PassFab FixUWin on a working computer.
Step 2. Choose the option to create a bootable USB drive.
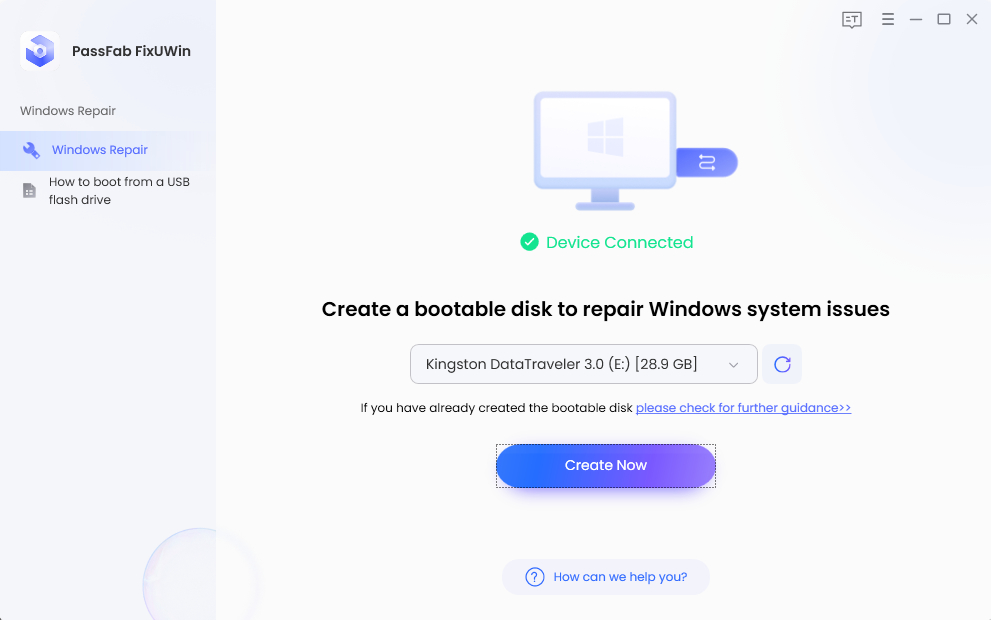
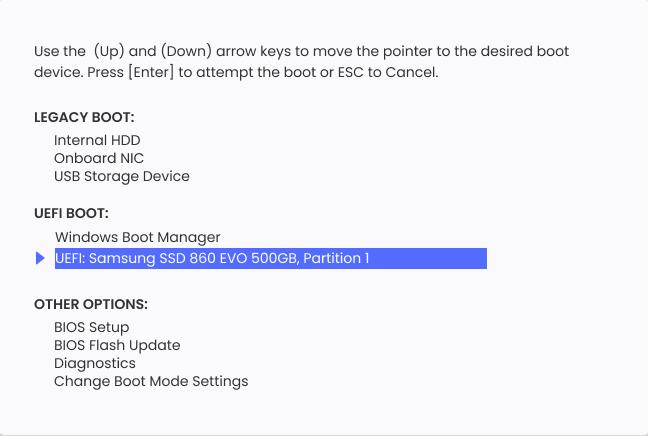
Step 3. Insert the boot media to the bsod computer. Press the boot key continuously to enter into boot menu. Set your USB drive as the priority option by adjusting the boot order in the BIOS/UEFI settings.
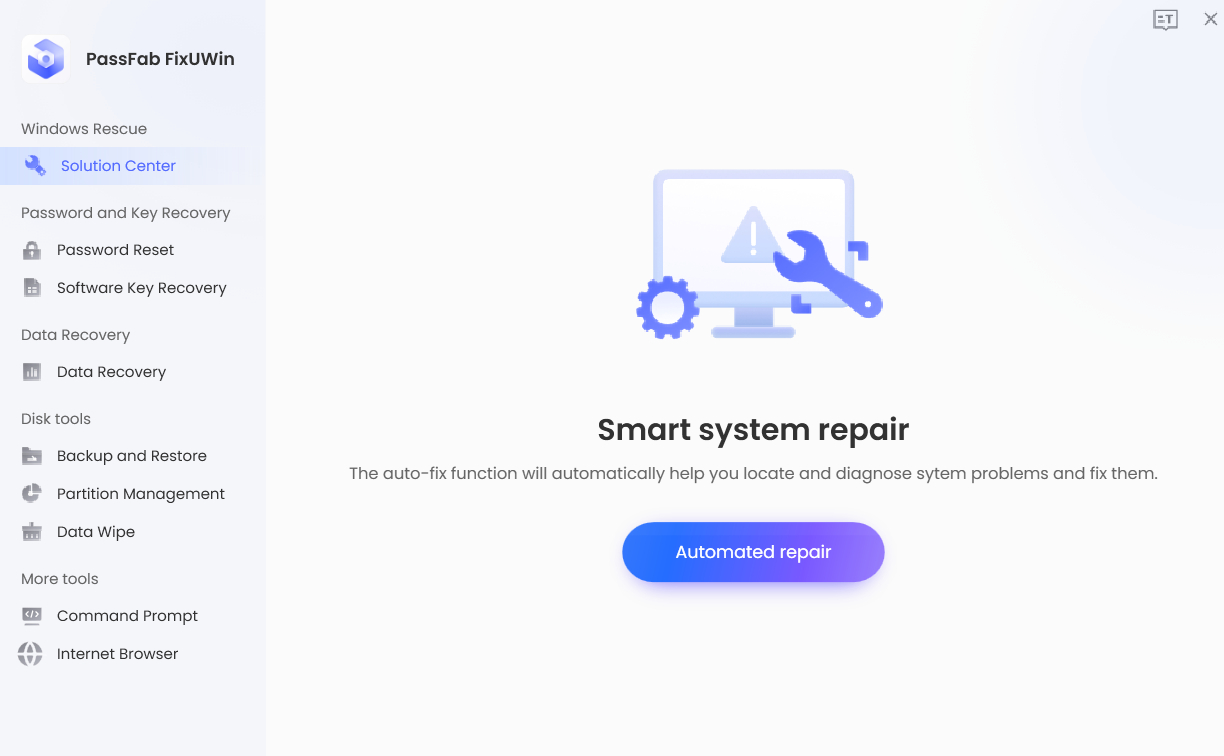
Step 4. And you will see PassFab interface, choose Automated repair. It will scan the problematic part and take corresponding action automatically.
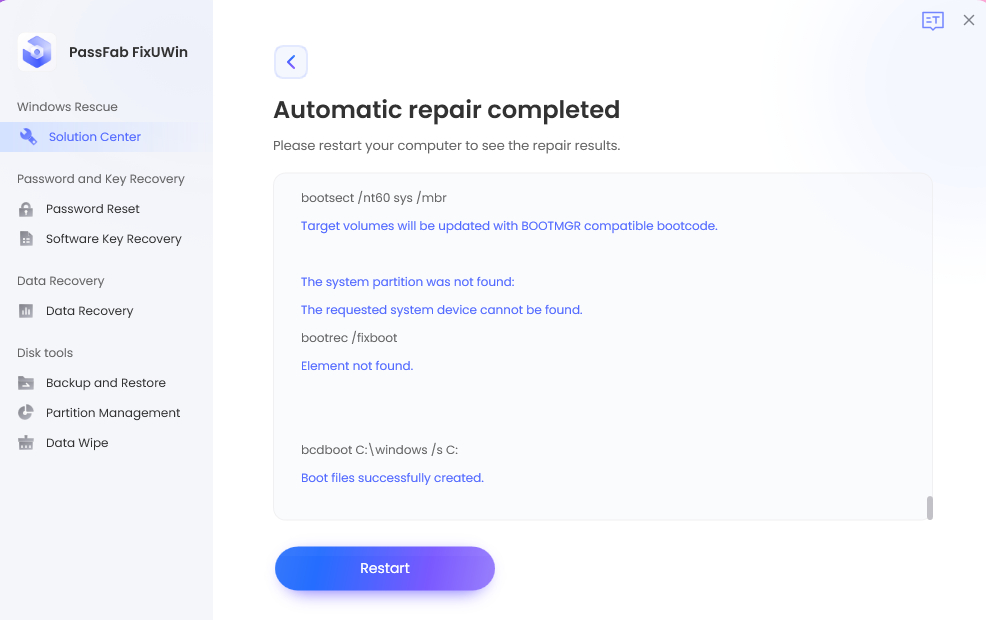
Step 5. After the repair complete successfully, click Restart to end the process.
3. Perform Sfc Command Prompt
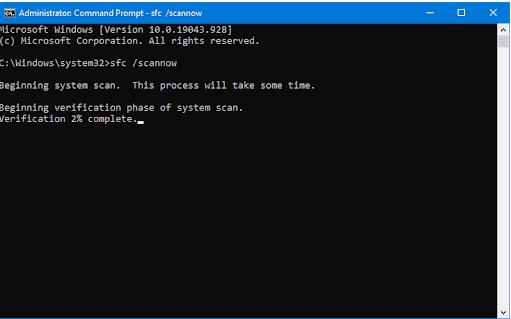
System File Checker (SFC) is a built-in Windows utility. It works by verifying the integrity of crucial system files and replacing any corrupted or damaged files with their correct versions from the Windows component store. By repairing these files, the utility helps restore your PC's functionality and allows it to boot up correctly, so that to fix automatic repair your pc did not start correctly in Windows 10.
Press the Windows key + X and select Command Prompt (Admin) from the context menu.
In the Command Prompt window, type the following command and press Enter: sfc /scannow.

The SFC scan may take some time to finish. Do not close the Command Prompt window or interrupt the process while it is running.
Note:
- If you cannot boot into Windows normally, you may need to access Safe Mode with Command Prompt to run the SFC scan.
- When entering the command to initiate the SFC scan, make sure you use the correct syntax:
sfc /scannow. An incorrect syntax will result in the command failing to execute.
4. Rebuild Bcd File
Rebuilding the Boot Configuration Data (BCD) file is another method to address the windows did not start correctly error. It is effective in resolving boot problems because it restores the BCD file to its correct state.
- Still, if you cannot boot into Windows, use Windows installation media or a recovery drive to access the Windows Recovery Environment first.
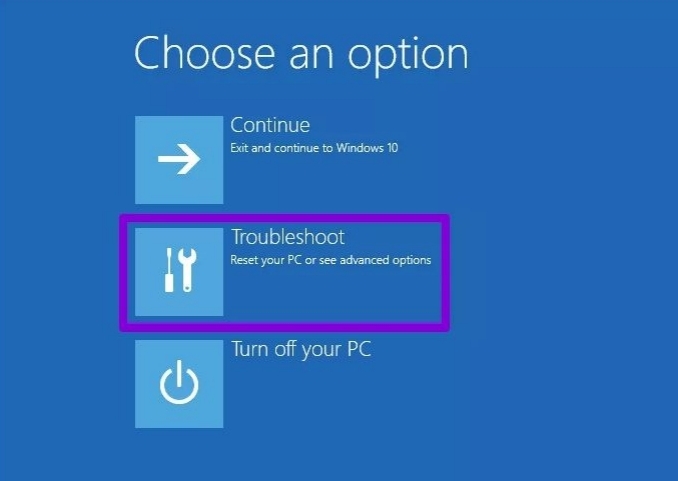
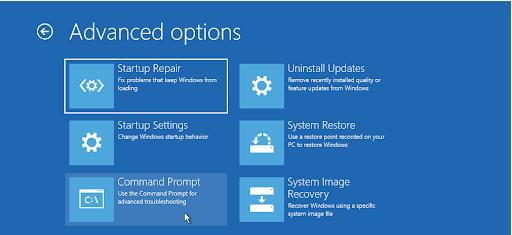
In the Windows Recovery Environment, choose troubleshoot > Advanced options > Command Prompt.
If your Windows can start normally, just open command prompt and run as administrator.
- Enter the following commands one by one, pressing Enter after each:
bootrec /fixmbr bootrec /fixboot bootrec /scanos bootrec /rebuildbcd
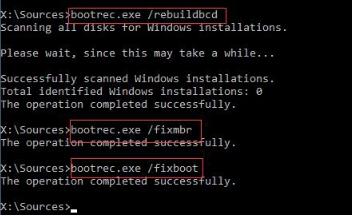
Rebuilding the BCD file involves using Command Prompt commands, which may be intimidating for users with limited technical knowledge. The process will be a little bit complicated compared to sfc command.
5. Perform System Restore
System Restore is a built-in Windows feature that allows you to revert your computer's system files, installed applications, and settings to an earlier point in time, known as a restore point. It can undo recent changes that may have caused the error, such as problematic software installations or configuration changes so that to fix pc did not start correctly bsod.
- Boot into the Windows Recovery Environment.
- In the Windows Recovery Environment, choose Troubleshoot > Advanced options > System Restore.
- In the System Restore window, select a restore point created before your pc did not start correctly loop first appeared. Click Next to continue.

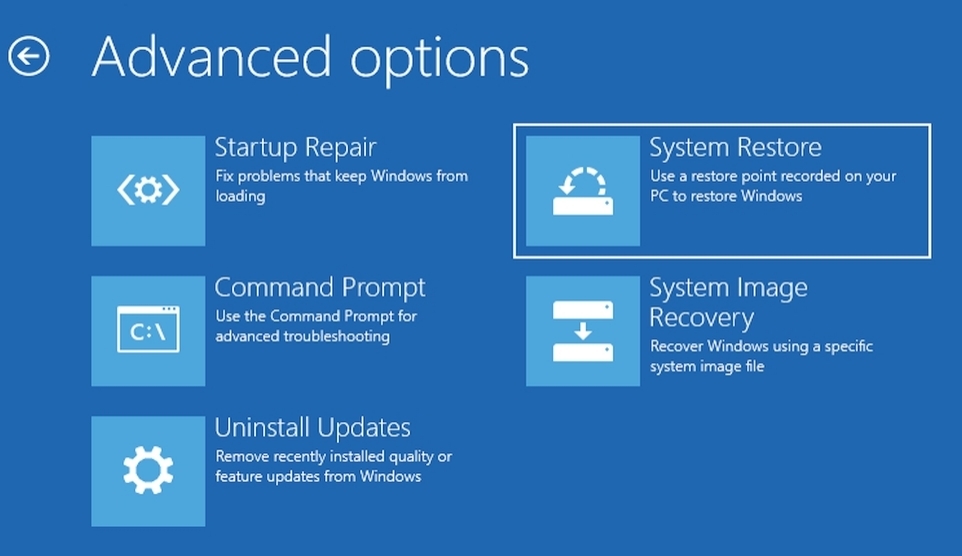
Once completed, your computer will restart. If the "your PC did not start correctly" error was caused by recent changes to your system, performing a system restore should resolve the issue.
Note: System Restore depends on the availability of restore points, which may not always be present or may not go far enough back in time to fix the issue.
6. Uninstall or Delete Recent Updates
Uninstalling recent updates can be effective in resolving boot issues because it removes the changes introduced by those updates, potentially fixing compatibility issues or conflicts that caused the error.
- Restart your computer and press the F8 key (or the specified key) repeatedly to access the Advanced Boot Options menu.
- Select Safe Mode with Networking and press Enter.
- Press Windows key + I to open the Settings.
- Click Update and Security, select Windows Update, and click View update history.
- Click Uninstall updates to open the Installed Updates window in Control Panel.
- Find the most recent updates installed before the error occurred, right-click them, and select Uninstall.
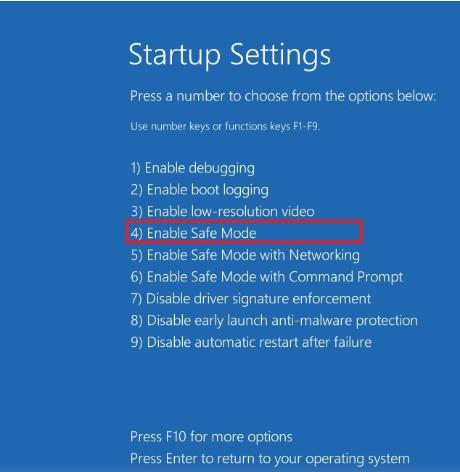

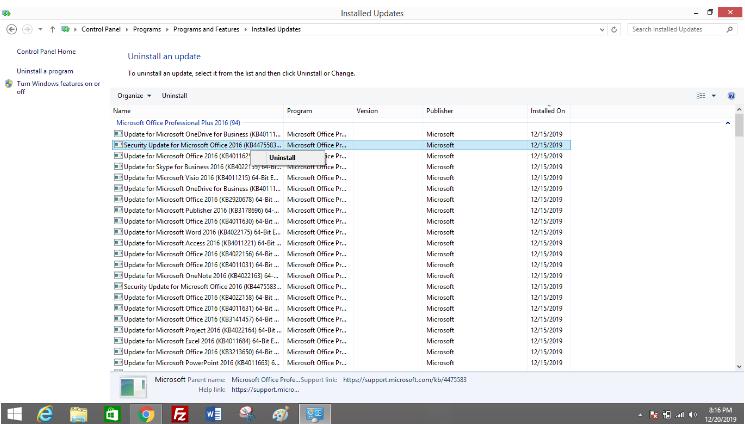
Note: You may need to boot into Safe Mode with Networking if you cannot access Windows normally. Focus on updates installed just before the error first appeared.
7. Reset Your Computer
Resetting your computer is the last-resort solution.
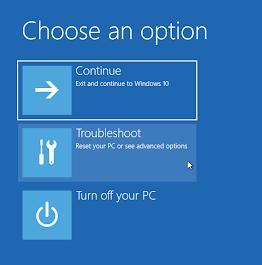
- Boot into the Windows Recovery Environment using Windows installation media or a recovery drive.
- Choose Troubleshoot, then Reset this PC.
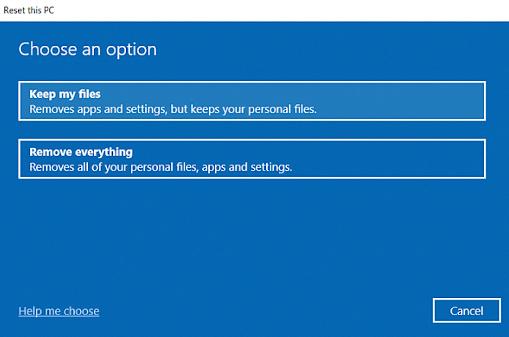
- Select either Keep my files to preserve your personal files or Remove everything to start fresh.
- Follow the on-screen instructions to complete the reset process.
Note: Before resetting your computer, ensure that you have backed up your important files and documents.
Final Verdict
Resolving the Your PC Did Not Start Correctly error can be a daunting task, but with the right tools and knowledge, it's absolutely achievable. We highly recommend PassFab FixUWin as a powerful solution that tackles this issue effectively. By utilizing this all-in-one tool, you'll save time, effort, and minimize the risk of further complications.
