Allocating a hard drive can be complex for those unfamiliar with its technicalities, as it involves partitioning it and allocating files, applications, and operating systems onto these partitions. The hard drive allocation process differs depending on which version of Windows you use and your intended use of the hard drive; to optimize storage space and performance while potentially risking data loss if done improperly. Let us walk through the step-by-step procedure of allocating hard drives in Windows 10 and 11.
Part 1. What is Unallocated Space and Free Space in Windows 10/11?
Part 2. Why Hard Drive Becomes Unallocated?
Part 3. What To Do with Unallocated Space?
Part 4. How to Allocate a Hard Drive in Windows 10/11?
- 1. To Create a New Partition with Unallocated Space
- 2. Extend an Existing Partition with Unallocated Disk Space
Part 5. How to Allocate a Hard Drive in Windows 10/11 FAQs
- Q1: How to Get Unallocated Space?
- Q2: How to Allocate Hard Drive Windows 10/11/8/7?
- Q3: What to do if Disk Management option greyed out on unallocated space?
- Q4: Should I leave unallocated space on a hard drive?
- Q5: How to allocate unallocated space for C drive in windows 10?
Conclusion
Part 1. What is Unallocated Space and Free Space in Windows 10/11?
When it comes to managing storage on a Windows 10 or 11 computer, it is critical that users understand the distinction between unallocated and free space in Windows 10. Unallocated space refers to any portion of a hard drive not assigned to any partition or logical drive while free space refers to space within an existing partition that remains unused; both can be utilized for different purposes like creating new partitions, expanding existing ones or installing operating systems.
Understanding unallocated and free space distinction is vitally important in effectively managing hard drive storage - helping users make optimal use of available hard drive storage capacity as well as understand how best to effectively utilize and maximize all available hard drive storage capabilities available through effective disk management practices.
Part 2. Why Hard Drive Becomes Unallocated?
- An unallocated hard drive may become unallocated for various reasons, with one of the primary ones being when an end user deletes a partition or volume without their knowledge, leaving space free and available on their hard drive.
- Formatting, repartitioning, or resizing partitions are among the many processes that may result in unallocated hard drives, while malfunction or failure of the hard drive itself are also factors.
- Sometimes a virus or malware infection can also lead to the unallocation of hard drives or the corruption of their partition tables.
- Power outages, system crashes and improper shutdowns may all contribute to file system corruption or partition table damage, leaving hard drives marked as unallocated space.
But unallocated space doesn't necessarily indicate loss; recovery software and services may still be able to restore any lost files.
Part 3. What To Do with Unallocated Space?
Unallocated space can be utilized to create new partitions, extend existing ones, or use data recovery software to recover lost data. Before engaging in any disk management operations it's crucial to back up all data before proceeding and exercise caution to avoid losing any important information.
Part 4. How to Allocate a Hard Drive in Windows 10/11?
In this part, you'll learn how to allocate a hard drive in Windows 10/11. Here, we'll take you through the process of creating the partition, as well as extending an existing partition using unallocated space.
1. To Create a New Partition with Unallocated Space
There are a few of the ways explained below through which you can create a new partition(s) with unallocated space. These methods vary from the easiest to the most difficult.
Method 1: Easiest: Create Partitions with PassFab 4EasyPartition
-
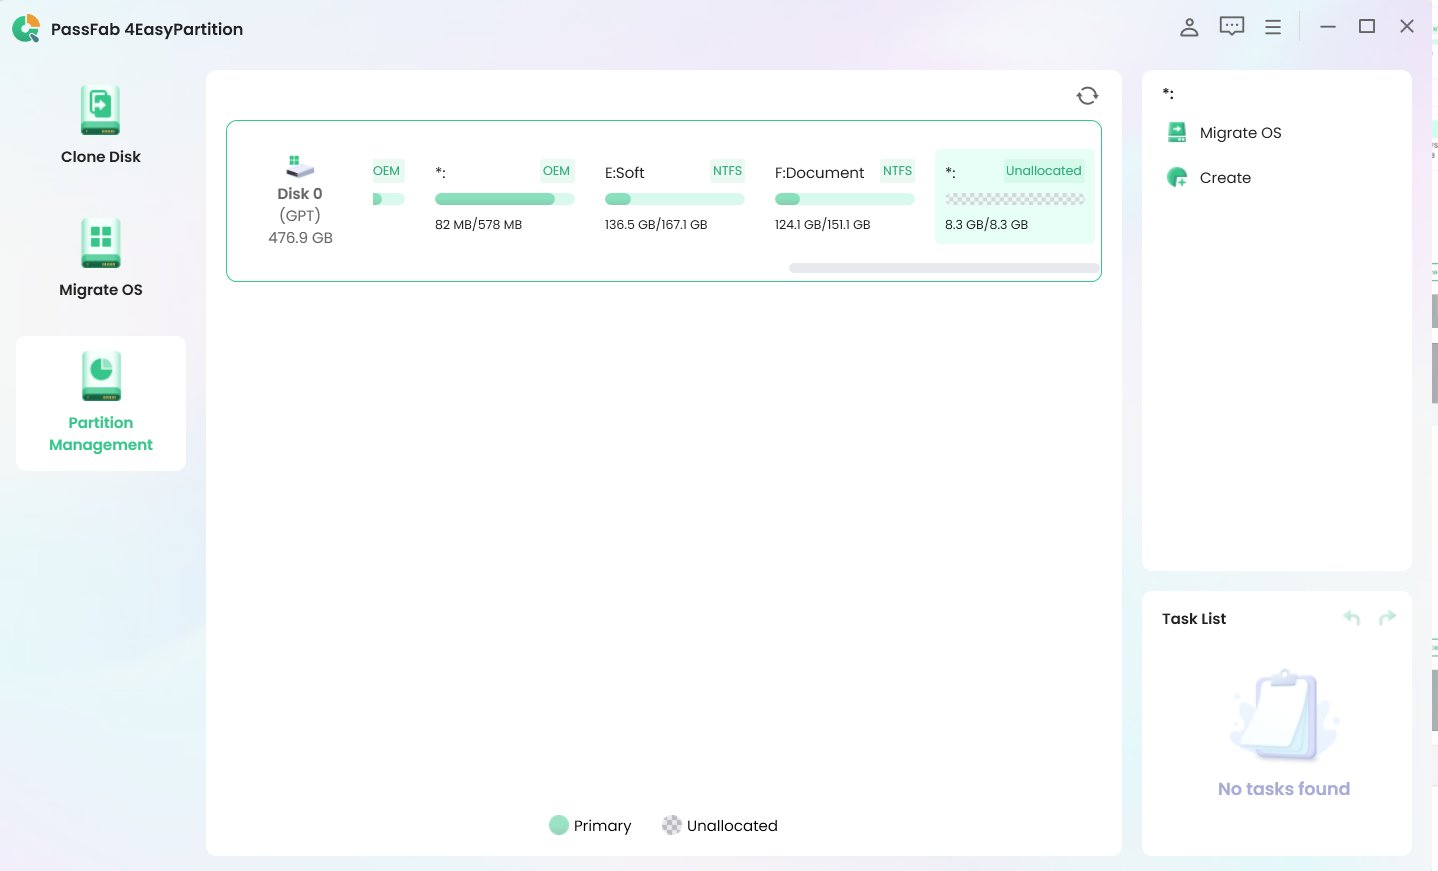
Launch the program, identify the unallocated space on the hard drive that you want to allocate into a partition and click the unallocated space and select "Create" from the menu on the right.

-
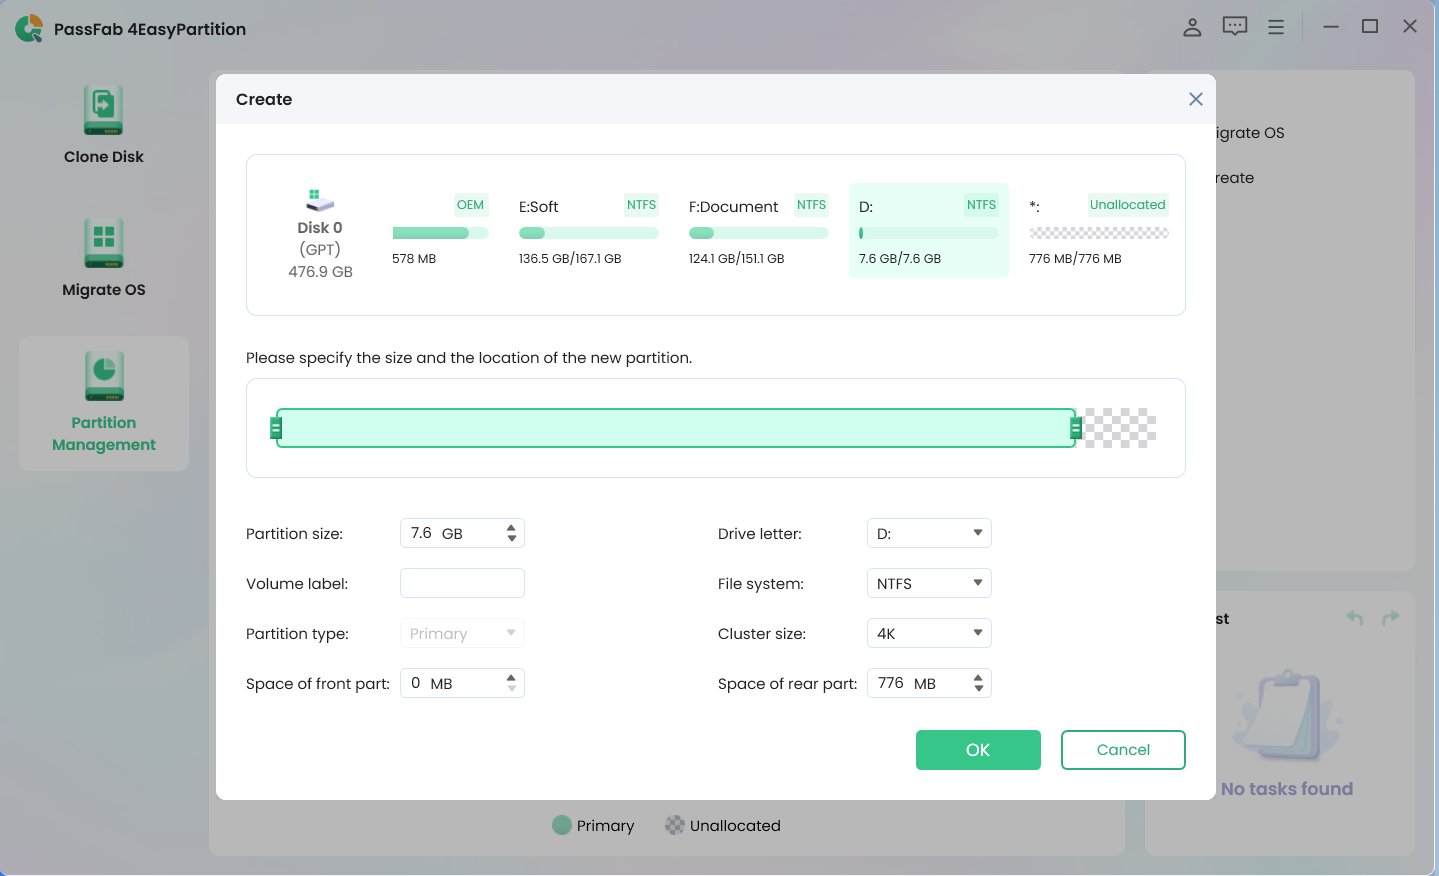
Select a file system and allocation unit size to create your new partition, name it and adjust its size by using either drag-and-drop slider bar or manually entering its size in megabytes (MB) or gigabytes (GB). Afterwards click "OK" to create it out of any available space.

Method 2: Medium: Use Disk Management
-
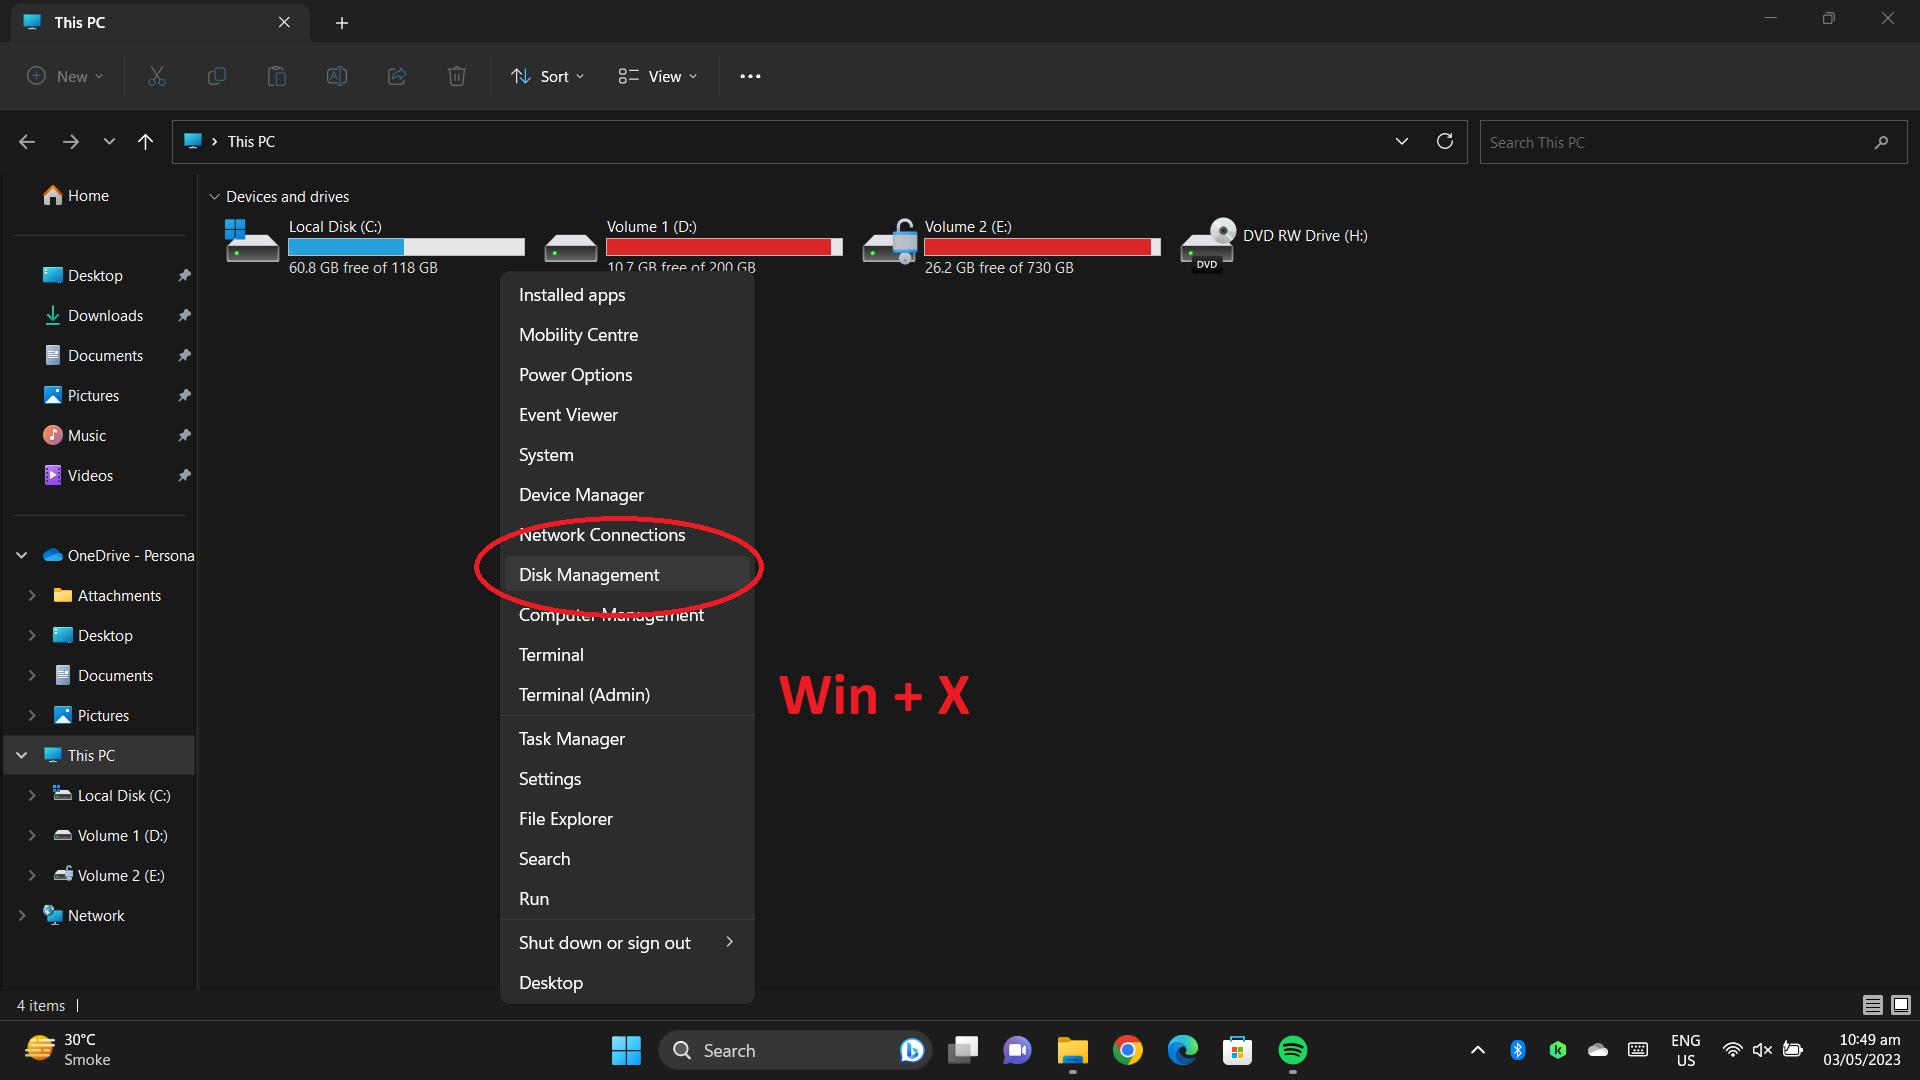
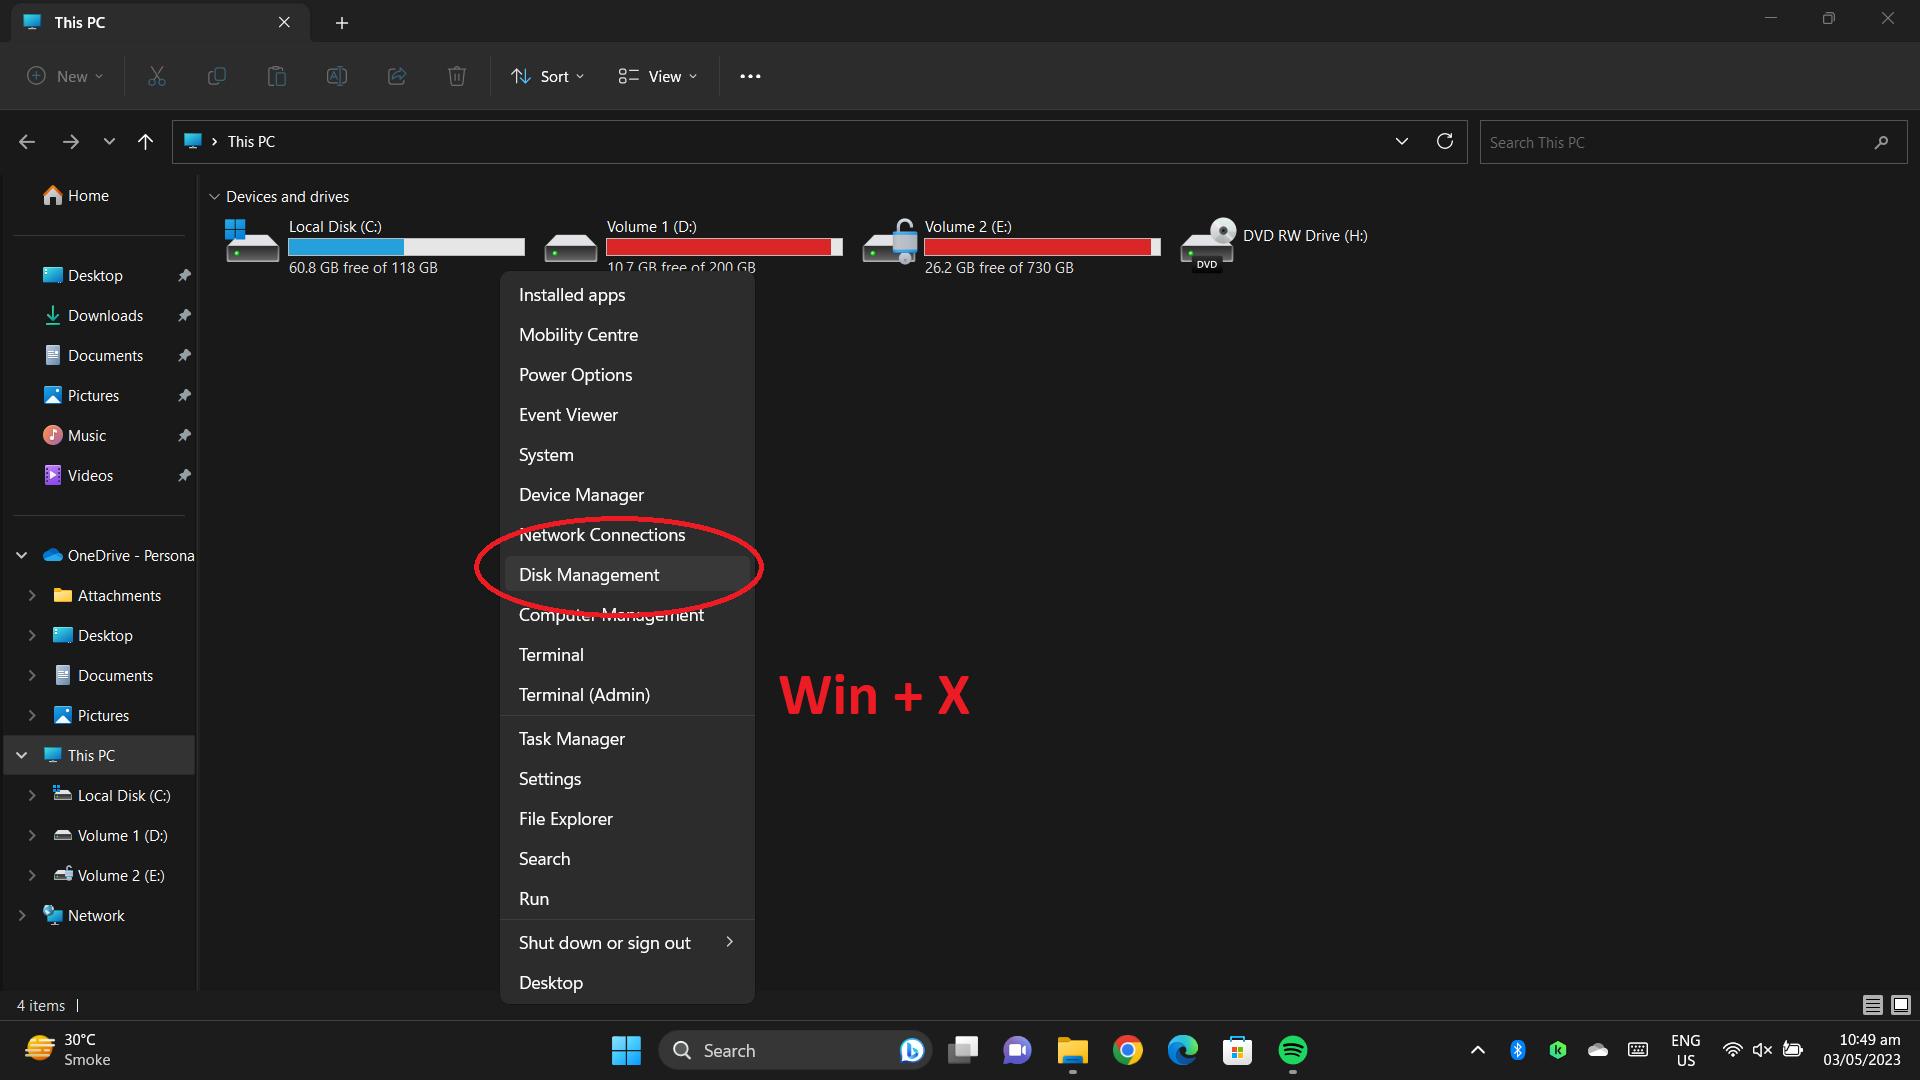
Press Windows key + X and choose Disk Management from the drop-down menu to launch Disk Management.

-
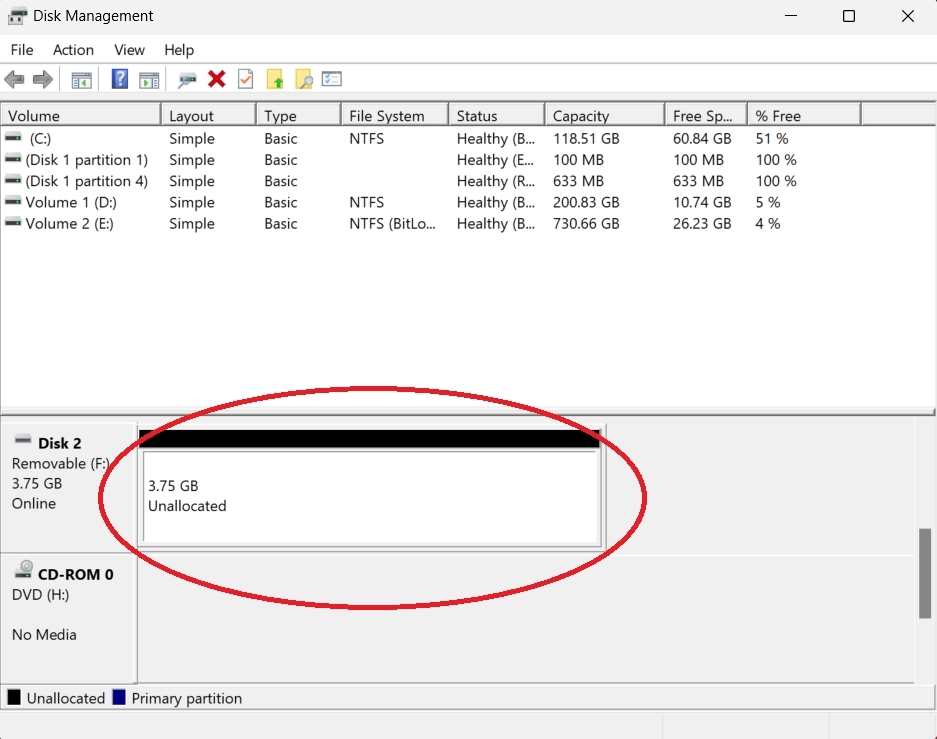
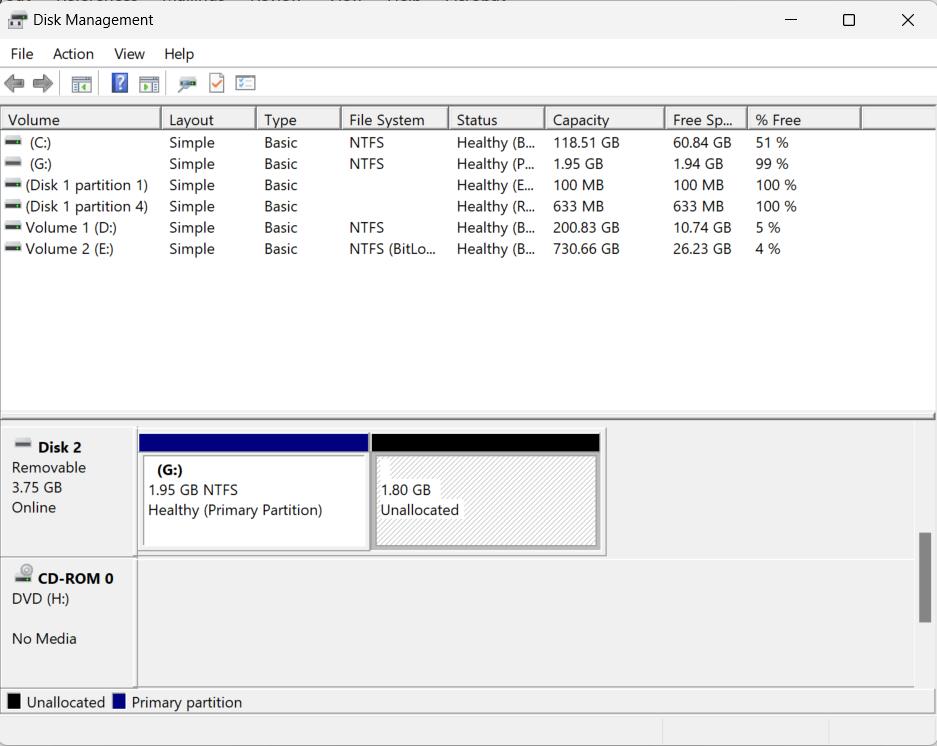
Locate Unused Space: Unallocated space can be identified by its absence of drive letters on a black bar.

-
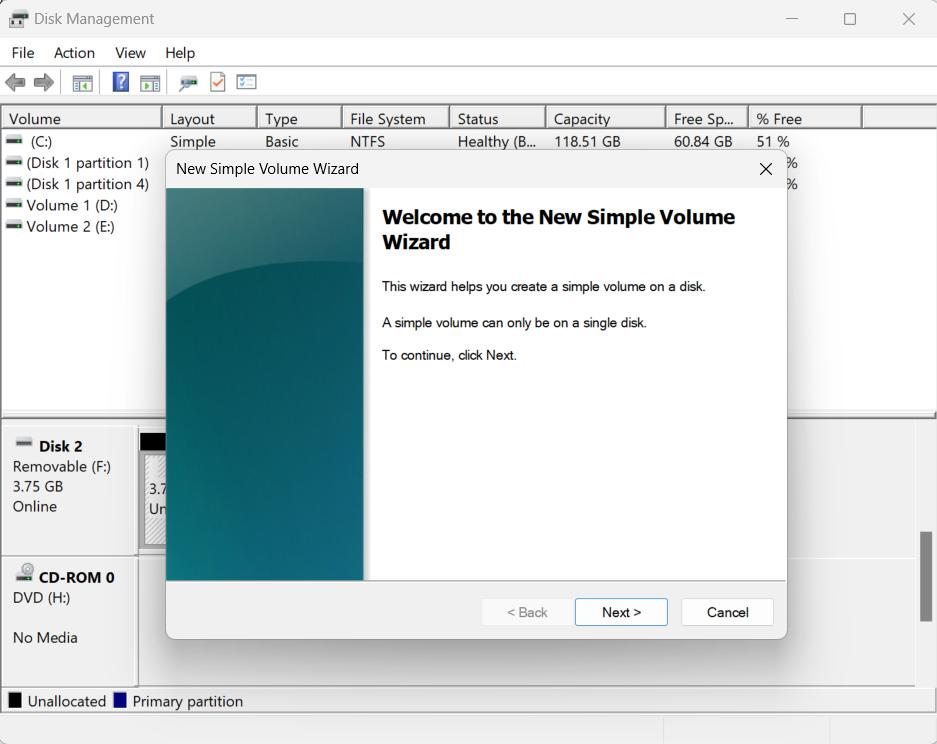
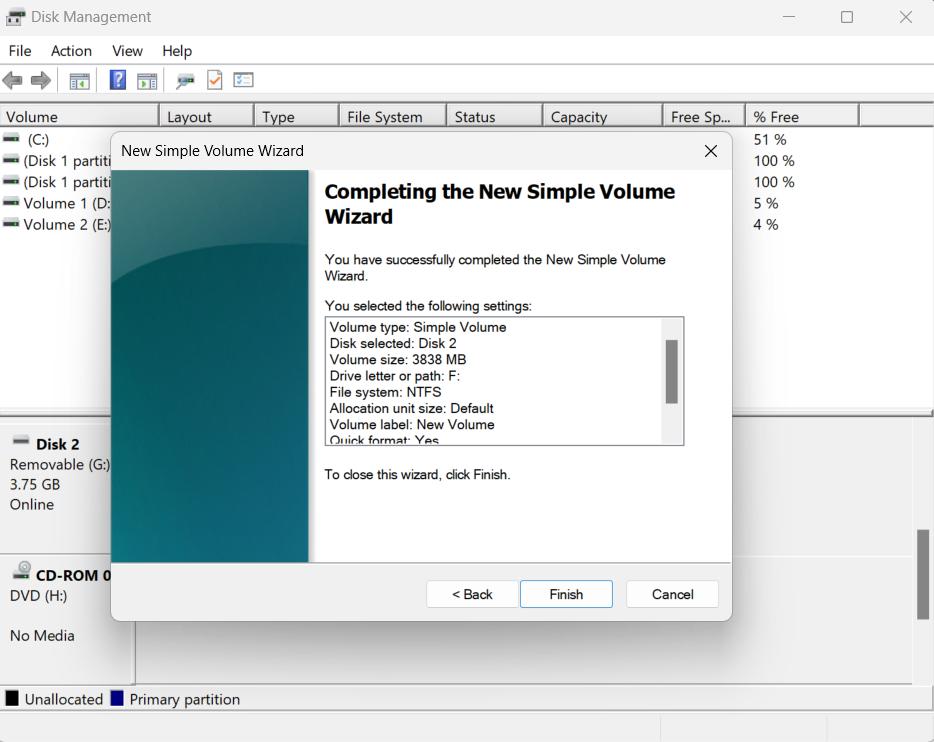
Right-click any unused space: From the context menu, choose New Simple Volume.

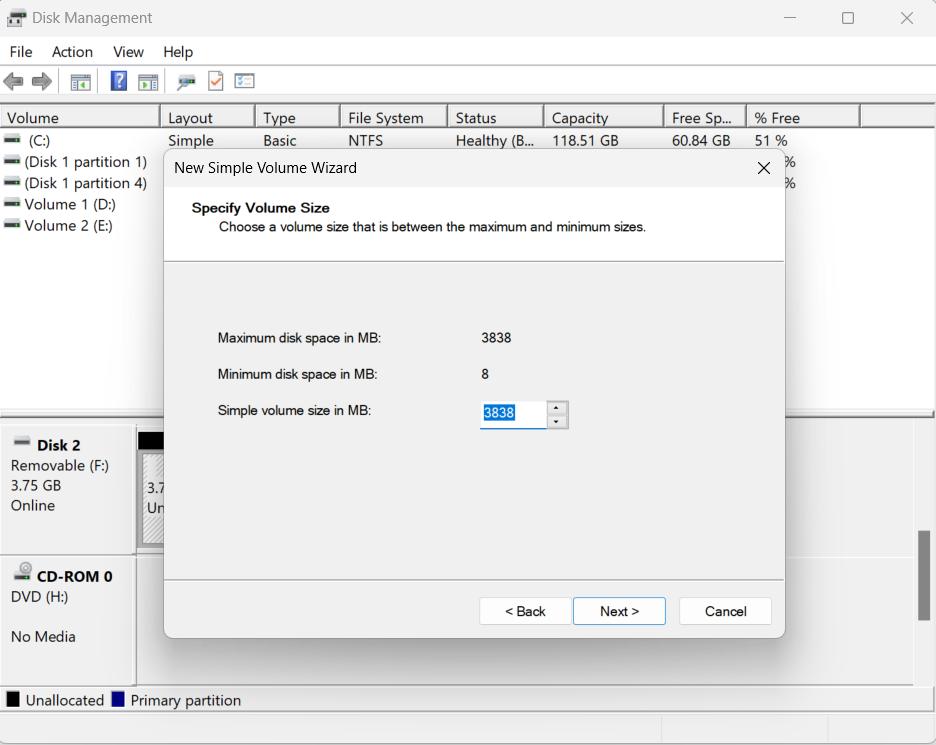
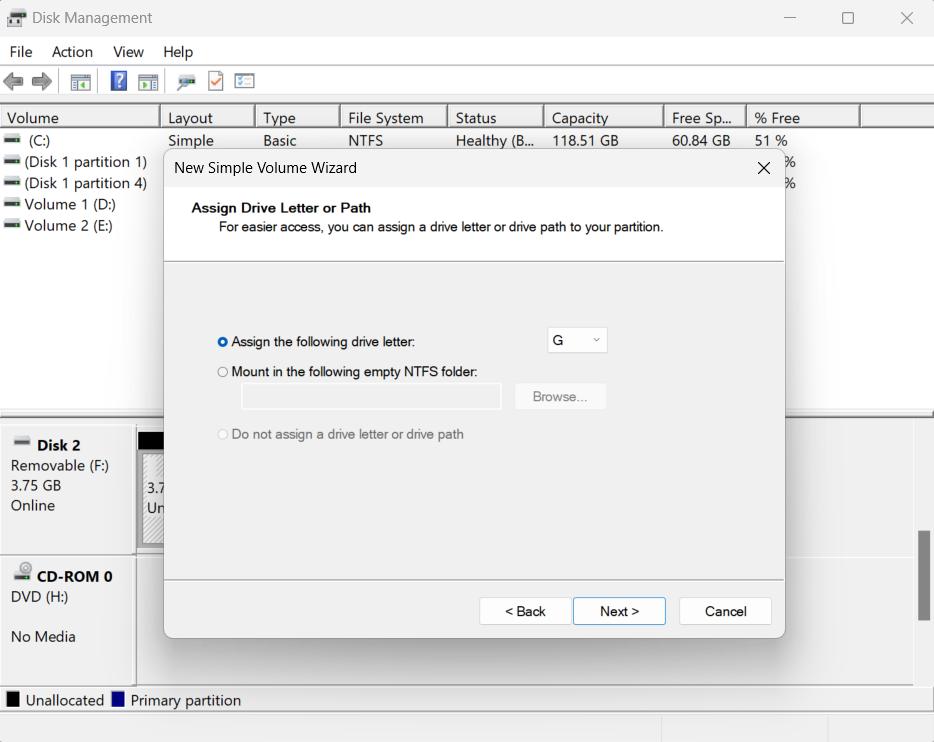
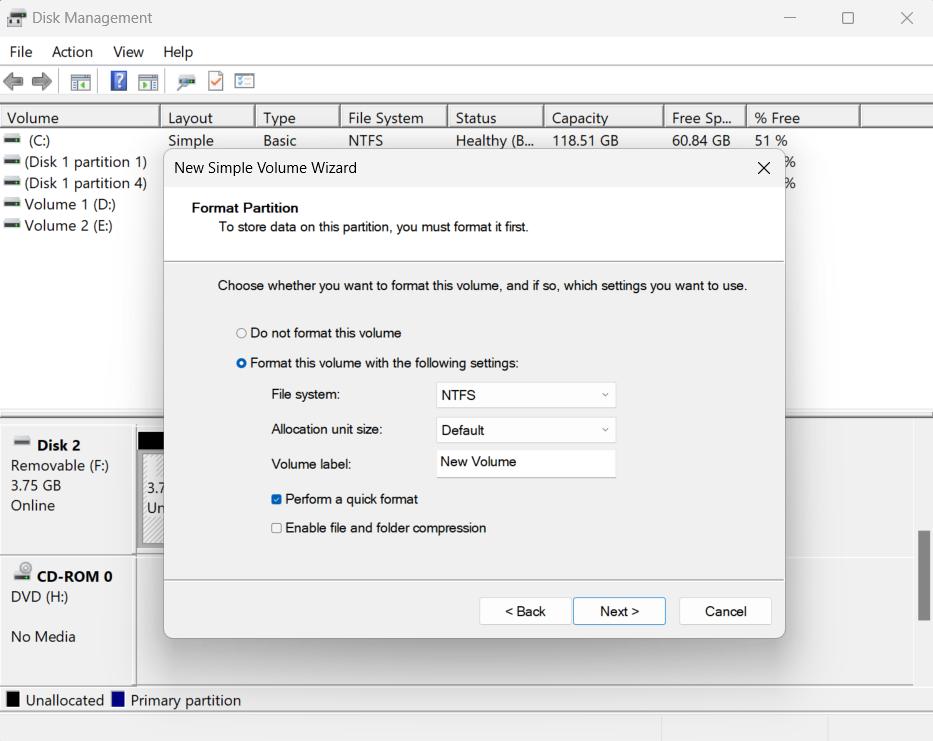
Follow the prompts: The New Simple Volume Wizard will guide you through the process of creating a partition, from assigning a drive letter and partition size specifications, to formatting with an operating system file system.


Finish the Wizard: Once the wizard is completed, your new partition will be created, and any unallocated space allocated accordingly.

Method 3: Hardest: Use DiskPart CMD Command
-
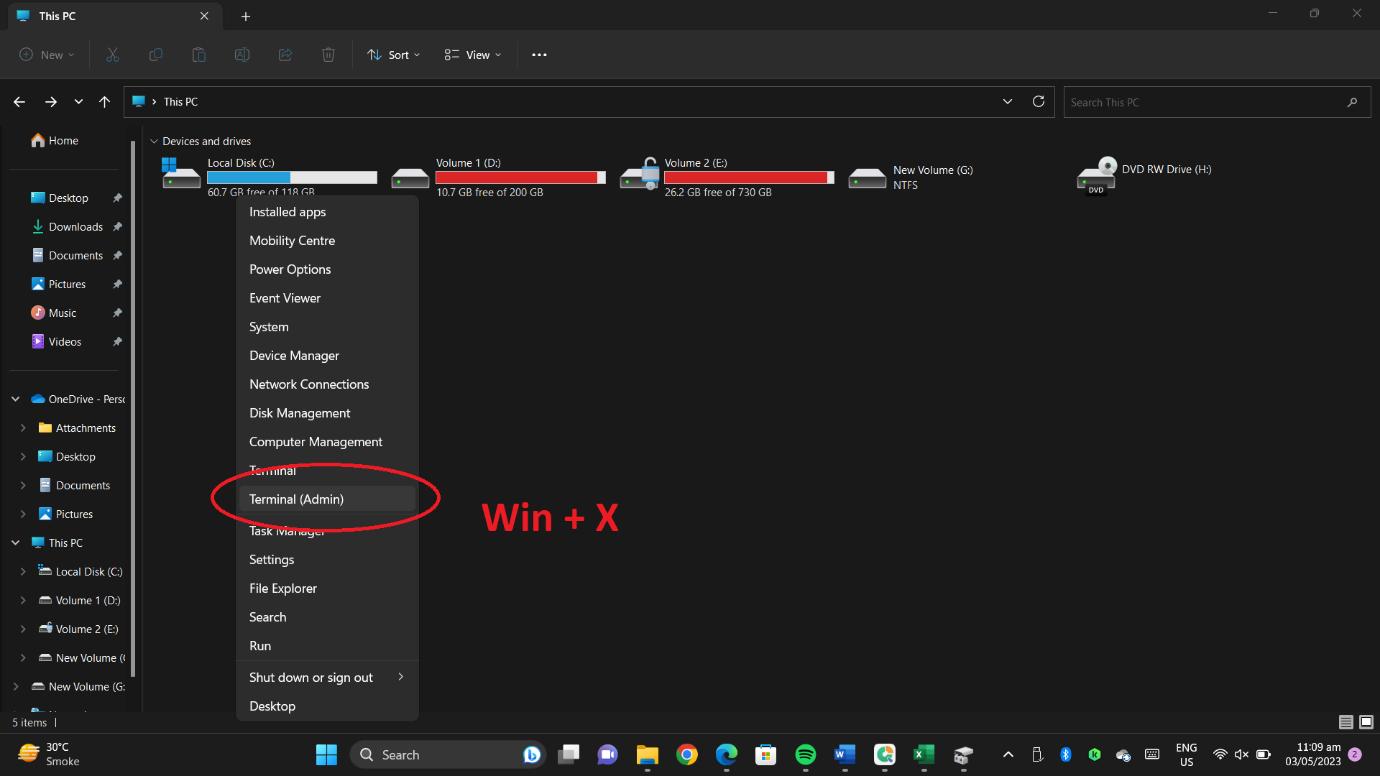
Launch Command Prompt (Admin) or PowerShell (Admin). Press Windows Key + X and choose either Command Prompt or Windows PowerShell as the appropriate entry option.

-
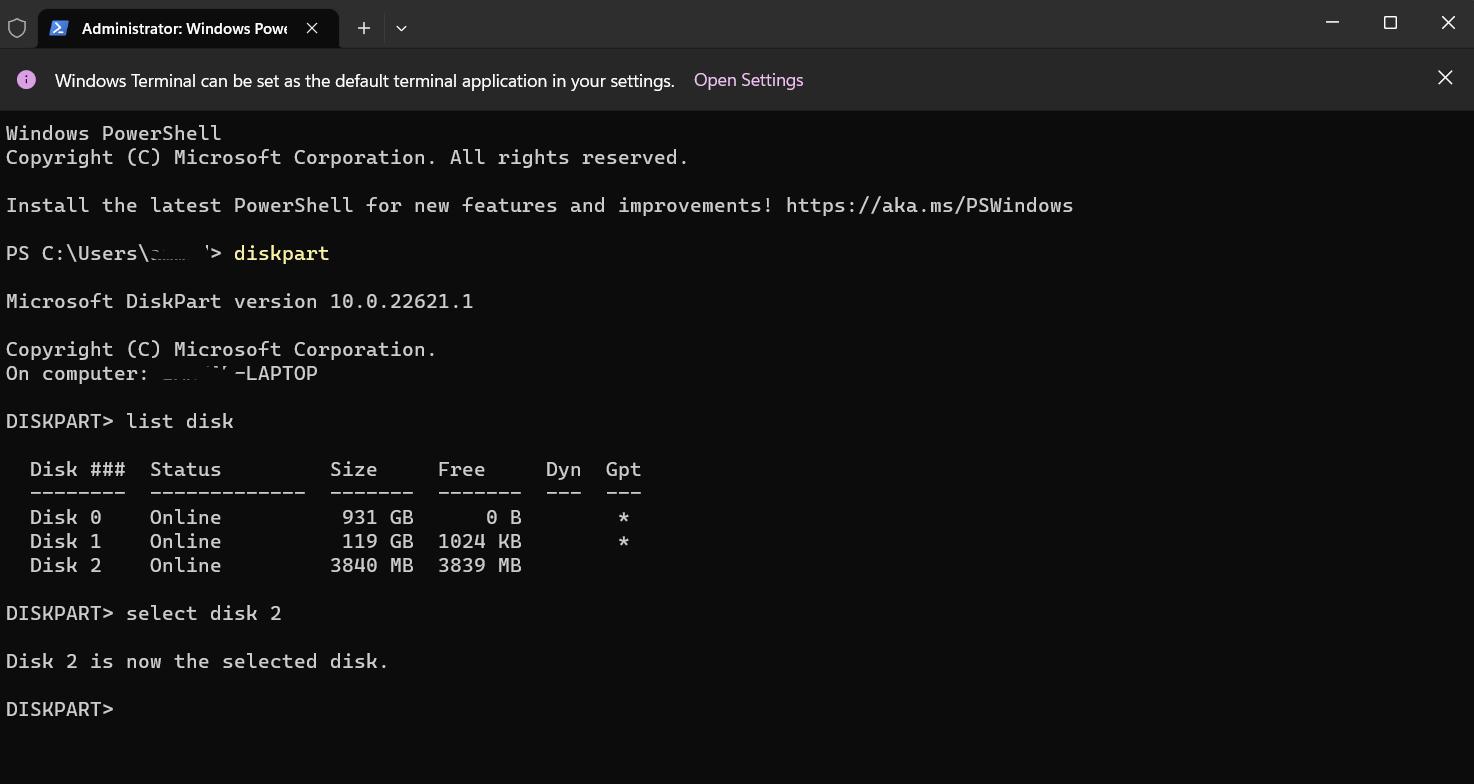
Type "diskpart" and hit Enter. This will open the DiskPart command-line utility.

-
Type "list disk" and hit Enter. This will display a list of all the disks attached to your computer.

-
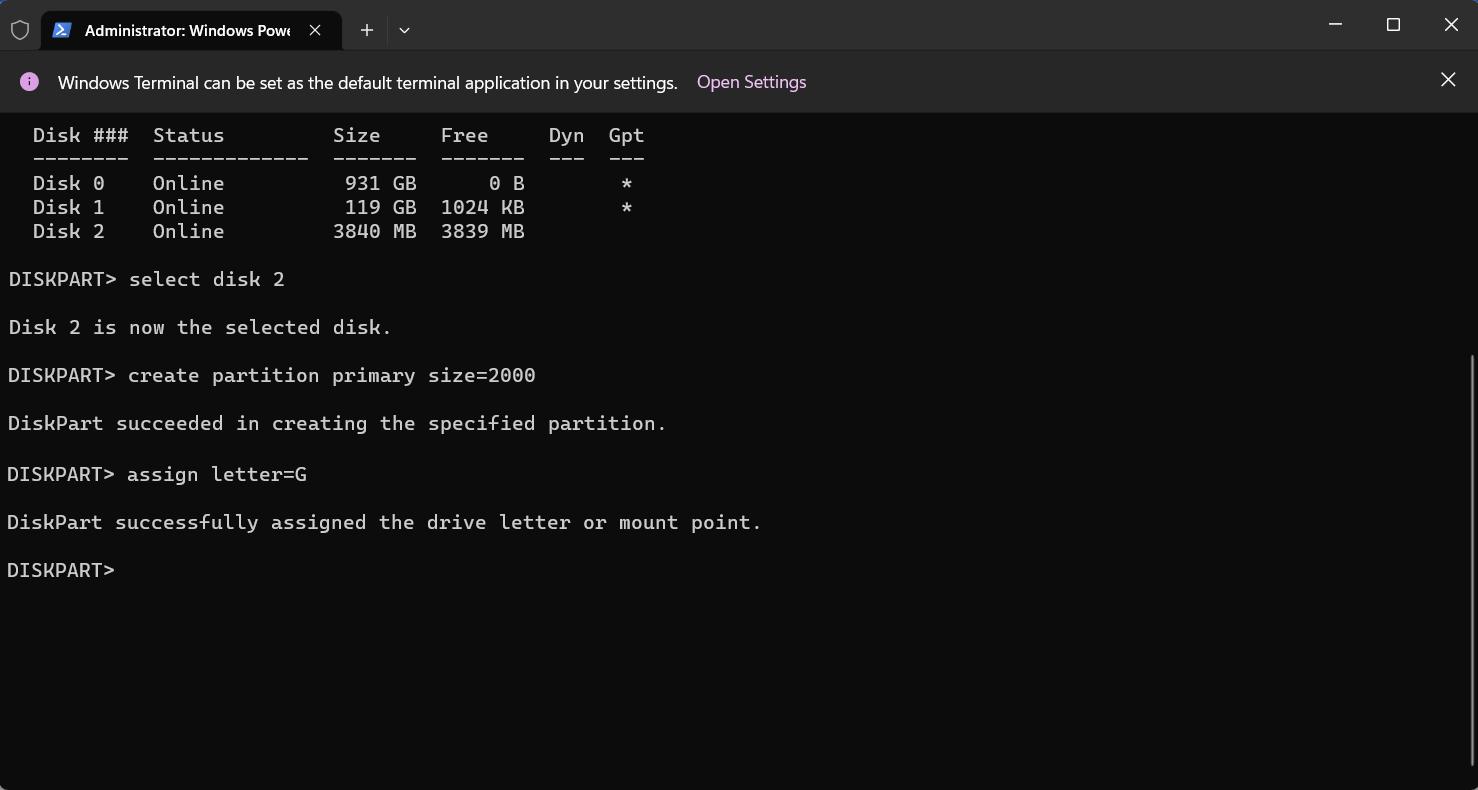
Type "select disk X" (replace X with the disk number of the drive you want to allocate) and press Enter.

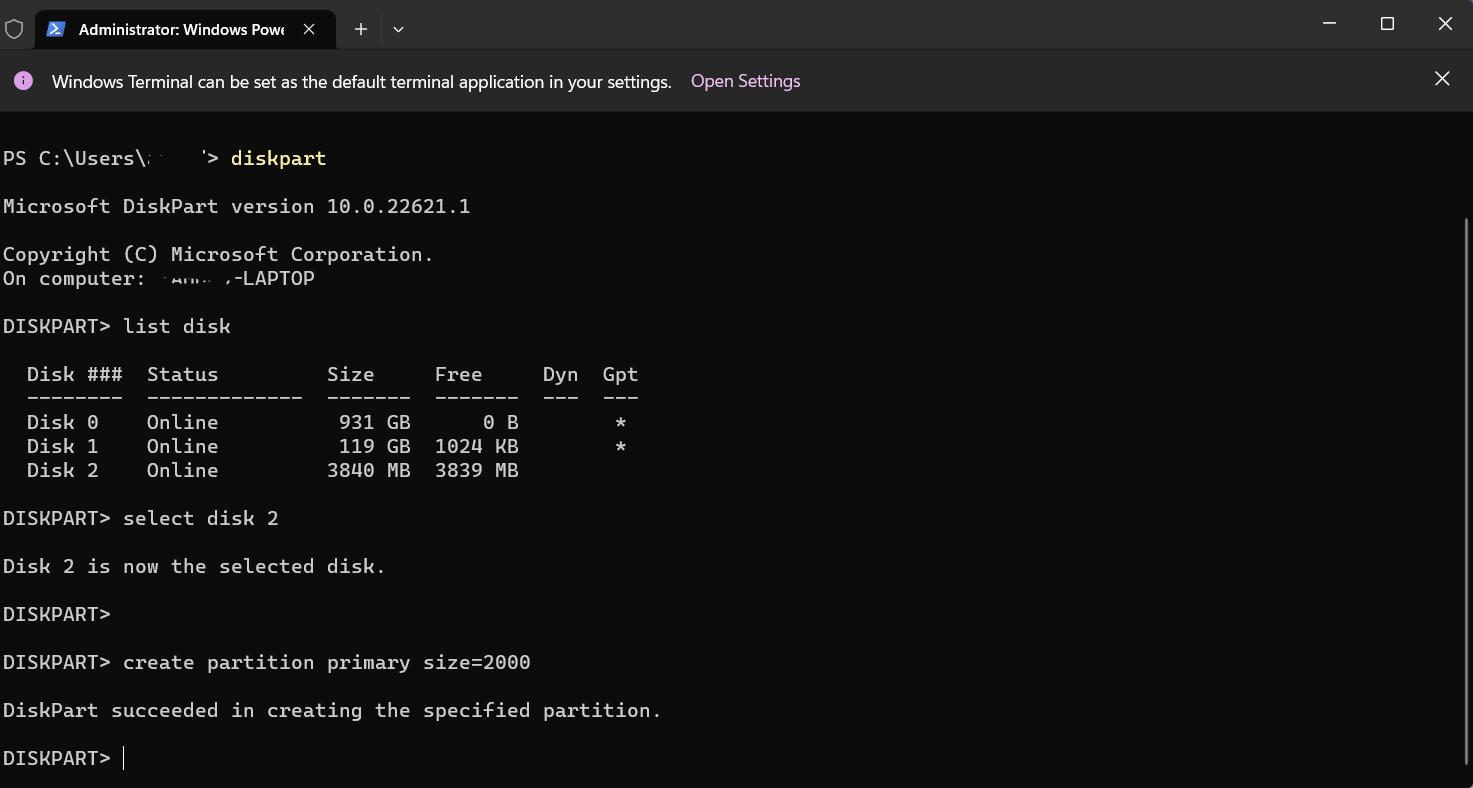
Type "create partition primary size=X" (replace X with the size in MBs that you want to allocate) and press Enter.

To assign a letter to this new partition, type "assign letter=X" (replace X with the drive letter you want to assign to the new partition) and hit Enter.

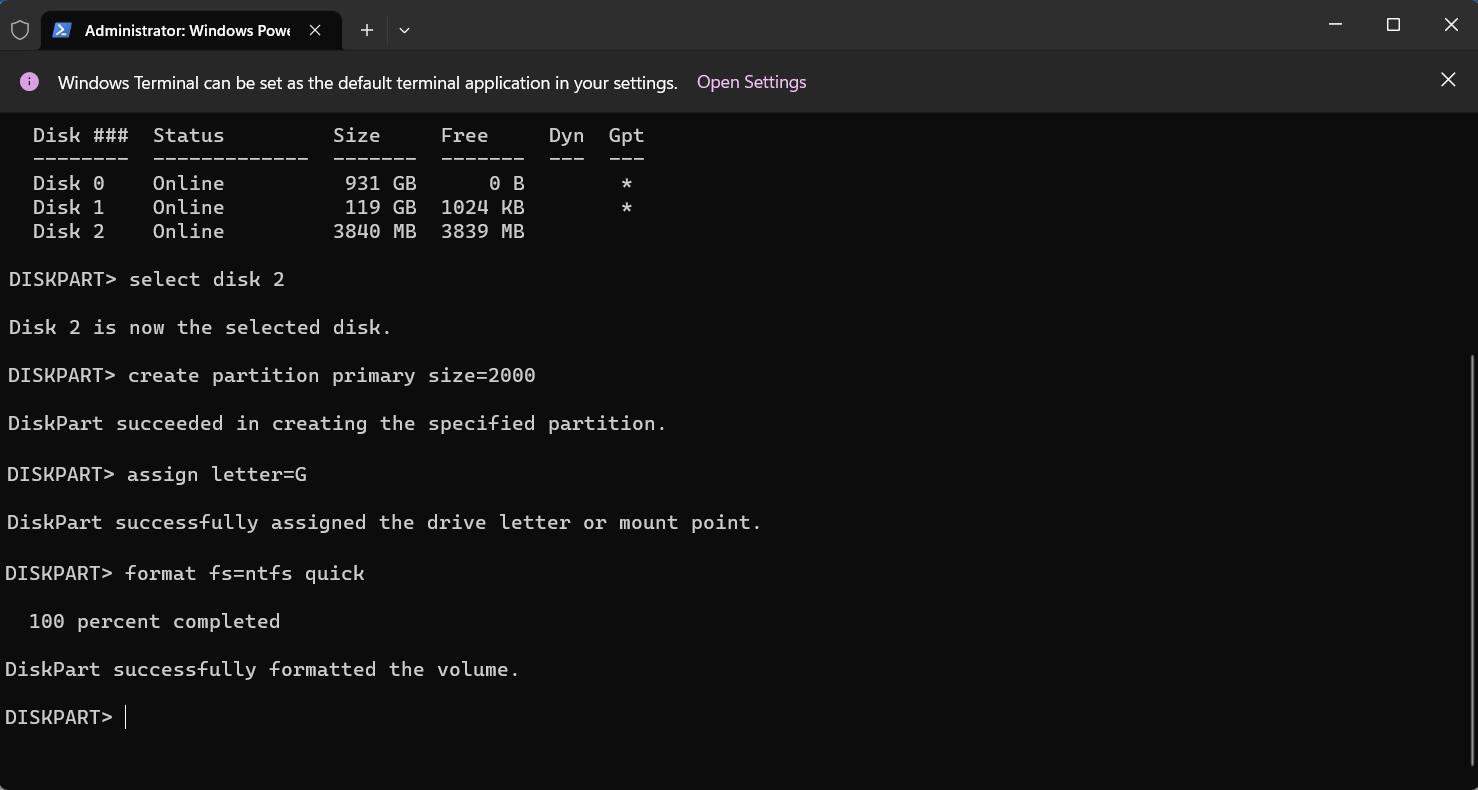
To format this new partition, type "format fs=ntfs quick" and hit Enter. This will format the partition with the NTFS file system.

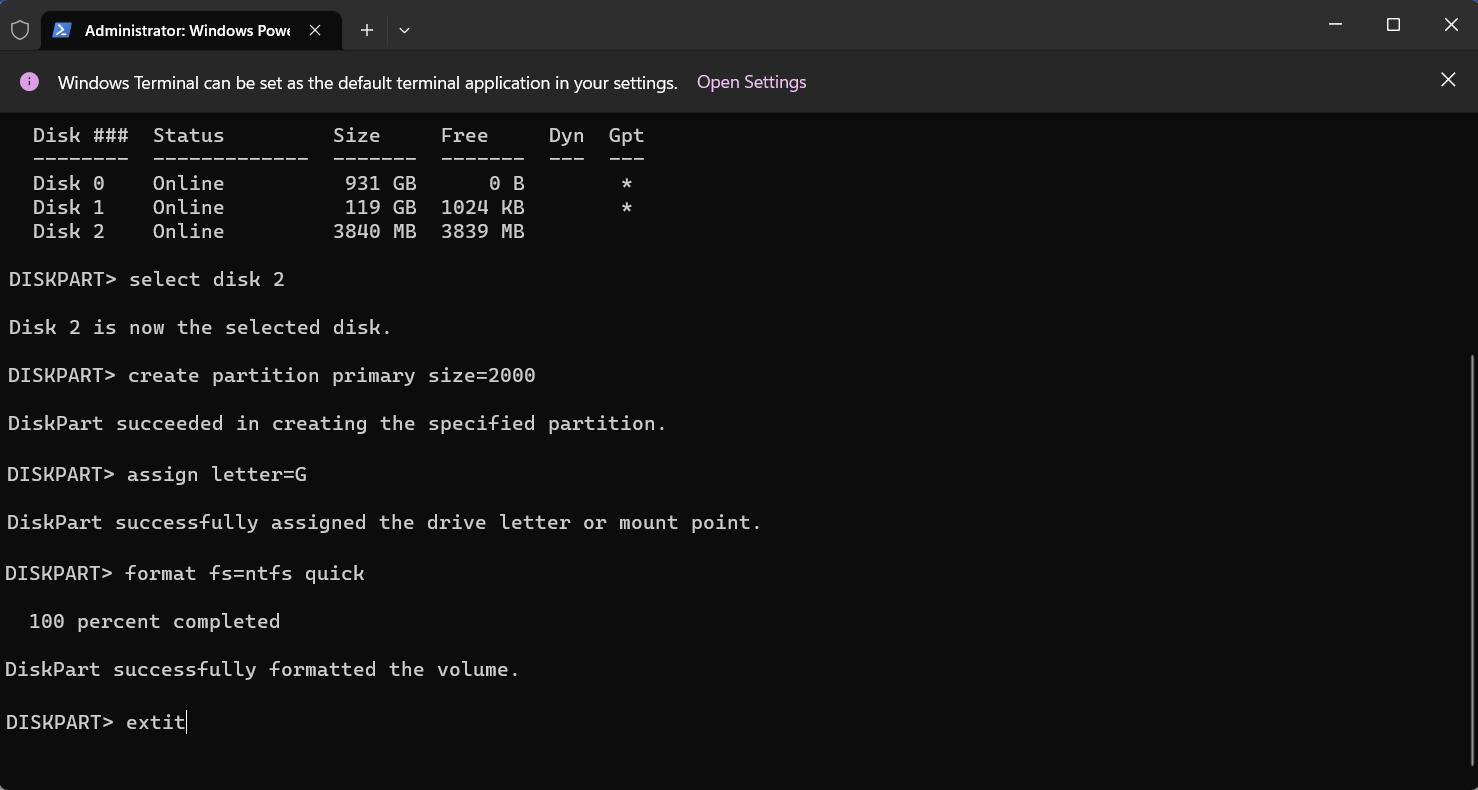
Type "exit" and hit Enter to exit diskpart.

2. Extend an Existing Partition with Unallocated Disk Space
There are a few of the ways explained below through which you can extend existing partition(s) with unallocated space. These methods vary from the easiest to the most difficult.
Method 1: For Beginners: Use PassFab 4EasyPartition
-
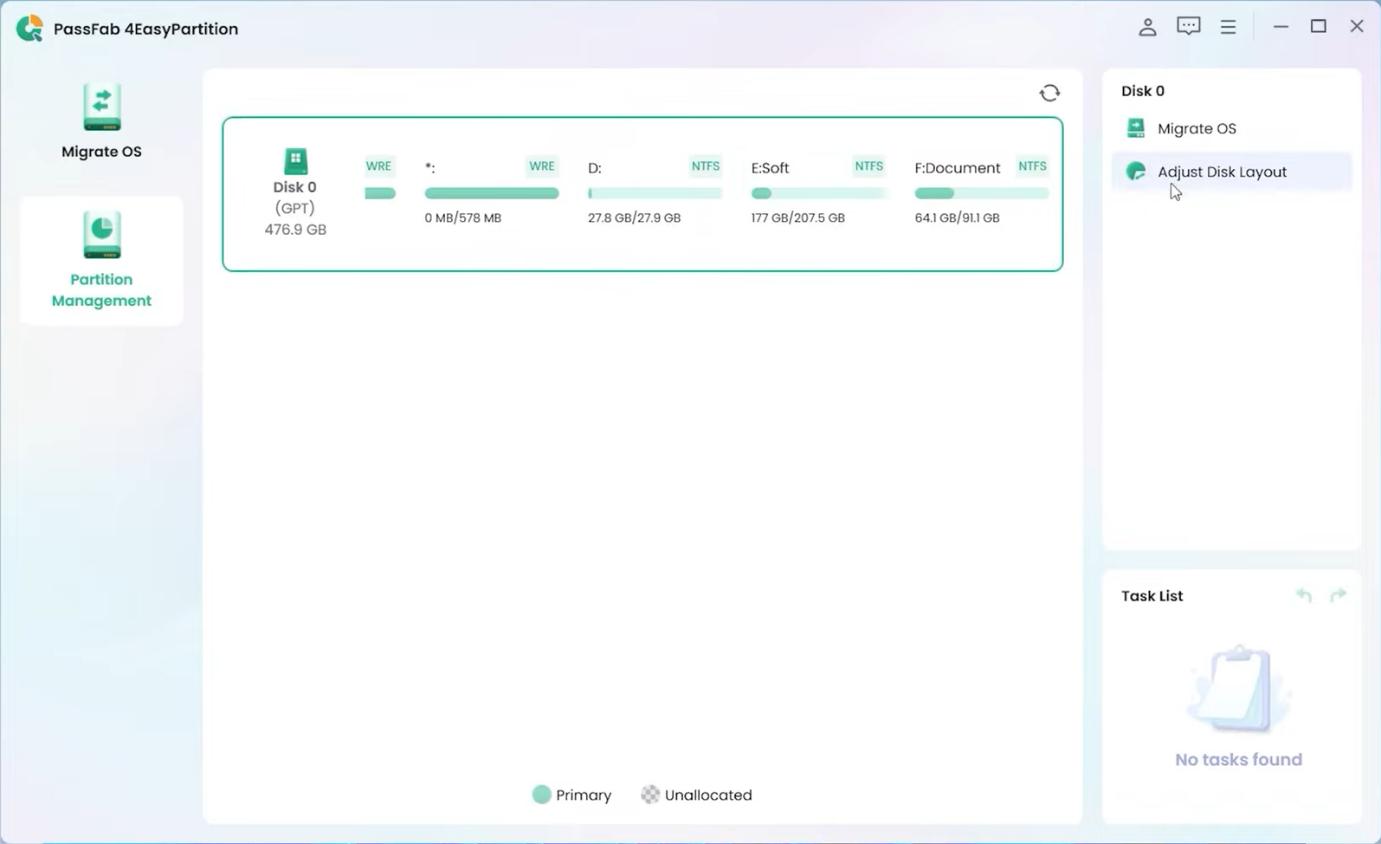
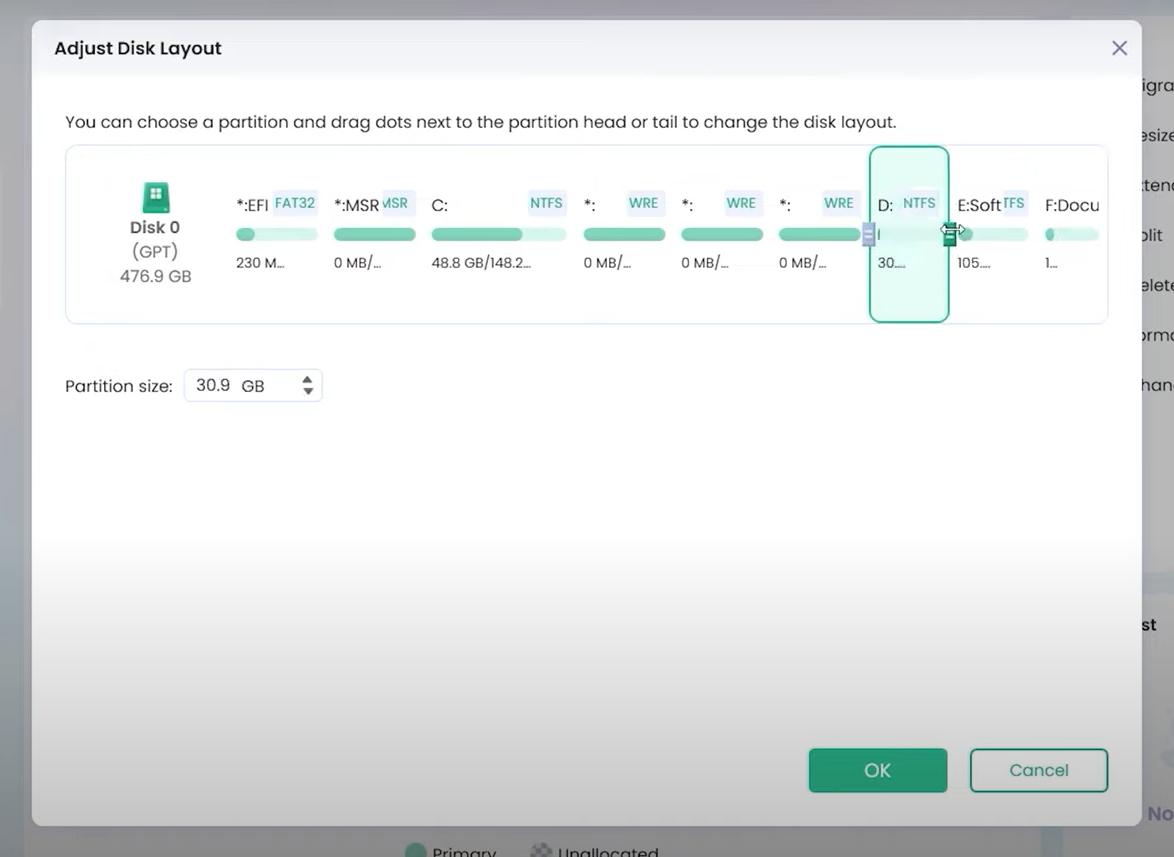
Launch PassFab 4EasyPartition and right-click on the drive whose partition you want to extend or shrink and select "Adjust Disk Layout" from the menu on the right.

-
In the pop-up window, you will see the current size of the partition with sliders. You can adjust the partition size by dragging the slider bar. Once done, click on "OK" to save the changes and preview the result in the main interface.

Method 2: For Experienced: Use Disk Management
-
Launch Disk Management: Press Windows key+X and choose Disk Management from the drop-down menu.

-
Locate Unallocated Space: Unallocated space can be identified by a black bar without drive letters attached.

-
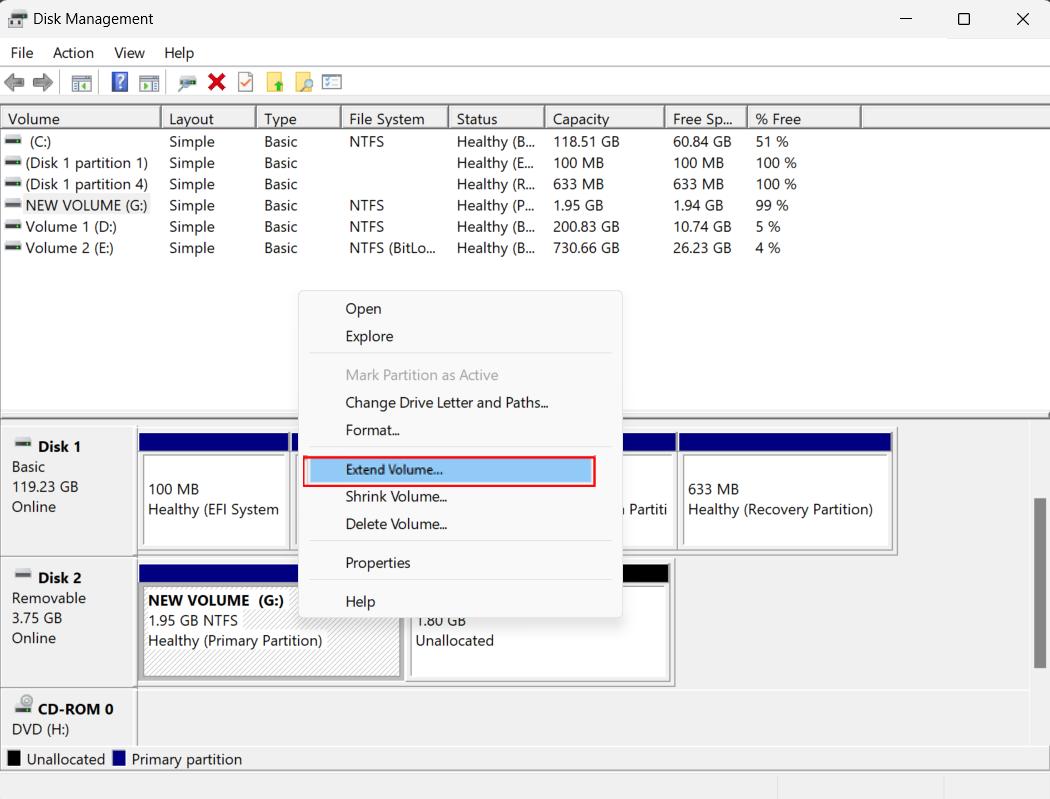
Right-click on the partition that needs extending and select Extend Volume from its context menu.

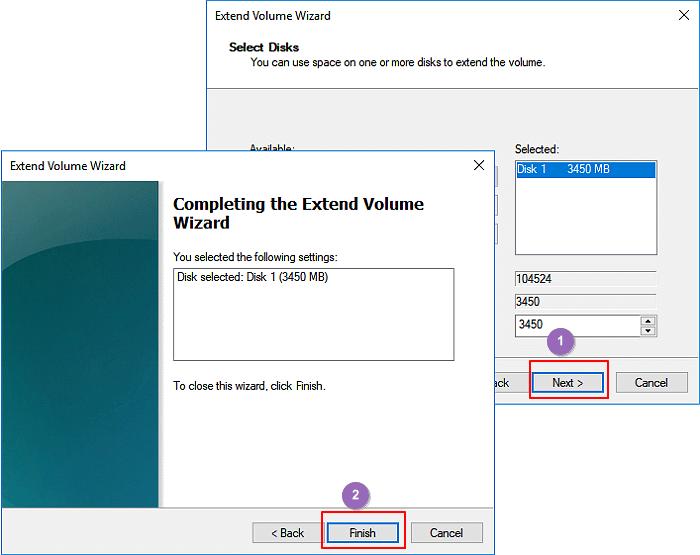
Follow the prompts: The Extend Volume Wizard will guide you through the process of expanding a partition, such as specifying how much additional space should be added and selecting unallocated space that should be utilized.

Method 3: For Professionals: Use DiskPart Command
-
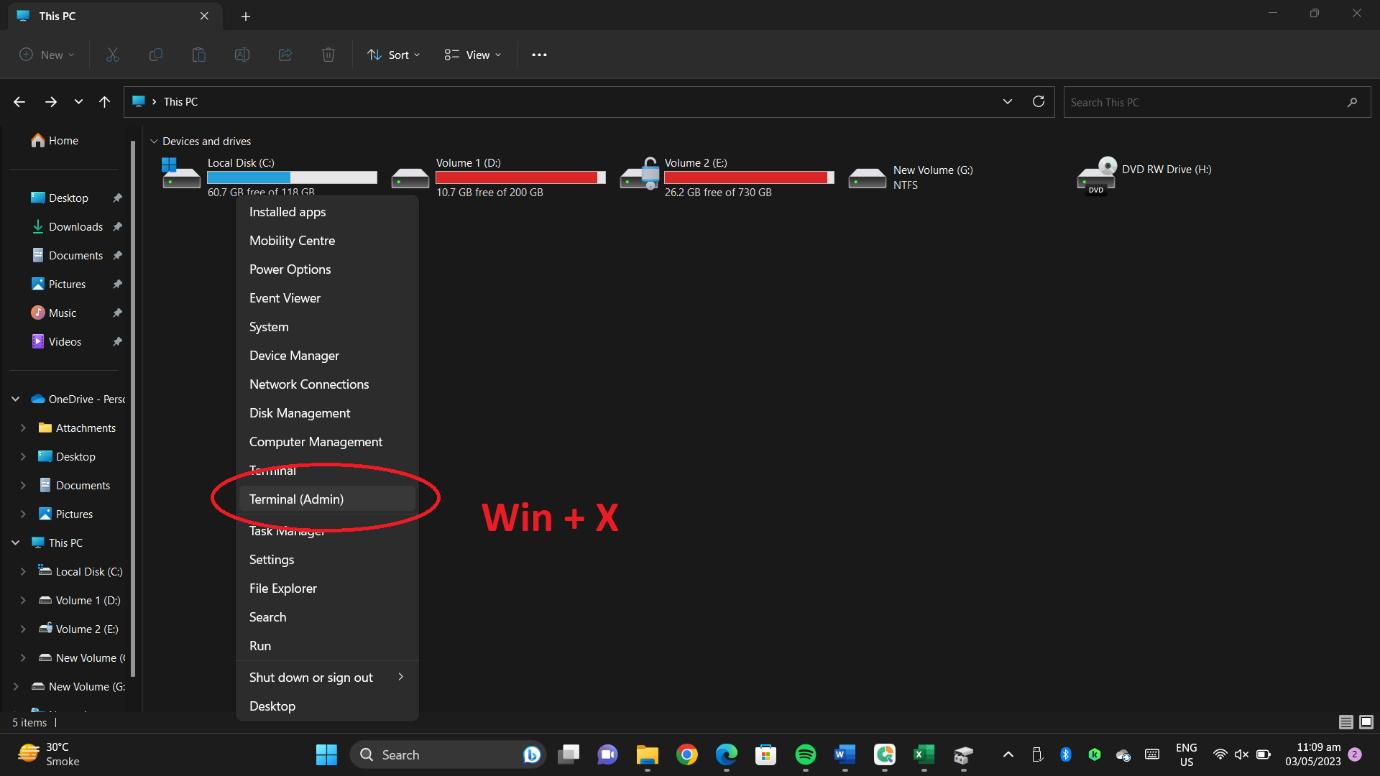
Launch Command Prompt (Admin) or PowerShell (Admin). Press Windows Key + X and choose either Command Prompt or Windows PowerShell as the appropriate entry option.

-
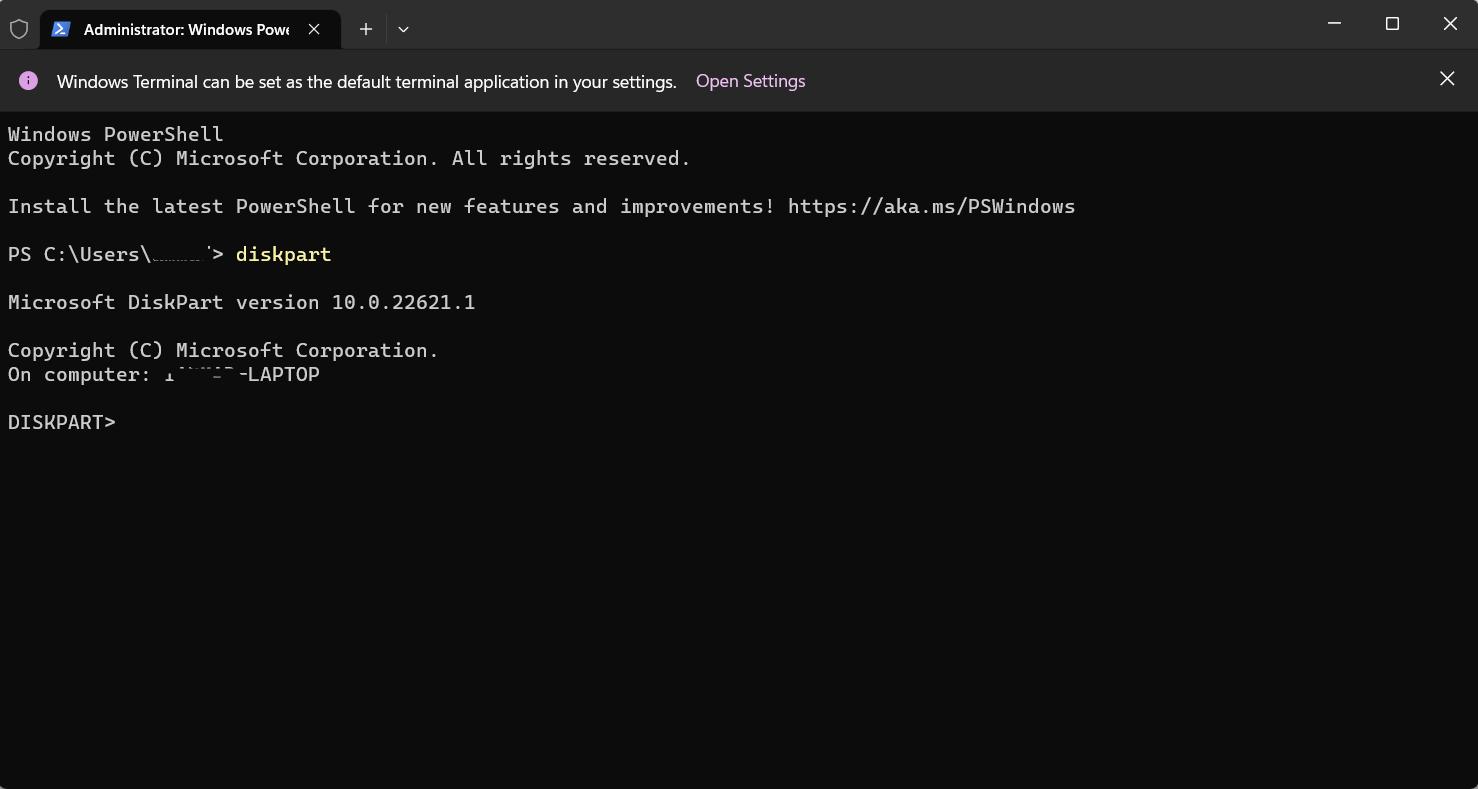
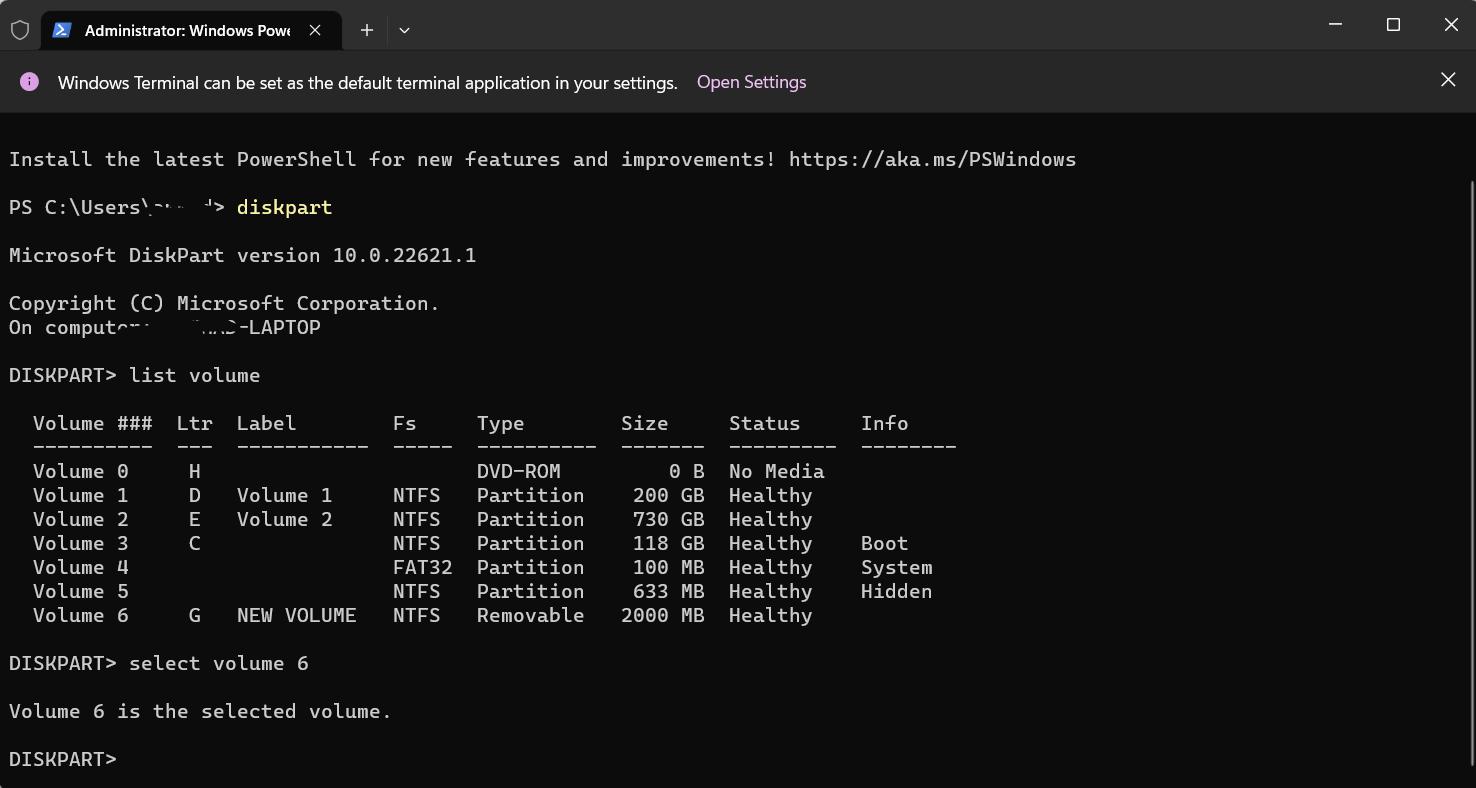
Type "diskpart" and hit Enter. This will open the DiskPart command-line utility.

-
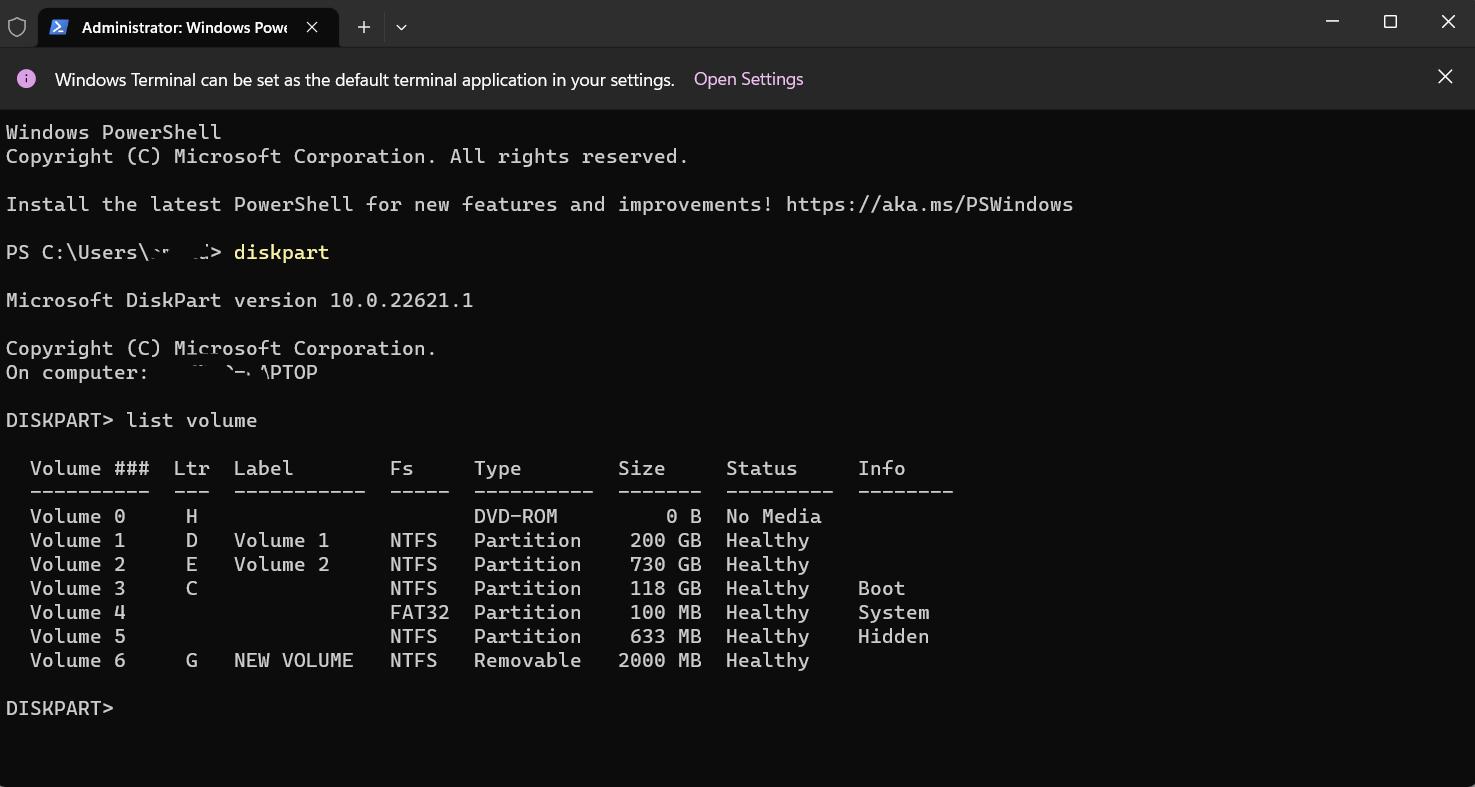
Type "list volume" and hit Enter. This will show list of all the volumes attached to your computer.

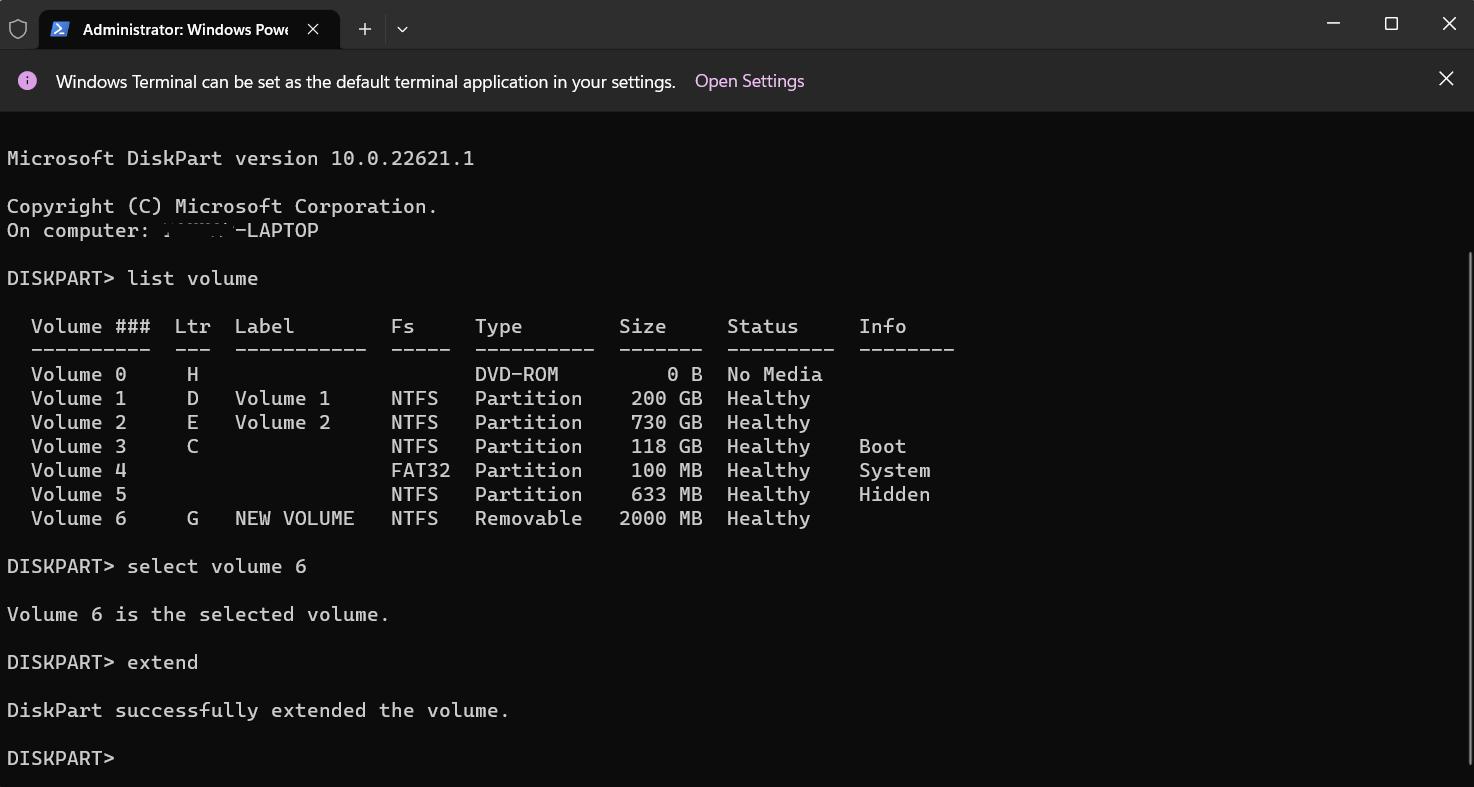
Select the volume you want to extend by typing "select volume X" (replace X with the volume number of the partition you want to extend) and hit Enter.

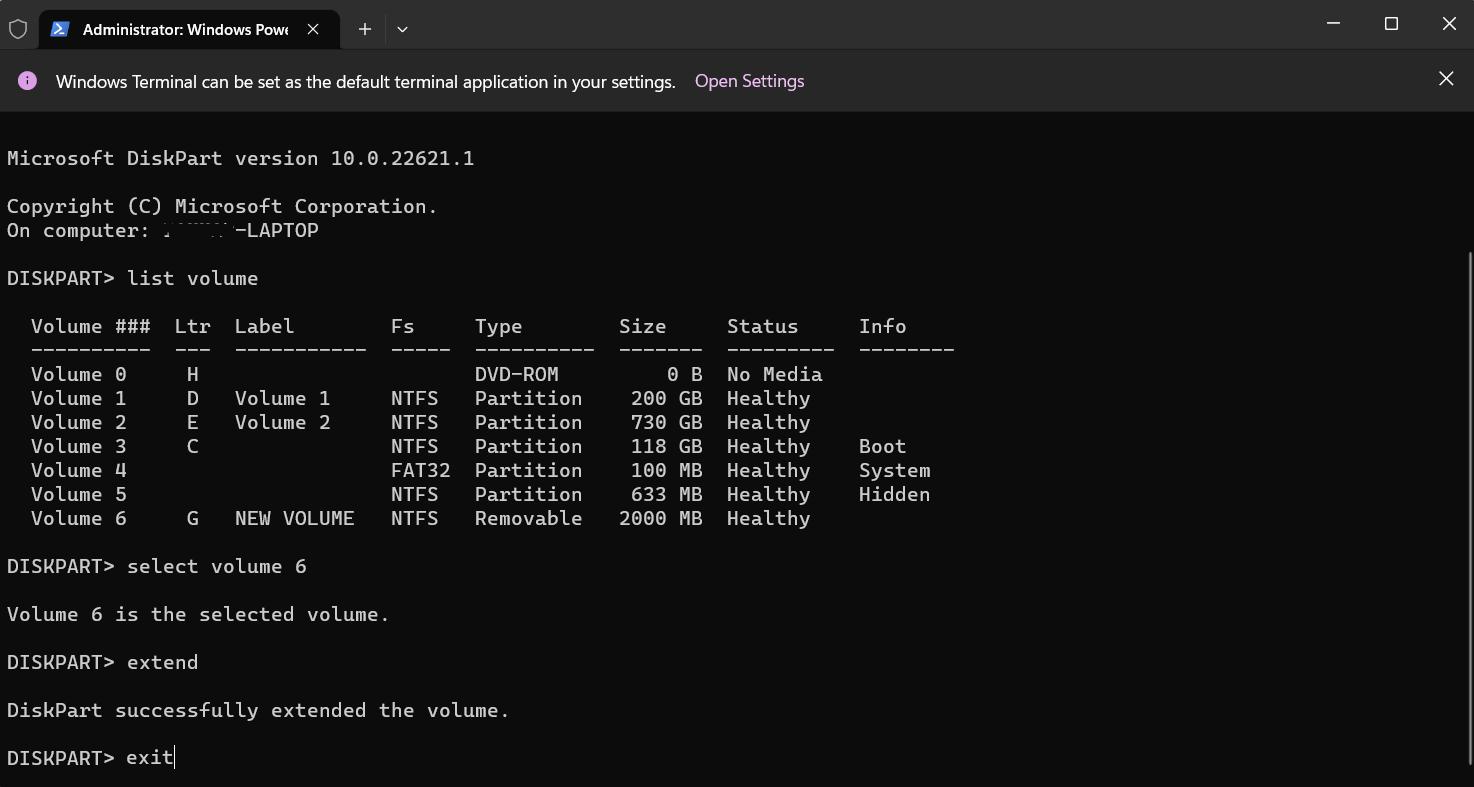
To extend your volume, type "extend" and hit Enter. This will extend the partition to use all available unallocated space on the disk.

Type "exit" and hit Enter to exit diskpart.

Part 5. How to Allocate a Hard Drive in Windows 10/11 FAQs
Q1: How to Get Unallocated Space?
To create unallocated space on Windows 10/11, shrink an existing partition or delete one using Disk Management. Right-click the partition, select "Shrink Volume" or "Delete Volume," and follow the prompts to create unallocated space. Take care to avoid data loss - always backup important information before any disk management operations!
Q2: How to Allocate Hard Drive Windows 10/11/8/7?
How to allocate a hard drive Windows 11/10/8/7? Launch Disk Management, right-click unallocated space, and choose "New Simple Volume," following its prompts through the wizard. When finished, your hard drive will be allocated and ready for use - though be mindful to back up important data before performing any disk management operations!
Q3: What to do if Disk Management option greyed out on unallocated space?
If the Disk Management option on unallocated space is greyed out, try initializing or formatting to a compatible file system; alternatively, use PassFab 4EasyPartition to completely bypass it.
Q4: Should I leave unallocated space on a hard drive?
Wondering how to allocate a hard drive space Windows 10 or is it okay to Leave unallocated space on a hard drive? It is up to you; depending on your needs and preferences it may prove useful in future applications or performance, but allocating all available storage space could prove more efficient in terms of storage efficiency.
Q5: How to allocate unallocated space for C drive in windows 10?
If you are wondering how to allocate a hard drive without losing data, you’re at the right place. assign unallocated space for the C drive in Windows 10, launch Disk Management, right-click on it, select "Extend Volume," and follow the prompts in the wizard to expand its size into unallocated space - although this must be nearby otherwise it won't work properly.
Conclusion
Before taking any actions with unallocated space, it is imperative that you exercise extreme caution and back up all critical data before initiating disk management operations. By following the steps outlined herein, you can effectively allocate your hard drive by using unallocated space to create new partitions or extend existing ones, improving both computer performance and storage capacities.
