Have you ever thought of what auto-sharing on your Windows 10 computer might cause? In case auto-connect feature has been turned on for your Windows 10 system, it will automatically connect to open Wi-Fi connections nearby. This in turn enables file sharing on Windows 10, sometimes without your knowledge. Hackers might be floating around across open Wi-Fi connections and attack your It's always recommended to perform manual file sharing activities to protect the data on your computer as well as various login credentials across websites.
Part 1. How to Enable File Sharing on Windows 10
For enabling Windows 10 file sharing, you have a wide range of options. In this section of the article, we will see how to do it through File Explorer or HomeGroup. Previously HomeGroup was used to share files on Windows 10, but recent Windows 10 updates doesn't support that any longer. So, File Explorer has taken its place with some changes in the settings.
Using File Explorer, you can share files with other users within the same home network that contains your Windows 10 system. You can allow access to other members in the group to view or edit your files here. By adopting this method, you avoid the risk of data getting hacked by unauthorized users across a network. File sharing ensures a safe gateway to transfer or print files and prevent data hacking.
Windows 10 file sharing, on your network.
- Launch File Explorer and select the files you want to share.
- Right click on the file and tap "Give access to" > pick the name of specific people that you want to share files with.
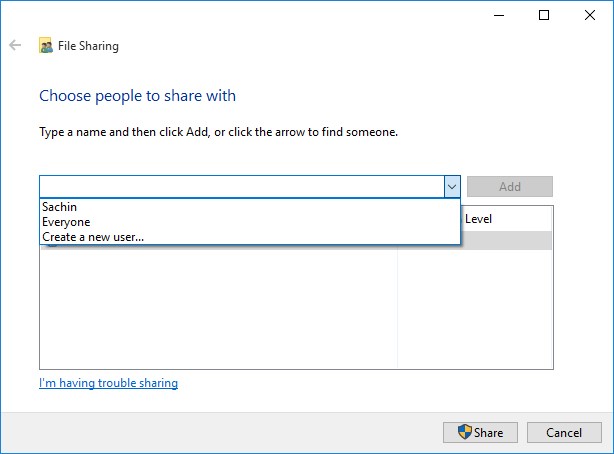
- From the drop down list, select a name for file sharing by hitting "Named user"/ "Everyone"/ "Create a new user" as per your preference. Here, you can pick "Named user" in this case and then press "Add".
- Now, hit "Share" for selecting the changes and confirm my pressing "Done".
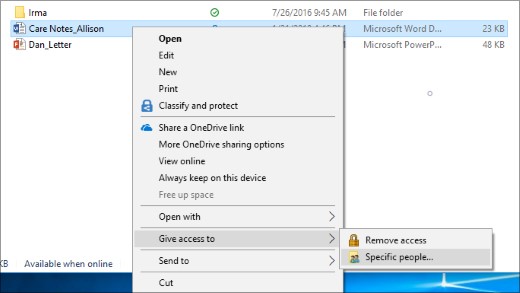
You got to enable File Permission.
File Permission manages the authority over "Read" or "Read/Write" by the person you are sharing the files with. The default mode for Windows 10 share folders is "Read" mode. If you want to allow users to make changes to your shared files, then you need to permit them to do so. You need to change the permission after adding the user before hitting the "Share" button.
Part 2. How to Enable Printer Sharing on Windows 10
Having a shared printer over the network prevents the extra cost of getting multiple printers in each department of any organization. Shared printers make the job easier, as you don't have to be near the printer to take a printout. These shared network printers help you greatly. You can access a printer through network sharing on Windows 10 or let others access it. In this part of the article, we are going to show you, how to enable printer sharing step by step.
- /powse your computer and launch "Control Panel".
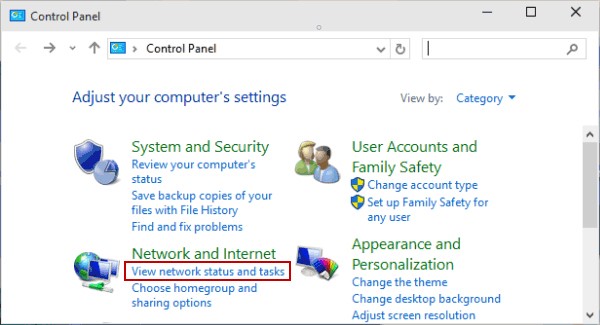
- Go to "Network and Internet" option and then select "View network status and tasks".
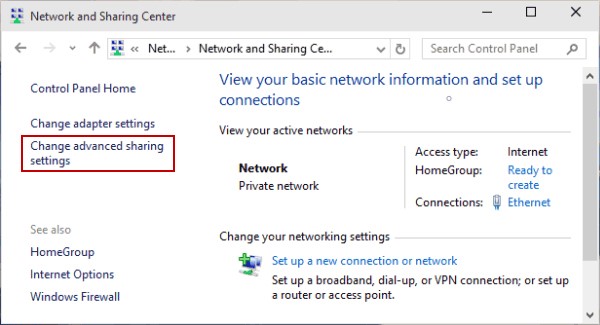
- Move to the "Network and Sharing Center" and select "Change advanced sharing settings".
- Select "Turn on file and printer sharing" followed by the "Save changes" button. Now, you can share the network printer on your Windows 10 computer within the network.
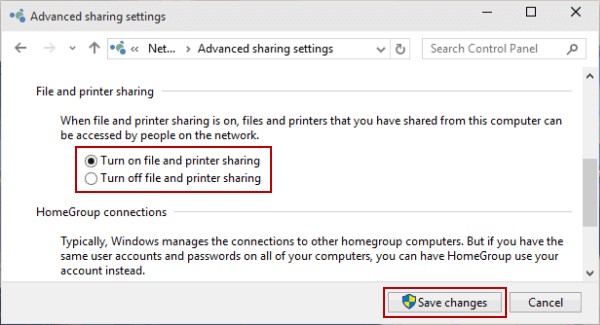
Note: To turn off printer sharing in the network, you need to choose "Turn off file and printer sharing" in this section. It is recommended to share printer only with reliable computers within your group, to prevent unauthorized access.
Bonus: What to do if you've lost access to your user account and don't even remember the password?
Well, having PassFab 4WinKey, you can create a Windows password reset disk and unlock the computer. You can create, remove, change or reset Windows password for a domain and a local computer using this application. It has high recovery rate and have better performance.
Step by step tutorial:
Step 1: Grab your copy of PassFab 4WinKey from its official website. Now, install and launch it over your computer. Get your USB file connected with the computer, opt in for the USB option on the software window and hit the "Burn" button. Press the "OK" button and eject the USB after burning it.
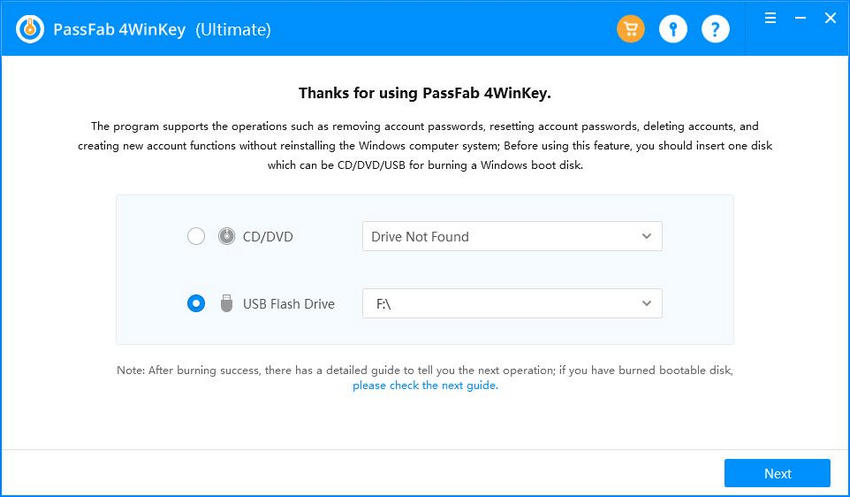
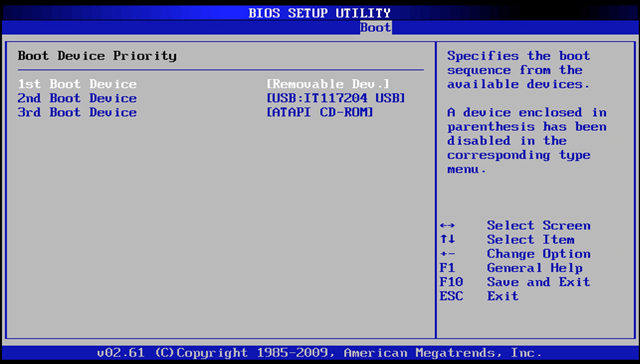
Step 2: Next, get your recovery USB flash drive connected to the locked PC and reboot it. You need to hit the "F12" key to enter the "Boot Menu" followed by selecting the USB drive.
Step 3: You'll now get to witness that PassFab 4Winkey is running on your screen. Make selection of the preferred Windows which has your locked user account.
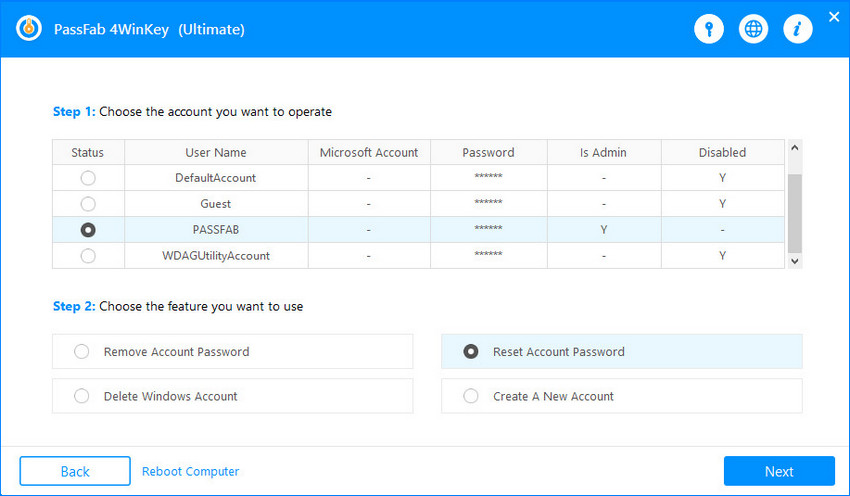
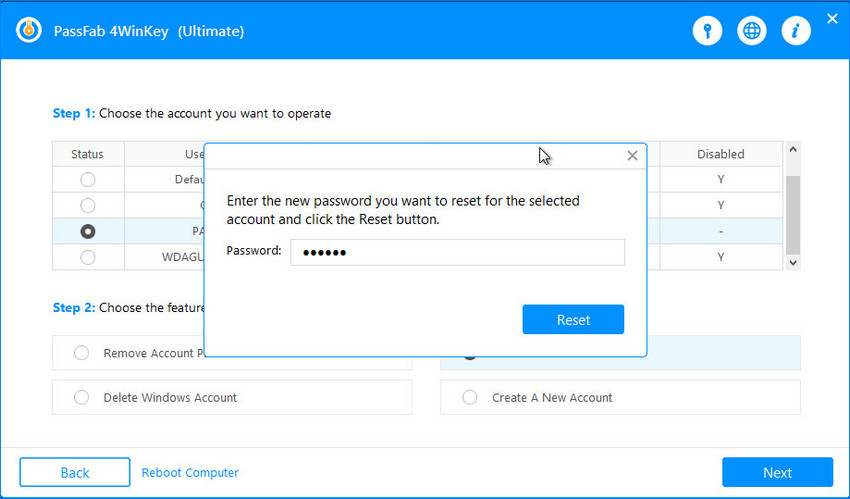
Step 4: Lastly, opt for the preferred user account for which you wish to reset the password. Now, type in the new password for the selected user account in the respective "Textbox area" available at the bottom of the window. Hit "Next" afterwards.
Conclusion
From the above article, we have learnt how to share files and printers through Windows 10 network sharing. You can use them to get the benefits. On the other hand, if you ever lose access to your Windows computer by forgetting the password, you now very well know that having PassFab 4WinKey at hand will easily sort your issue and get your computer unlocked.