There are certain occasions when you need to know how to create a local account in Windows 10. Microsoft always prefers to log into your computer using a Microsoft Account. It gives you the benefit of syncing your settings through multiple devices. However, some users prefer not to take this advantage; instead, they opt for a local offline account's more protected and private experience. Go through this article, you will know everything about Windows 10 create local account.
- Part 1: How to Create a Local Account in Windows 10 When You Are Signed-in
- Part 2: How to Create a Local Account in Windows 10 When You Are Locked Out
- Extra Tips: Forgot Windows 10 Administrator Password How to Do?
Part 1: How to Create a Local Account in Windows 10 When You Are Signed-in
If you don't wish to share your private information with Microsoft and you are wondering, "How to create a local account on windows 10 without a Microsoft account?" you've come to the right place. This article illustrates seven ways you can use to create a non-Microsoft or a local user account in your Windows 10:
- 1. Create a Local Account from Settings
- 2. Switch to a Local Account in Settings
- 3. Create a Local Account in Windows 10 with Netplwiz
- 4. Create a Local Account in Windows 10 Using Computer Management
- 5. Create a local account in Windows 10 with Command Prompt or PowerShell
1. Create a Local Account from Settings
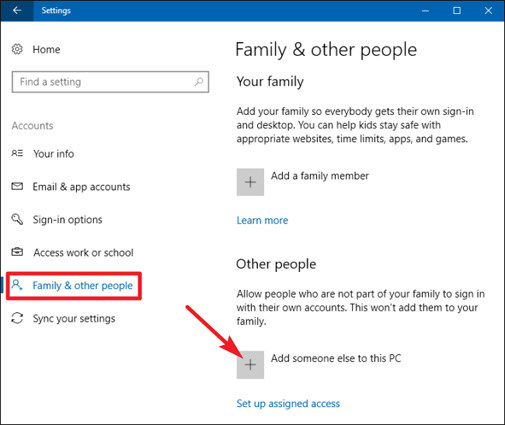
One of the easiest ways to create local account Windows 10 is with the Settings. For this, you need to follow these steps:
On the left column, click or tap on the tab with the name “Family & other users." Select the options sating to “Add someone else to this PC”.

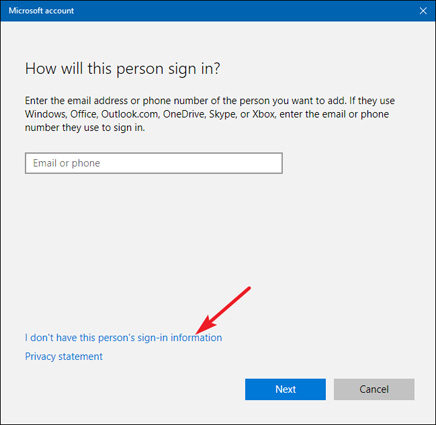
You’ll see the Microsoft account wizard open. It will ask you for an email or phone number of a Microsoft account. Select I don’t have this person’s sign-in information to proceed.

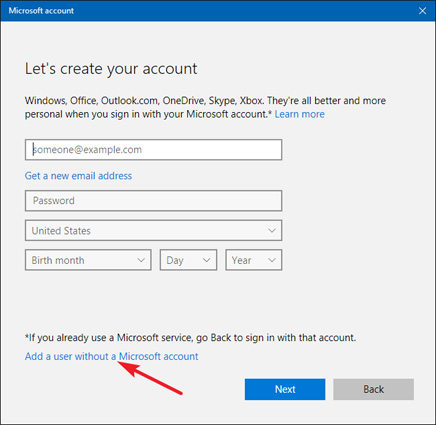
Microsoft will then urge you to create an account. You need to tap on the "Add a user without a Microsoft account" link and press 'Next.'

- The next step is to enter your preferred User name below, "Who's going to use this PC?" Add a password to authenticate your account and make it secure.
- The instant you start to set a password, you come across six additional fields at the bottom of your screen, in the section named "In case you forget your password." Pick three security questions from the list and choose an answer for each. Once finished, press Next.
- Your local account is generated, and you are reverted to the Settings app, where it is displayed under "Other users."
2. Switch to a Local Account in Settings
If you are already signed in with a Microsoft account, but you wish to maintain your privacy and stop sharing your information with the company, you can switch to a local account. For this, you need to take these steps:
- Go to the settings, or you can press Win+ I. From the accessible options, click on Accounts.
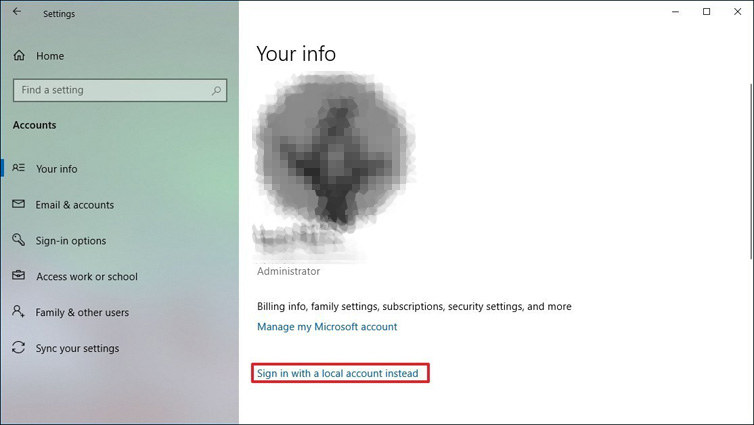
“Your info” tab will open. On the right side of the page, you’ll see an option saying Sign in with a local account instead. Click on it.

- Microsoft will show you the benefits of a Microsoft account. Tap on Next to continue.
- Authenticate your identity by providing the PIN or password for your account.
- Pick a new User name, set a password, and insert your Password hint. Once you are done, press Next.
- Click on the sign-out and finish, and you're ready to log in with your new credentials.
3. Create a Local Account in Windows 10 with Netplwiz
Another way you can create a local account Windows 10 is by using the netplwiz app. To begin,
- Open the Run window by pressing Win + R and insert “netplwiz." Then, tap on OK or press Enter.
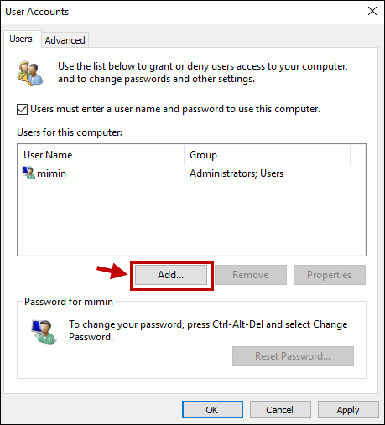
In the Users tab, ensure the option “Users must enter a user name and password to use this computer” is checked. Tap on Add.

- Choose “Sign in without a Microsoft account.”
- Click on next and set a new User name and password.
- Click on Next and press fish to get done.
- You will see the Accounts window, where your new user name is displayed among the “Users for this computer.”
4. Create a Local Account in Windows 10 Using Computer Management
If you are using Windows 10 Pro on PC, you can make use of the Computer Management tool to create a window 10 local account. For this,
- Type computer management in the searching bar and open it.
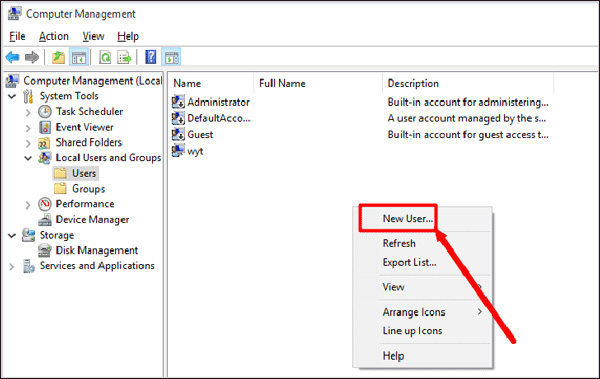
- Select “Local Users and Groups” after going to Computer Management.
Right-click on the folder named Users, and tap on New User.

- You’ll see the New User window. Set your username and password.
- Click on create and close the window.
- If you open the Users folder in Computer Management, your new account is displayed inside.
5. Create a local account in Windows 10 with Command Prompt or PowerShell
If you prefer to use command-line interpreters, you can use both the Command Prompt and PowerShell to add a local account to Windows 10. Both apps have identical steps.
- Search “cmd” in your taskbar and click on the “Run as administrator” option.
- Press confirm once the UAC window that pops up. It will launch the Command Prompt.
- This is the command you need to enter: “net user NAME PASS /add” – replace NAME with your new username and PASS with your new password.
- You will receive the message "The command completed successfully," and you can see the new user among the other accounts that exist on your device.
Part 2: How to Create a Local Account in Windows 10 When You Are Locked Out
If you are locked out of your Windows 10 because you forgot your Windows password, you can always create a New Administrator on Windows 10 without Logging in via PassFab 4WinKey. Here is what you need to do:
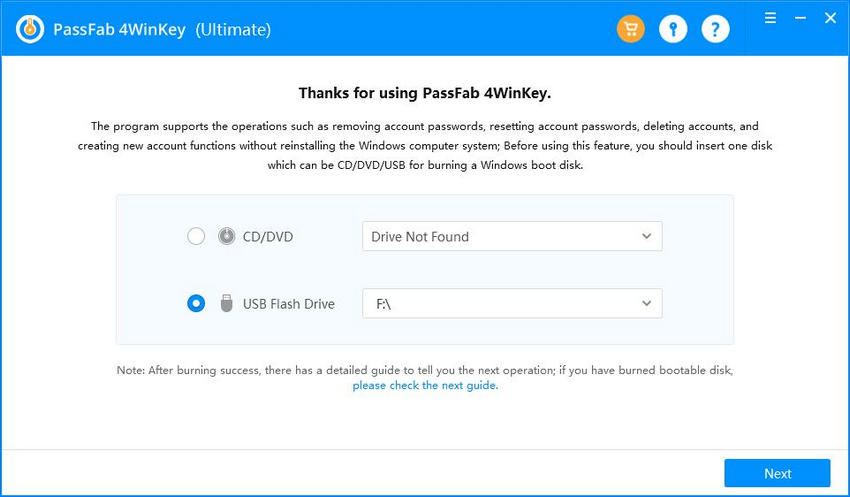
Download PassFab 4WinKey on any other PC. Insert a CD/DVD or a USB drive to generate a bootable drive. Select USB in PassFab 4winkey.

- Hit the Next button to initiate the burning process. Don’t forget to transfer data from the USB drive because it will be lost during the process. Burn USB in PassFab 4winkey.
- Please take out the removable disk and insert it into your locked device. Press F12 or another key to enter boot options, choose boot from your USB.
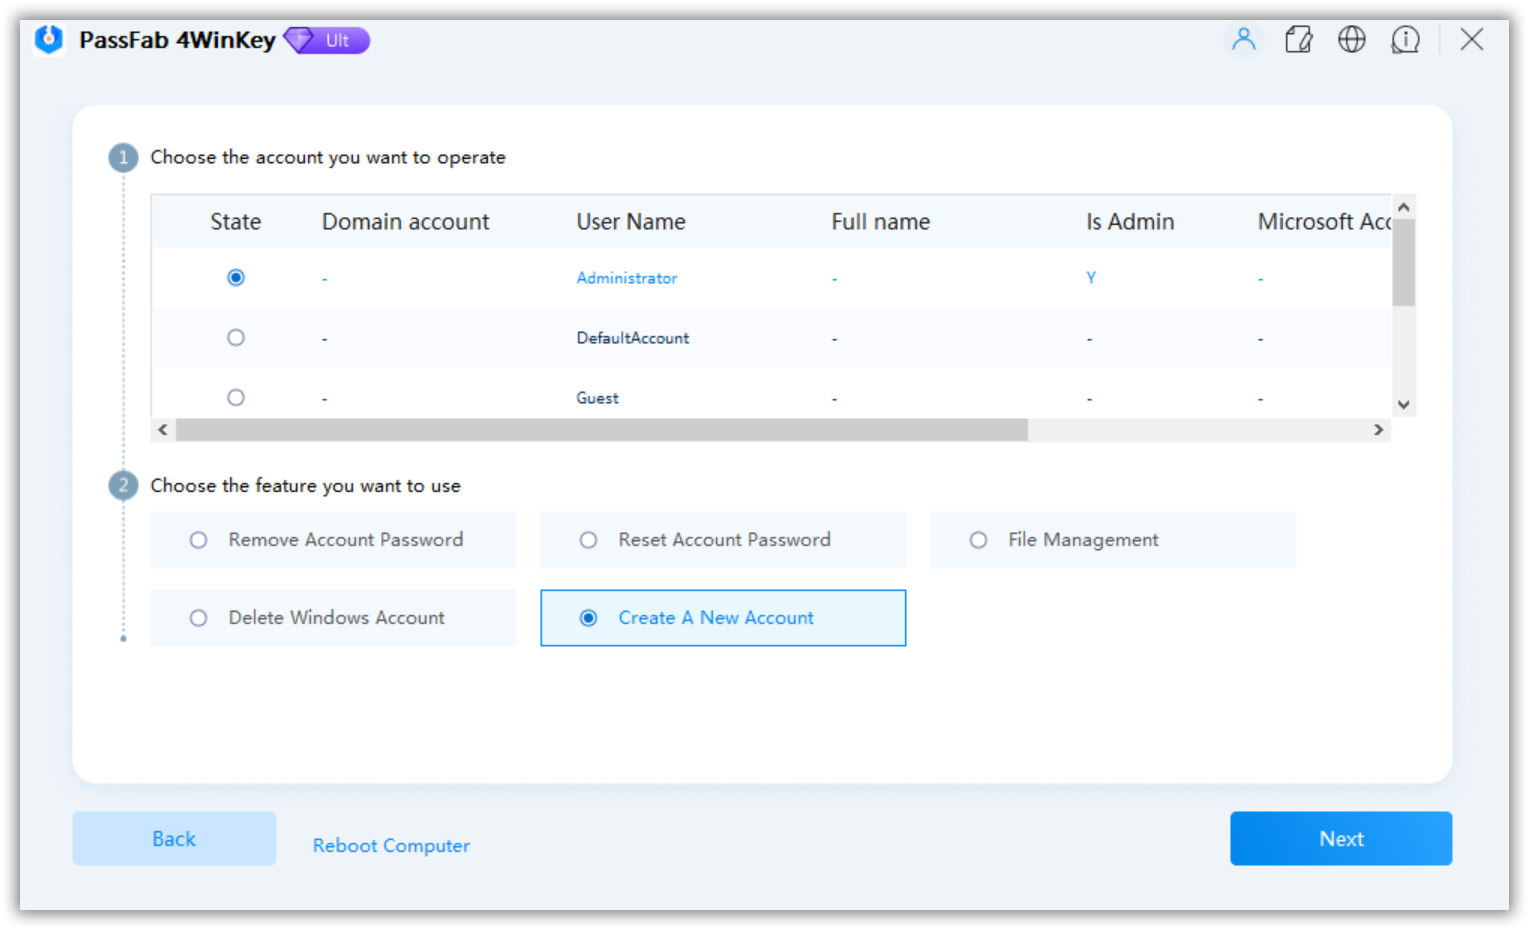
You’ll see a popup window on your Windows 10 screen. Choose the operating system and tap on Next. Choose windows version in PassFab 4winkey. Afterward, select the Create A New Account option and hit. Select administrator account in PassFab 4winkey.

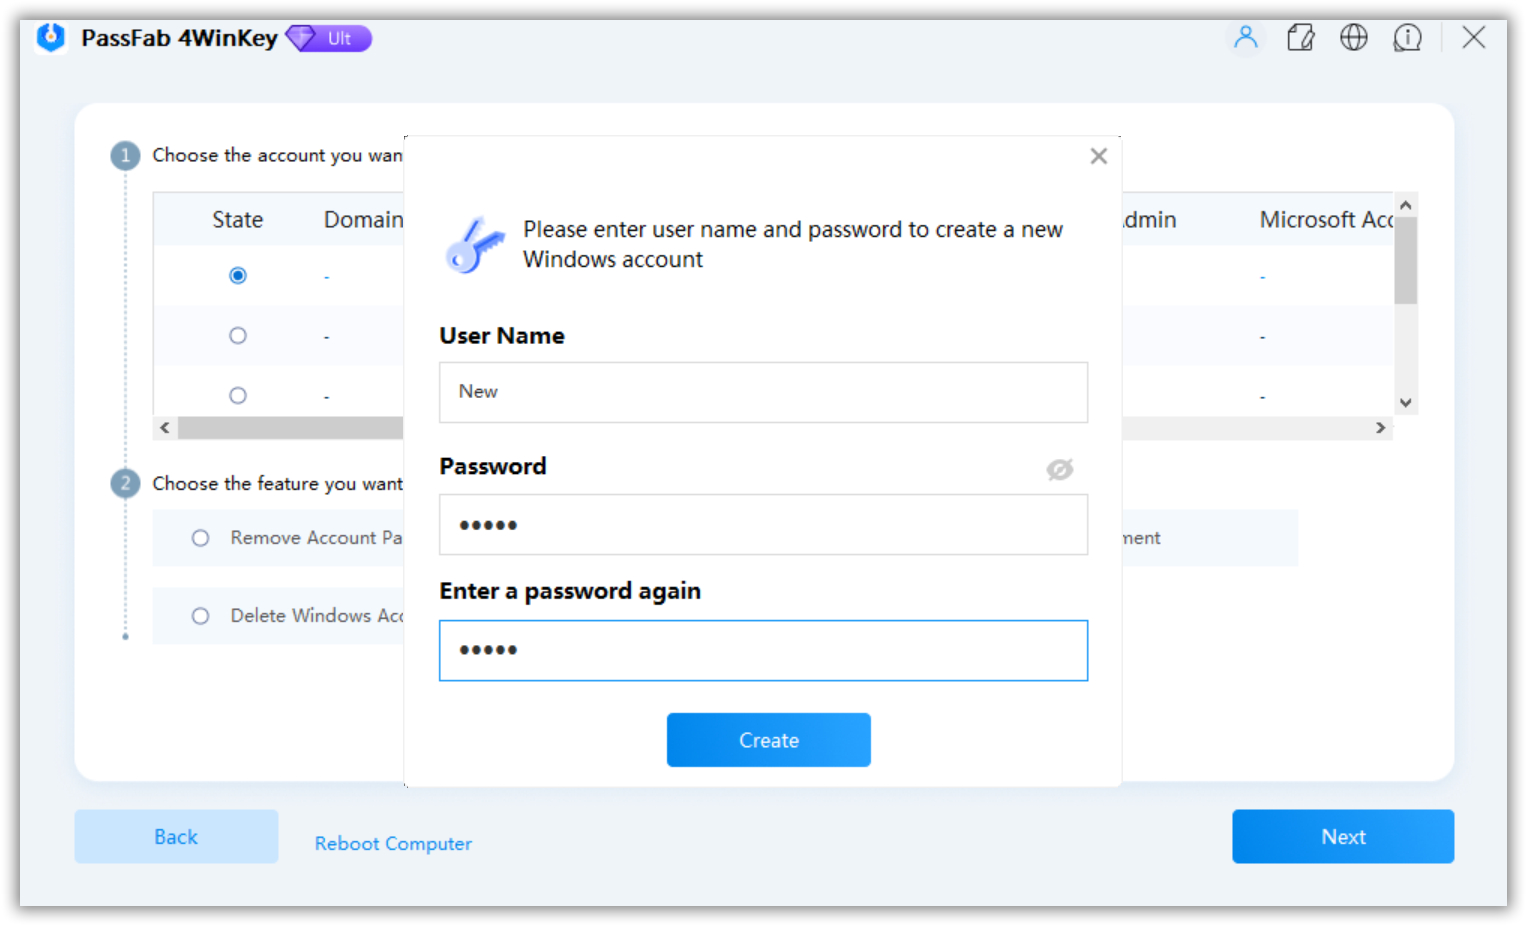
Set the new username and password and click on "Create." Generate user name and password in PassFab 4winkey.

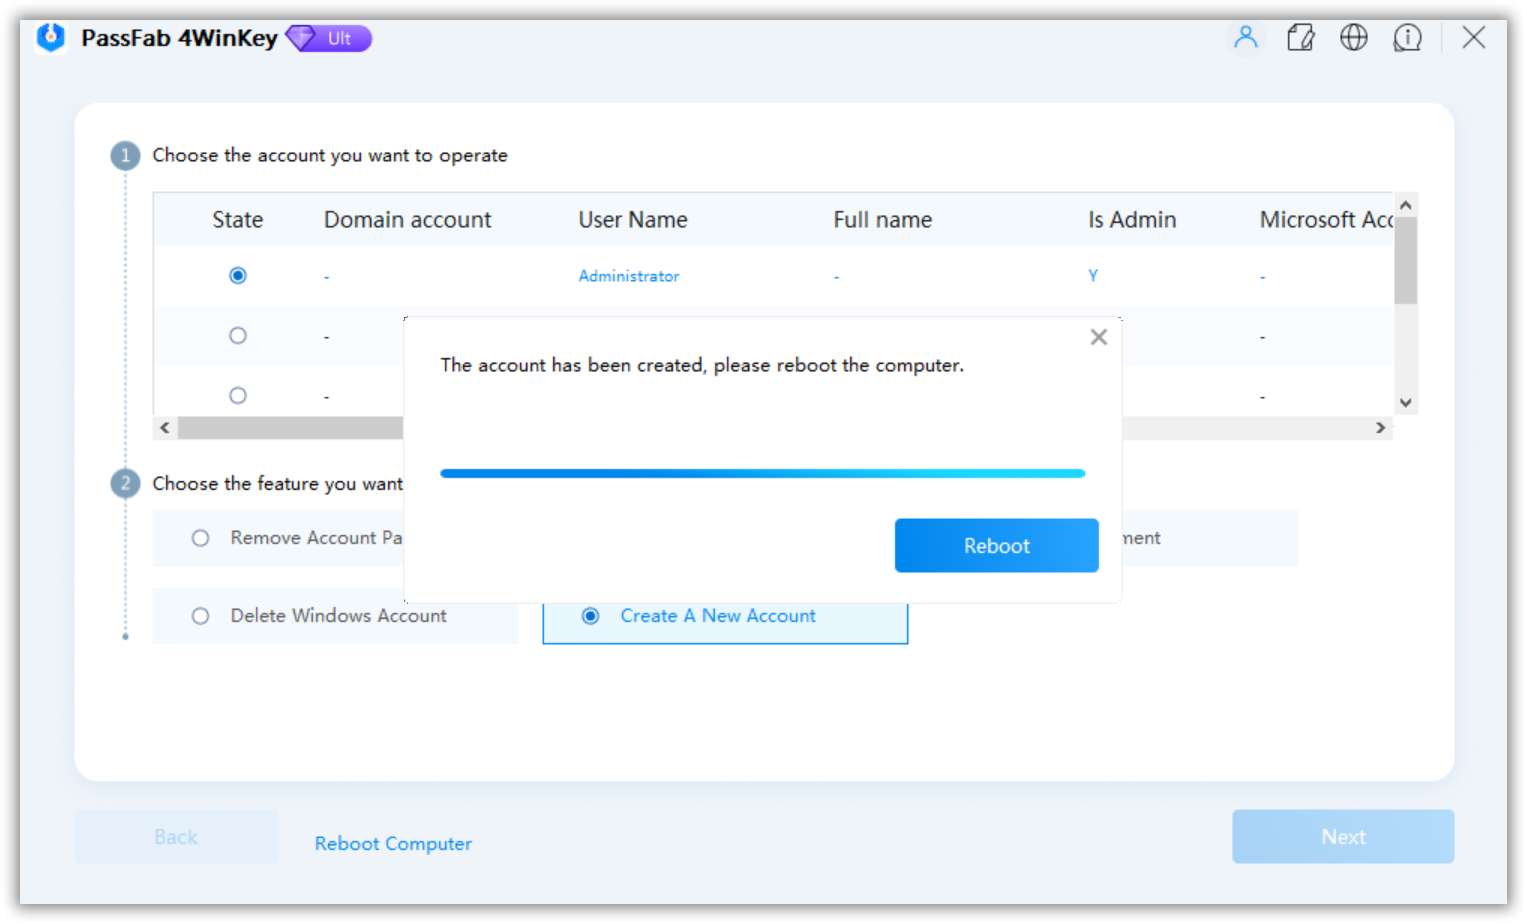
Once it is done, the tool will need you to restart your computer. Tap on the "Reboot" button. The PC will restart. Then you can sign in to your Windows 10 with the new administrator account.

The PassFab 4WinKey does not only allow you to create a new account, but you can also reset or remove Windows 10 Administrator password, reset your Microsoft password, and remove any user account using this tool.
Part 3: How to Create a Local Account in Windows 10 While Setting Up
You have the option of creating a non-Microsoft account while installing Windows 10. During the installation process, when you’re asked to choose the account you prefer to use, select the Offline account option.
However, you cannot always find the Offline account option while installing Windows 10. To avoid being compelled to create a Microsoft account, do not connect your computer to the internet before the Windows 10 installation process completes. This makes sure you complete the installation using a local store.
Final Words
Using a local account, you can perform any task on your PC while keeping your settings and files secure and private. Now you have seven ways on Windows 10 create local account. Use whatever way you find feasible for you. However, we recommend PassFab 4WinKey. It saves you from the technical difficulties you may come across using other ways.
