Before you disable secure boot on Windows 10. Let's learn what secure boot is? Secure boot with UEFI, has been introduced to protect your Windows system against malicious software applications as well as unauthorized OS loading during start up. It also enables bootloaders, OSes, utilities and UEFI drivers to work in sync with UEFI. Once, secure boot is enabled, software or firmware having 'signed approved keys' are only allowed for execution. Secure boot also prevents rootkits and malware attacks to load on the system by blocking them.
Part 1. How to Disable Secure Boot on Windows 10
If you wish to run some hardware, PC graphics cards, operating systems like Linux or older Windows versions. Along with that, starting up Windows from Windows password recovery tools is also restricted. Then, you might need to disable secure boot on Windows 10.
Let's check out the process to disable secure boot on Windows 10. We must tell you that Windows 8/8.1/10 all have UEFI instead of a BIOS. And, this disabling of secure boot on Windows 10 process is same for them as well. This UEFI allows you to make use of the secure boot feature on your Windows computer.Step 1:Access UEFI setup in Windows 10
There are four methods to enter UEFI settings, i.e. PC settings, hot key, command prompt, and Shift/Restart. Here, we will follow the last method:
- Tap on "Power" icon over the login screen. Hit the "Restart" button on the screen, while holding the "Shift" key on your keyboard.
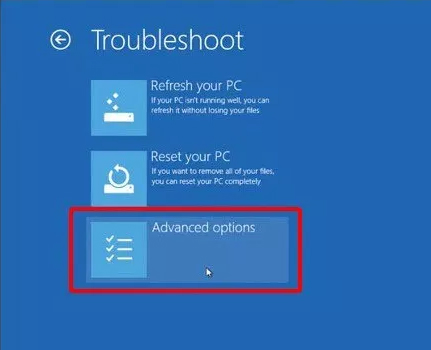
- Now, choose "Troubleshoot" and pick "Advanced Options".
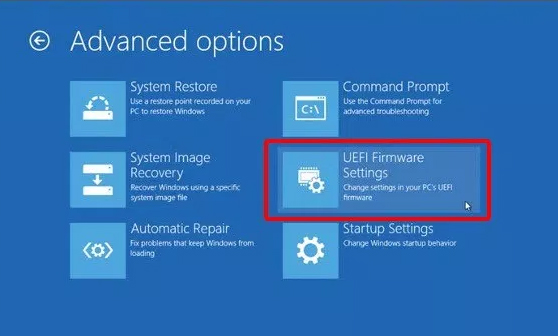
- Next, go to "UEFI Firmware Settings" and then hit on "Restart".

Step 2: Disable secure boot Windows 10 using UEFI firmware settings
- First load the Setup utility screen using the "F12"/"Esc" key and then follow the below mentioned instructions.
- Go to the "Boot" menu by using the arrow keys.
- Choose "Secure Boot" and then the "+" or "-" keys for enabling or disabling the values.
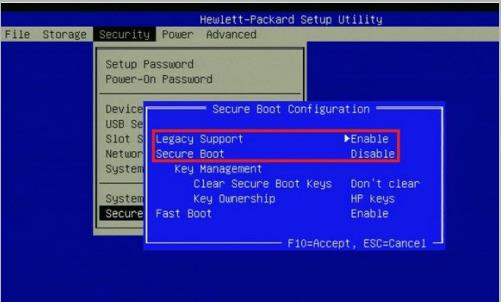
- After using "Up" and "Down" arrow keys to choose "Secure Boot Configuration" click "Enter".
- Hit "F10" after seeing the "Secure Boot Configuration" warning.
- Select "Secure Boot" using the "Up" and "Down" arrows. Disable it using the "Left" or "Right" arrow key. Tap "F10" for saving the changes you made.
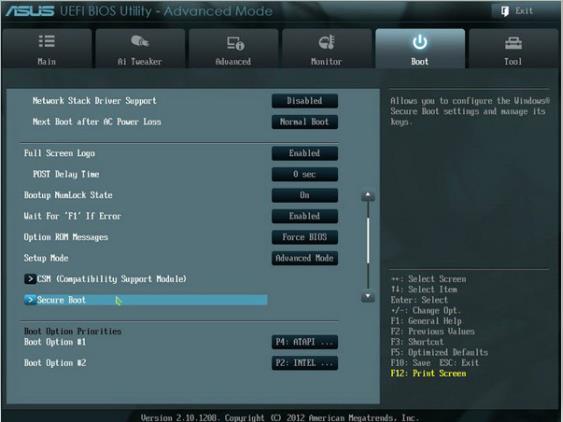
- First of all, highlight the "Boot" tab within the UEFI BIOS setup.
- Now, "Disable" the "Secure Boot" item here.
- Move to "Boot" and then tap "Secure Boot Menu". Press "Key Management" afterwards.
- Hit the "Clear Secure Boot Keys" and then turn the "Secure Boot" to "Disabled".
As secure boot settings vary from brand to brand in computers due to the diverse motherboards they have. You might find it tricky to locate the "Secure Boot" option in their UEFI BIOS. But, commonly that can be located within "Boot", "Security" or "Authentication" menu for changing the value.
If you have an HP computer, you can disable secure boot Windows 10:
If you are a Dell computer owner, disable secure boot on Windows 10:
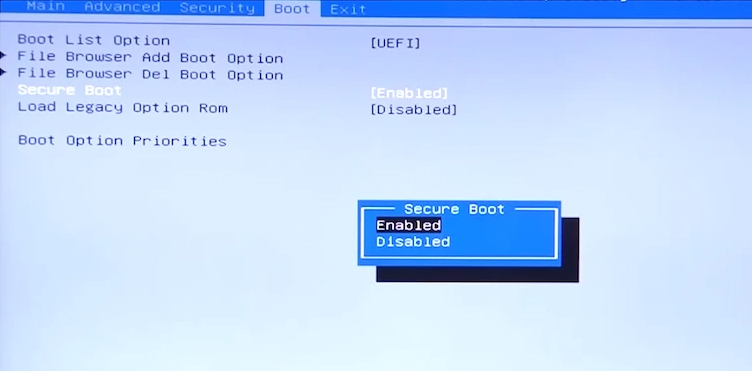
If you have an Asus system, disable secure boot on Windows 10:
What Should You Notice After Disable Secure Boot
When it comes to Windows computer protection, you have a wide range of security options. Disabling secure boot on Windows 10 means, you are making your computer vulnerable to virus attacks and unauthorized software installations. So, you got to take care of your system to maintain security. You can set login password as well as Administrator password for preventing external attacks. Moreover, downloading third-party software can also come in handy to prevent virus or Trojan attacks from the internet.
Conclusion
Frankly, disable secure boot has both advantages and disadvantages. All you should do is make sure you can enjoy the advantages and avoid the disadvantages. If you are worrying about password too much to remember, I will recommend a Windows password recovery tool which named PassFab 4WinKey. You can use this tool to solve all your Windows password problem, such as reset Windows 7 password ans so on. It supports all Windows version, you can even create bootable disk from Mac.
