Have you, too, faced the issue of RSAT disappearing after updating Windows to version 11? Remote Server Administration Tools (RSAT) is a Windows Operating system toolkit that allows IT, administrators, to manage server roles and functionalities from a desktop operating system. It is a useful package with all the management tools you need for your system. However, many users lose their RSAT package upon installing a new Windows version. With a new OS update, the RSAT sometimes gets removed from your device. The issue has been communicated to Microsoft, but there isn't any solution yet. Nonetheless, you can install it again either through settings or Powershell.
This article includes everything you need to know about RSAT Windows 11 20h2. It explains how RSAT works on Windows Server and its special features. You will also find two ways to install RSAT tools and a method to reset your Windows Server password if you forget it.
Part 1: What is RSAT?
Remote Server Administration Tools (RSAT) is a set of tools for administering Windows systems. You will not find RSAT installed on your system by default. It is available on Windows Professional or Enterprise editions that you can remotely control. IT administrators use RSAT to manage system features, roles, and role services. RSAT lets you administer Windows Servers from a PC running Windows 10 or Windows 7 SP1 from a Windows client device.
The software comprises the Best Practices Analyzer and tools for cluster-aware updating, Group Policy administration, and Hyper-V management. It supports Windows 7 to Windows 11, Windows Server 2008, Server 2008 R2, and Windows Server 2012. The new Windows 10 and Windows 11 update the RSAT feature is now included as a set of "Features on Demand" Windows.
Part 2: What is Windows Server, and how is it different from Windows?
What is Windows Server?
Windows Server is a set of operating systems developed by Microsoft primarily for usage on servers. Servers are supercomputers meant to run continuously and supply resources to other systems.
Microsoft launched Windows Server 2003 in April 2003. This was the first time Windows Server was commercially published. However, Windows Servers were available before this too.
IT administrators use Windows Server in the corporate environment. Thus, normal users generally need not be concerned about it. The Windows server is quite different from regular windows, although it might not appear with the first look.
Comparison between Windows Server and Normal Windows:
The interface of both is quite alike. The taskbar, desktop icons, and Start button all have the same layout. Why is it so? Every Windows Server release correlates to a Windows consumer release. For example, the server edition of Windows XP is Windows Server 2003.
The most recent versions are Windows Server 2016, based on the Windows 10 Anniversary Update, and Windows Server 2019, based on Windows 10 version 1809. You can perform several tasks on both Windows Server and Windows consumers as they share a common code base. You can use Notepad on Windows server and install browsing and picture editing apps.
Besides the many similarities, Windows Server incorporates special features that the regular Windows OS version doesn't. There are:
- Being a corporate-friendly, Windows Server comprises numerous enterprise software to assist businesses. These tools include the Active Directory, DHCP, Print Services, File and Storage, Windows Update Services, etc.
- Since the Windows Server has fewer hardware limitations, it can support up to 24TB of RAM. It can also support 64 CPU sockets. The high hardware capacity allows efficient functionality so that the server can handle large employees and users in a corporate environment.
- Windows Server has restricted features and is locked down by default. The security is far more strong than the regular Windows for obvious reasons.
- Another factor among the two is that Windows Server is much more expensive as large corporations utilize it for their system management.
Part 3: How to Install RSAT on Windows 10/11?
There are two ways you can install Remote Server Administration Tools on Windows OS 10/11.
Install RSAT on Windows 11 from Settings
- To install RSAT Windows 11 20h2, follow the steps below and get the toolkit downloaded to your system in no time.
-
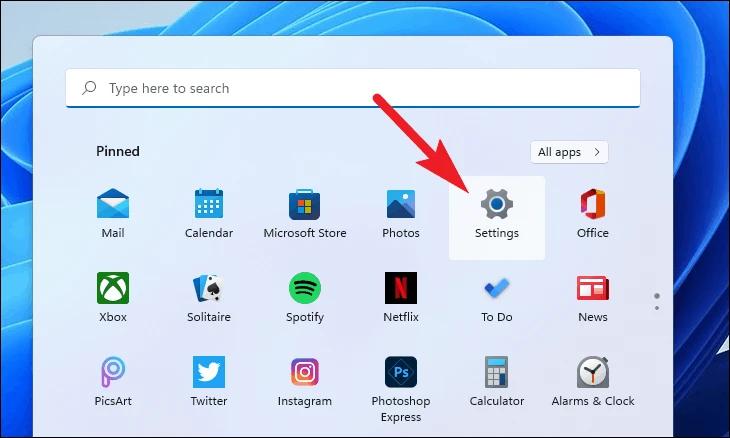
In your Windows 11 system, open the Start Menu search for "settings" to launch the Settings app.

-
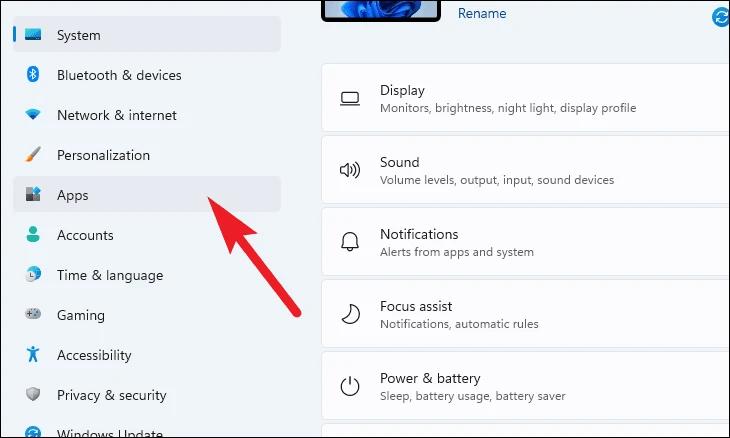
The Settings window will open. On the left, you will find a list of options. Click on the Apps tab. Another list of options will appear on the right side of the Window. From there, select Optional Features.

-
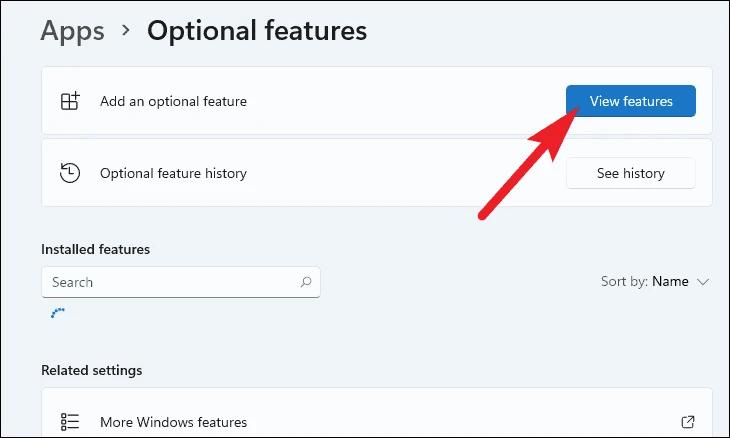
Then, click the 'View features' button to get a list of all optional features on the' Add an optional feature' tile.

-
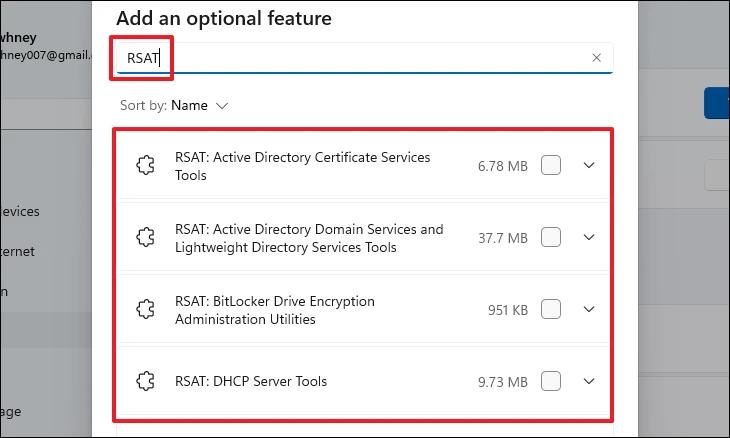
To display all RSAT options, either browse through the alphabetically arranged list or type RSAT into the search box at the top of the overlay window on the screen.

-
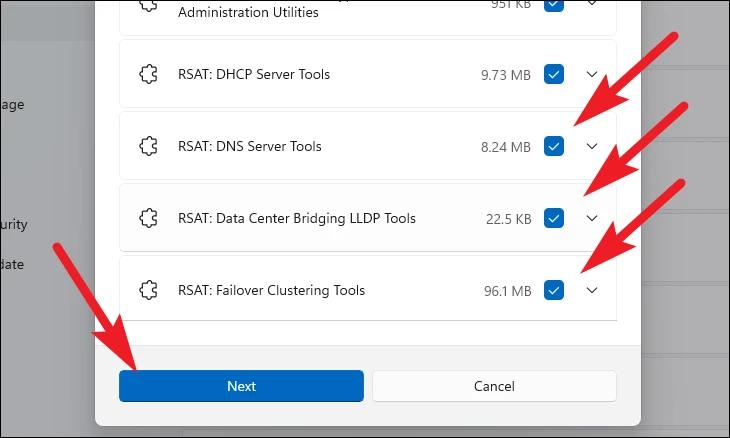
Tap the checkbox along with each option to select it. After choosing all the options, click on Next to continue.

-
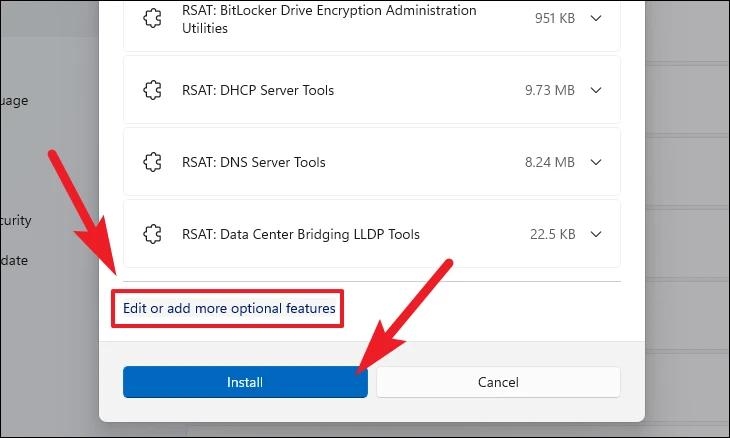
The selected options will be listed below, indicating the components to be installed. You can add or delete the selections through the Edit or Add More Optional Features button at the bottom of the window. After you are sure of your selected options, click on Install to download the tools.

-
Wait patiently till Windows install all of your selected components. You can keep track of the installation process through the Optional Features tab. After the process completes, you are good to go!

Install RSAT on Windows 11 using Powershell
The Powershell command-line tool also lets you install the RSAT tools on Windows 11. You can install all the RSAT tools at once or choose each tool separately with this method.
-
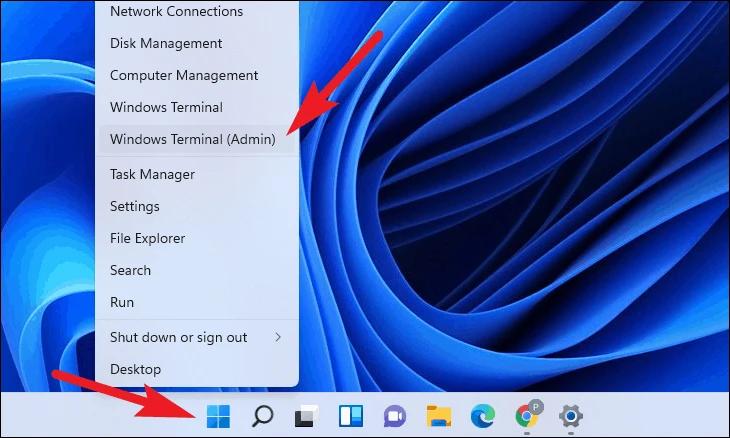
To install RSAT Windows 11 Powershell, right-click on the Start menu on your Windows computer's taskbar. From the popup menu, choose 'Windows Terminal (Admin).'

-
It will direct you to The UAC (User Account Control) overlay screen. Enter the credentials for an admin account if you don't already have one. Otherwise, select the 'Yes' option from the popup.

-
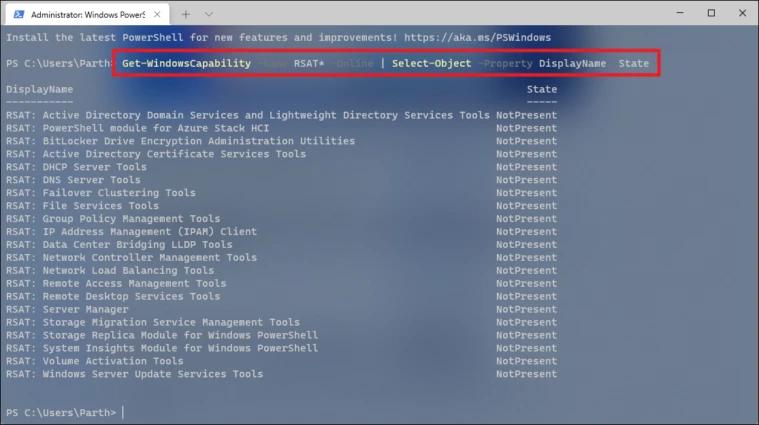
To verify the RSAT tools available for your computer along with their present status, use the following command and click 'Enter.' You can either type or copy/paste the command:
Get-WindowsCapability -Name RSAT* -Online | Select-Object -Property DisplayName, State
-
This command helps you discover the RSAT commands you can install on Windows.

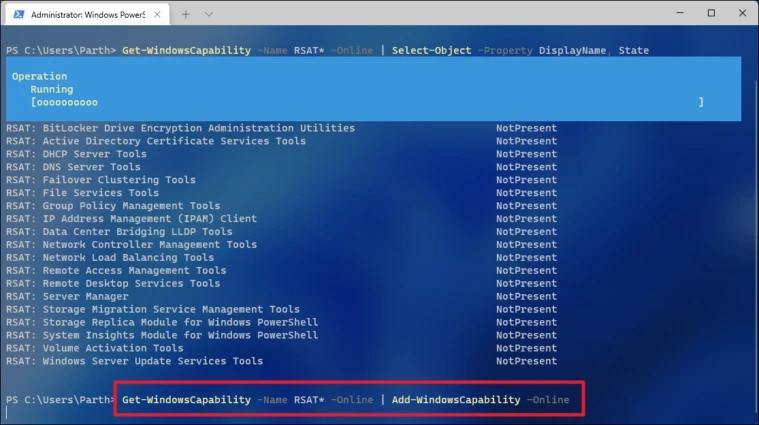
To install all RSAT tools at once, follow the steps below:
You can use the following command and download all the RSAT tools available in one go. Type in or copy/paste the following command into the elevated PowerShell window and click 'Enter' on your keyboard to run it.
Get-WindowsCapability -Name RSAT* -Online | Add-WindowsCapability -Online
Part 4: How to reset Windows Server Password using PassFab 4Winkey?
If you have forgotten your Windows Server password, you won't be able to log into your device; however, you can remove or reset your account password to access your device again. PassFab 4WinKey is the ultimate software to reset, remove or delete local admin or guest passwords domain passwords, delete accounts or unlock locked devices. This software guarantees to provide a solution to unlock your device using a CD, DVD, or a USB Flash Drive in a few easy steps.
The Ultimate Version of PassFab 4WinKey includes the following features.
- Reset the Windows local admin, guest, or domain passwords, as well as the Microsoft password.
- Remove Windows administrator or guest passwords and local and domain passwords.
- Delete all Windows accounts except the local built-in account and the Microsoft account.
- Create a domain account or a Windows administrator account.
-
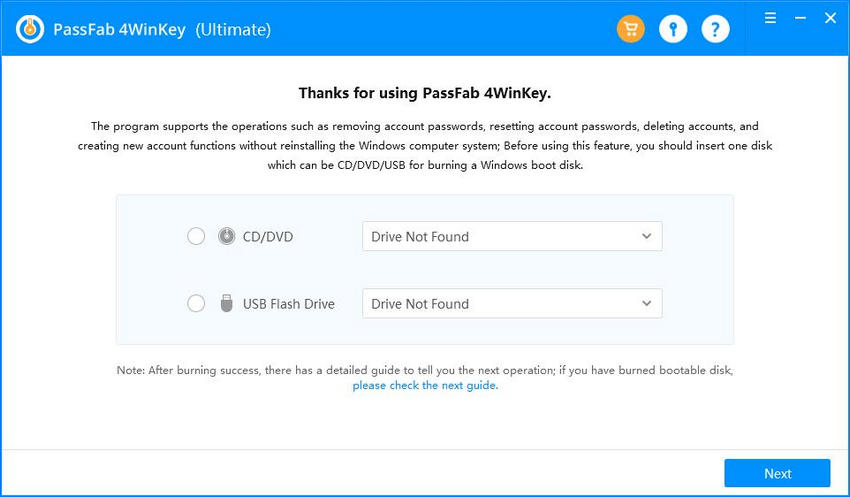
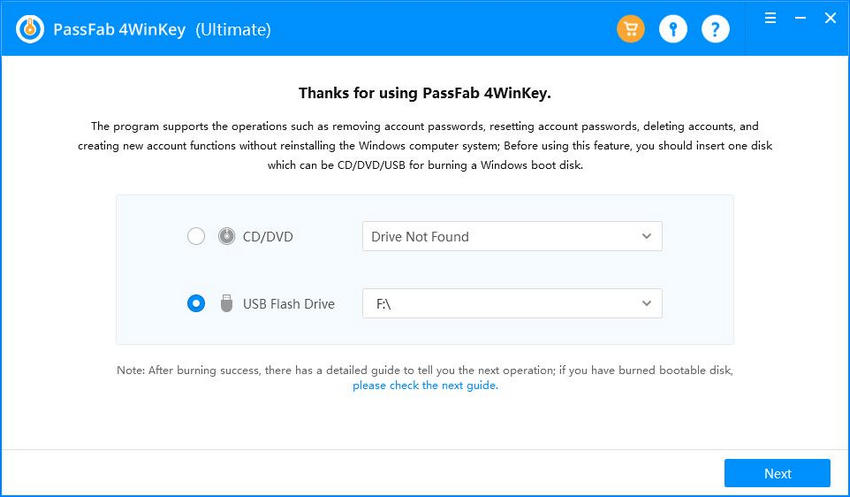
Use another device to install PassFab 4Winkey. Launch the software and select a boot media from the interface, i.e., USB Flash drive or CD/DVD.

-
After selecting, click on Next. 4WinKey will begin the process of creating a bootable disc on your USB/CD/DVD drive. Wait for a few minutes till the software burns your bootable disk successfully.

- Now you need to follow the instructions displayed on the screen to make the USB able to unlock your locked Windows.
- After you are done, insert the USB into your locked Windows device. Restart the computer and tap "F12" or "ESC" on your keyboard to enter the Boot menu.
- Select the inserted disk using arrow keys; then press "F10" to save and exit. As soon as you exit the BIOS settings, your device will restart again.
-
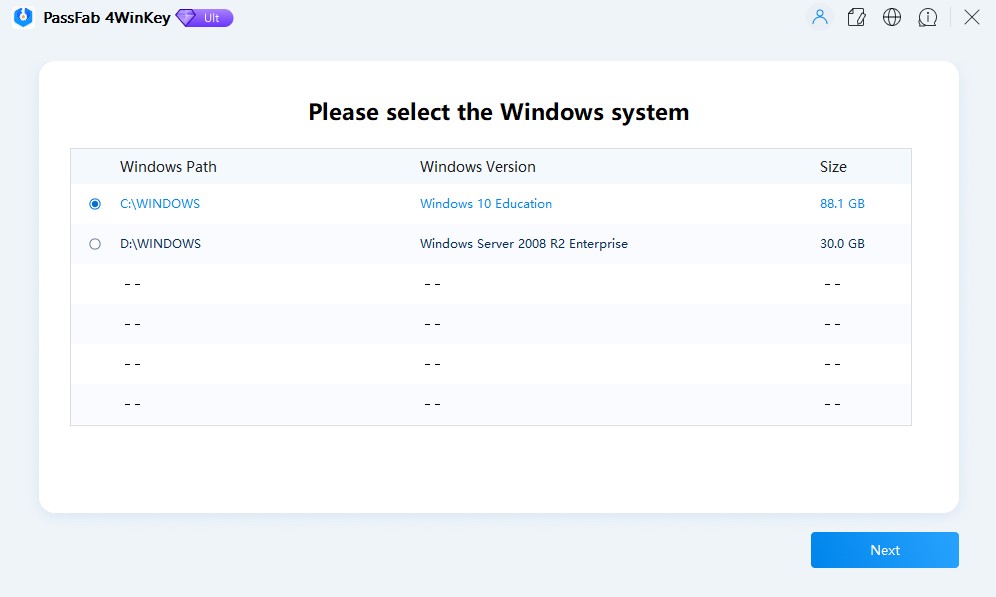
On the interface, you will be asked to select your Windows. Choose your Windows Server version and click on Next.

-
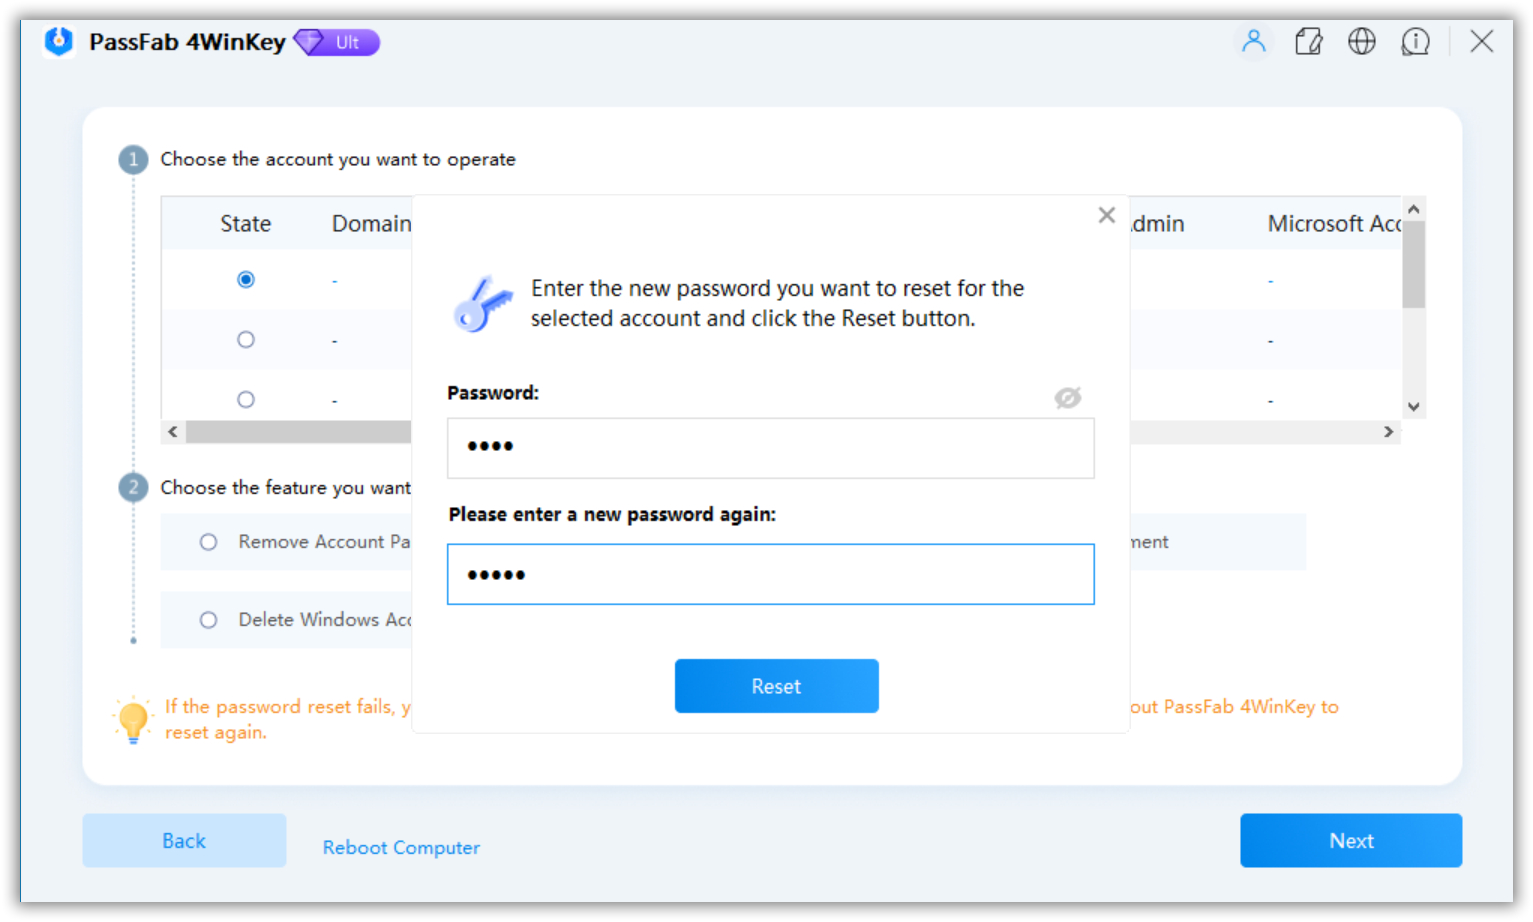
Select the locked account and choose the "Reset Account Password" feature to reset your account password. Now you can enter the new password and click on Next.

-
Once the loading completes, click on Reset.

Your device will restart automatically. Now, you can log into your Windows Server Account with the new password and access your device!
Final Notes
The RSAT is a useful tool for larger corporations and organizations handling hundreds of user systems at a time. The RSAT tools allow efficient management and administration of computers through Windows Server mode. The Windows Enterprise edition is especially used in business settings to assist IT tasks.
Many users have lost their RSAT tools after installing the new Windows update. Although there is no reason why this happens, you can download these tools on the latest Windows again. In this article, you discovered how to Install RSAT tools on Windows 11. Using the Settings or Powershell method, you can install all RSAT tools at once or download them individually.
The PassFab 4WinKey is a popular software for unlocking devices by removing or resetting passwords. You can easily reset your Windows Server Password using the bootable disk method discussed above.
We hope this article answers your queries regarding RSAT Windows 11 20h2!
