Windows is not a perfect Operating system, namely terms of stability. Even MacOS is not a perfectly stable OS. Every OS has its set of flows. The majority of the users don't even notice the flows, but there could be a situation where you have come across some issue that can't be fixed using task manager or UI options.
For instance, while updating windows, if your system crashes, you can't reboot it using the power button. You need to use an external drive that is capable of troubleshooting the issue and revert the system to its normal state.
In this guide, we will learn about two such external options that could save your machine and its data. Meantime, I will brief you about different ways of how to make a windows 10 recovery disk and windows 10 system repair disk.But before that, let have a look at the differences between a recovery disk and a system repair disk:
Part 1: What are Windows Recovery Disk and System Repair Disk
Windows 10 Recovery Disk is a windows 10 recovery Flash drive that allows you to reinstall your windows. There could be situations where you will be facing issues with your windows boot-up or it might be malfunctioning, in such conditions, a Windows recovery disk comes in handy.It is recommended to create windows 10 recovery disk whenever your system receives stable updates. It is because, while reinstalling, you could get a stable windows version, that too latest.
Windows Recovery Disk won’t restore your data, all it does is reinstalling the OS with previous settings. So beware of the fact that data lose will be there if you will use Windows recovery disk.
To create a Windows Recovery Disk, you need the following:
- USB Drive with at least 16 GB STORAGE
- Running Windows Machine
Apart from this, another drive is a System Repair disk. Let’s say, you don’t want to reinstall the windows, you just want to repair the faulty elements in the windows. In such conditions, a system repair disk comes handy.
System Repair disk is not a full-fledged OS drive, basically it contains windows recovery tools that allows you to fix all sorts of issues.
If you are going to use a System Repair Disk, your data won't be affected.
Let’s understand it using an example, assume that the framework of windows 10 is damaged and windows is malfunctioning. In such situations, you can either reinstall the OS using Windows Recovery Disk or can simply fix the issues of the framework using a System Repair Disk.A Windows 10 repair drive doesn't require 16 GB. Even a CD will be enough to create Windows 10 system repair disk.It is recommended to always keep a system repair disk handy with you.
To understand the differences between Windows recovery drive and system repair disk, have a look at the table below:
| Windows Recovery Disk | System Repair Disk | |
|---|---|---|
| Reinstall the Windows | Require 16 GB USB Drive | 100% Success Rate |
| Repair the Windows | Require 1 GB USB Drive | In some cases, it might not work. |
Since you are familiar with both options, let’s look at different ways to create a windows recovery disk and a system repair disk.
Part 2: How to create a Windows 10 Recovery Disk
First, let's explore the way to create Windows 10 Recovery Disk. Instead of diving into multiple methods, we will focus on a single yet most effective method to create a recovery disk.
In this complete process, we are not going to use any third-party tool. Instead, we are going to use some of the in-built utility applications.
Follow the steps below to create a recovery disk without any fails:
- Insert a USB Flash Drive with at least 16 GB of Space into the system. Make sure you have nothing important in the flash drive. As it is going to be formatted in between the process.
-
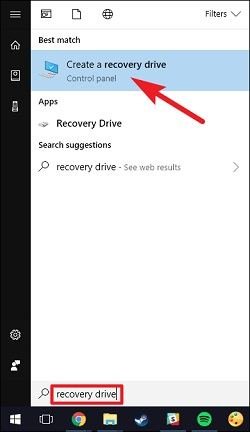
Click on Start Menu and Search for "Recovery Drive".

- Launch the "Create a Recovery Drive” option. A new Recovery Disk window will appear on the screen.
-
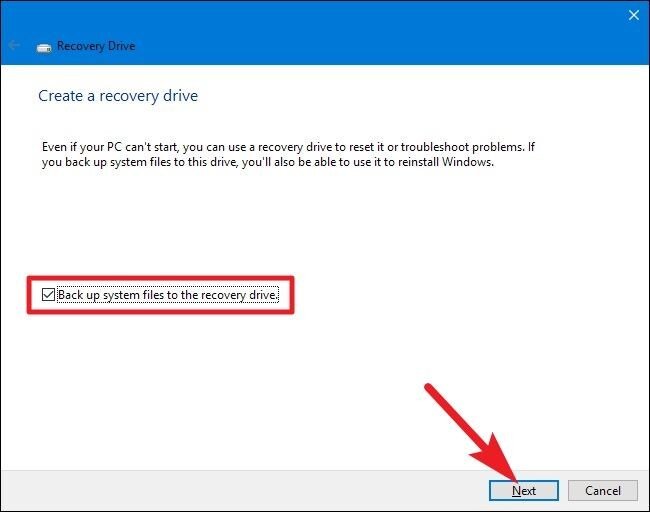
Check the option "Back Up system Files to the recovery drive". Click on "Next".

-
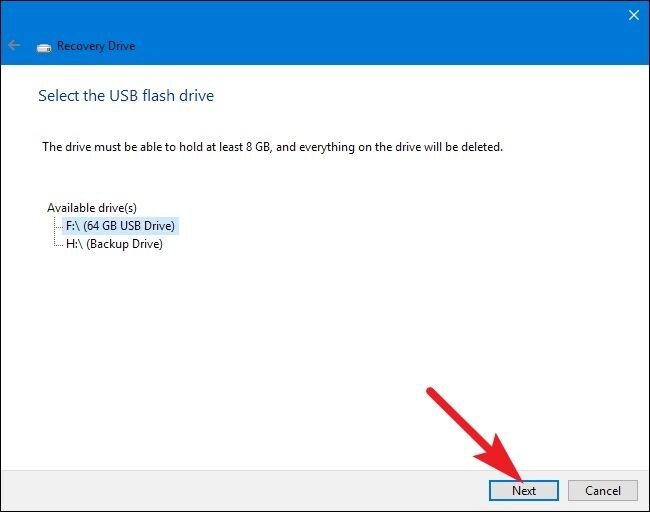
In this step, you will see a list of available drives in which you can create a recovery disk. Be careful while selecting, as all the disk data will be erased. Carefully select the USB drive that you have inserted in Step 1.

- Once you have selected the appropriate drive, click on “Next".
-
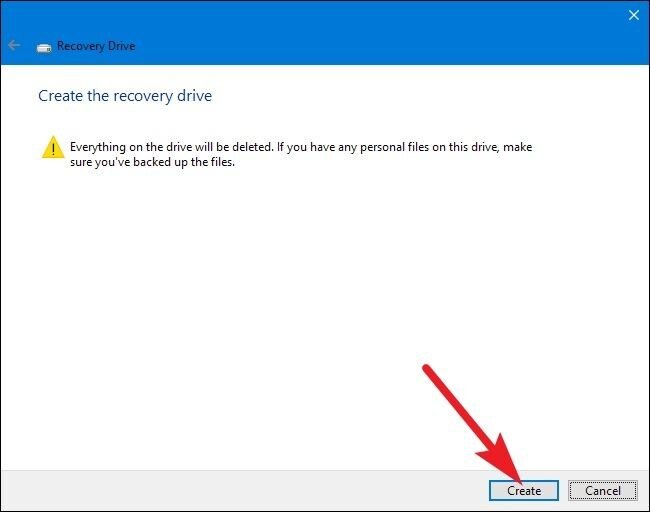
A warning screen will appear. Therefore it will say that all your USB data will be erased therefore, you must take a backup of the data before proceeding further. If you are Okay with data deletion, click on "Create."

-
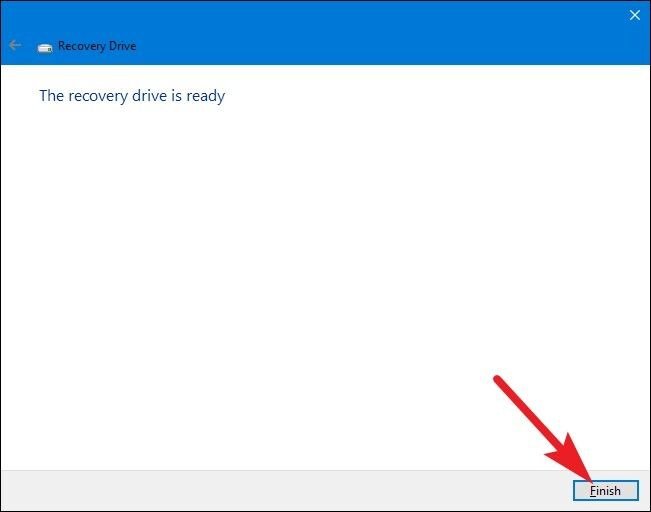
The whole process will take some time, maybe 10-15 minutes. Be relax and don't terminate the process in between. Since we are using the inbuilt Windows application, there are almost no chances of the process getting stuck.

Once the Recovery disk is ready, you can use it whenever your window starts to malfunction and re-install the OS using it. You don't have to worry about downloading an ISO and create a new bootable USB.
Part 3: How to Create Windows 10 System Repair Disk
As mentioned above, if you don't want to reinstall Windows, you can use a system repair disk to repair the malfunctioning elements of the windows.
However, before we proceed, let me tell you that the success rate of the System Repair Disk is not 100%. You might face a situation where the system repair disk is not working. In such situations, you have to use a Windows 10 Recovery Disk.
Follow the steps below to avoid maximum errors throughout the process:
- Click on "Start". Search for "Control Panel".
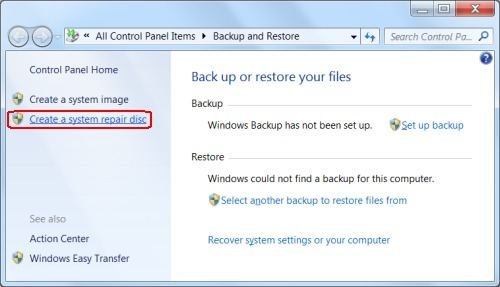
- Launch Control Panel and navigate to the Option "Backup and Restore". Click on it.
-
In the left sidebar of the Backup and Restore option, you will be another option, "Create a System Repair Disc". Don't get confused with "Create a System Image" and "Create a System Repair Disc"; both are very different. You have to select "Create a System Repair Disc".

-
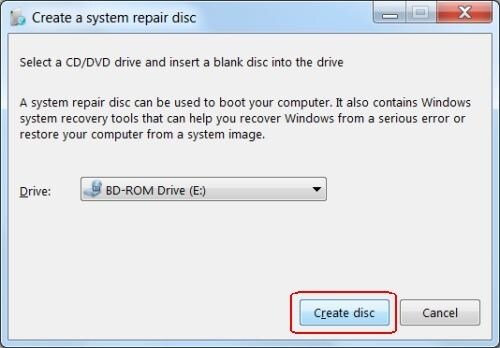
A new wizard will appear; here you have to select the appropriate USB Drive.

Warning:
Make sure you select the correct USB drive, wrong selection could lead to data loss of that particular drive.
-
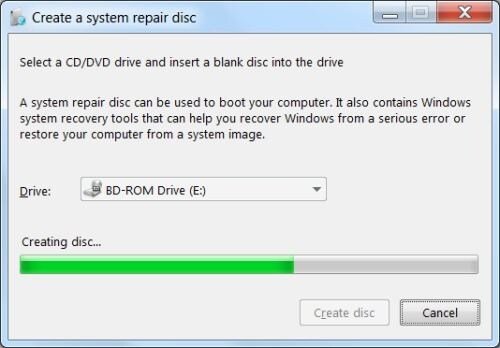
Once the USB drive is selected, click on "Create Disc" and Wait for a few minutes.

Let the process complete. Once it is completed, you will see a dialog about the label of the Drive and use case. Close it, and now you are good to go.
Since you have a System Repair disk, whenever you feel like windows ran into some errors and it is not acting normal, you need to insert the USB and reboot the system. Use the Start-up Keys to navigate to the Repair options and troubleshoot your OS.
As mentioned above, this system repair disk might not help you in all cases; there could be errors that this repair disk can't fix. In such situations, you must use the Windows USB recovery disk.
However, if you face a situation where you can't remember Windows 10 login password and don't want to lose the data, you can go through the next section of the guide. In this section, I will brief you about the simplest way to create a bootable windows 10 password recovery disk.
Part 4: How to Create Bootable Window 10 Password Recovery Disk using PassFab 4WinKey
For this particular process, we are going to use a third party utility tool; it is because PassFab 4WinKey has a 100% success rate and it's very quick.
PassFab 4WinKey is a paid tool. Now, you might be thinking that there will be free alternatives to PassFab 4WinKey but, before you go deep into it, let me tell you that there isn't any excellent free alternative tool for PassFab 4WinKey.
All of the alternatives might give you errors in between the process. Therefore, it is strongly recommended to use PassFab 4WinKey only to have a smooth experience.
Follow the below-mentioned steps:
- Download the “PassFab 4Winkey Utility Tool” and Insert a USB Flash Drive of at least 16 GB Storage.
- Launch the “PassFab 4WinKey” on your PC/Mac.
-
A New window will appear, now select the appropriate USB Flash drive and click on "Next".

-
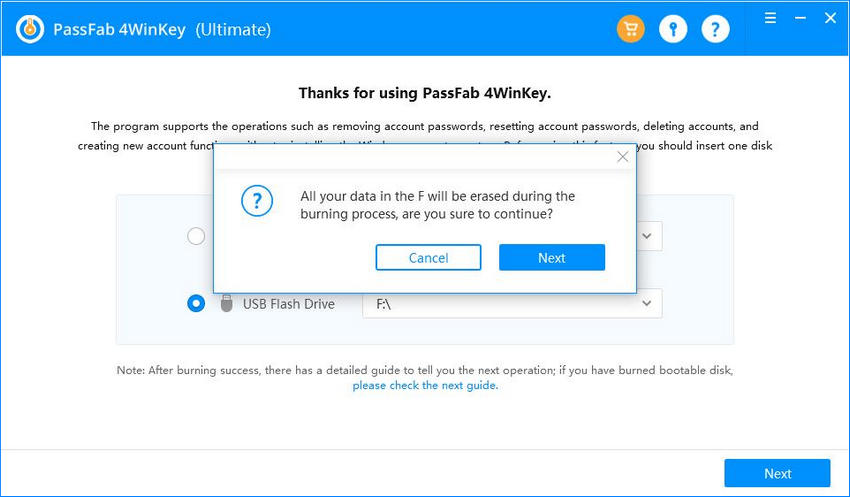
Once you have selected the USB Drive, you will see a popup, asking for your confirmation to format the drive. Click on “Next”.

-
Once the USB is formatted, PasFab 4WinKey will begin to burn your USB Drive.

-
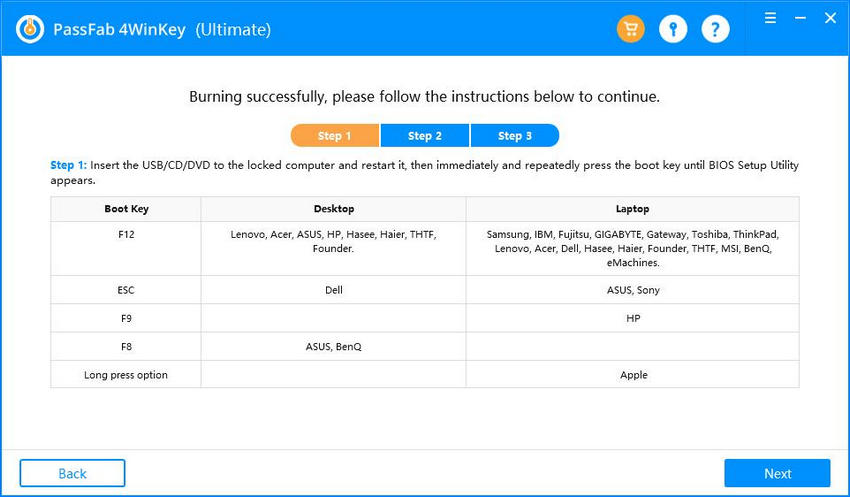
You have to wait for a couple of minutes. Once the burning process completed, you will see burning successfully message on the screen.

That's it, you have successfully created a Bootable Windows 10 password recovery disk.
Part 5: FAQs about Windows System
Q1. When to Create the Windows Recovery Drive or System Repair Drive?
Creating a Windows Recovery Drive is recommended whenever you receive a stable update on windows, and everything is working smoothly. So that in future, if you need to reinstall the windows, you can get a stable version.
Besides that, a System Repair Disk must be created as soon as you get a new version of windows installed on your system.
Q2. Can you create a Windows 10 Recovery Disk from another computer?
Yes, you can create Windows 10 recovery disk or windows 10 system repair disk on another computer, but you need to make sure that both the computers are running on the same Windows version.
Final Notes
If you are using your Windows machine regularly, it won't take much time to create a recovery drive or a system repair drive. However, when your system runs into errors, these two drives will come in to rescue your system.
Though there are options like creating a bootable USB drive to install a fresh version of Windows, that will be time-consuming, and you need to have another machine ready with you. On the other hand, recovery disk and system repair are one-time processes and will be helpful in the long run.
Besides that, you can also have a password recovery disk ready with you so that if you forget your login password or want to bypass Windows password, you will have something to roll back the windows without losing the data.
If you'll ask me, I would strongly suggest you create these three drives on top priority.
