Windows local security authority protection is an essential feature that protects the user credentials and blocks the unsigned drivers and plugins from illegal access. This feature should always be enabled as it keeps your PC safe by verifying user logins and password changes. However, many users have reported problems with this feature even if it is turned on. If you face the same issue, you will find the 5 best solutions to eliminate it in this article. Stay tuned and try out the given ways.
Part 1. What Happens If Local Security Authority Protection Is Off?
Part 2. What if Windows 11 Local Security Authority Protection is Off Even After Restart?
- Method 1: Use the Windows Security App
- Method 2: Use Windows Registry Editor
- Method 3: Use Microsoft PowerShell
- Method 4: Use Local Group Policy Editor
- Method 5: Run SFC and DISM Commands
Part 3: Extra Tips: How to Fix Computer Blue/Black Screen if your PC is Attacked by a Virus?
FAQs
Part 1. What Happens If Local Security Authority Protection Is Off?
Local Security Authority (LSA) in Windows is responsible for authenticating users. If LSA protection is off, it increases the system's vulnerability. This is because third-party authentication packages and software can interact directly with the LSA, potentially leading to unauthorized access or manipulation.
These packages might be legitimate, like certain system tools, but they could also be malicious. A common form of attack is credential dumping, where an attacker can extract (or "dump") credential information from the system. This can lead to unauthorized access to the system and other resources on the network.
Therefore, it is generally recommended to keep LSA protection on to improve the security of your system.
If the Windows 11 Local Security Protection is off, a message will appear on your PC screen stating, "Local Security Authority Protection is off. Your device may be vulnerable."
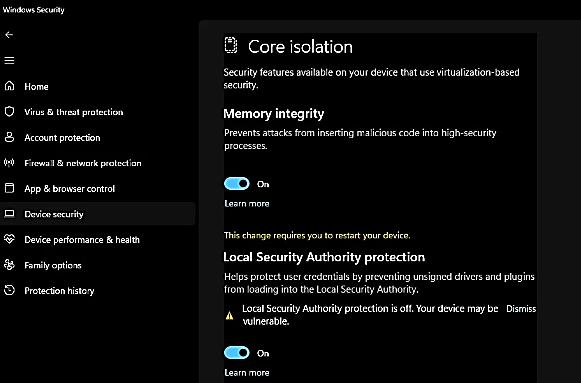
Here are some other potential reasons behind it:
- Faulty Windows Updates—Faulty or corrupt Windows Updates are one of the leading causes of the Windows 11 Local Security Authority protection is off. Many people have reported suffering from it after the last update Moment 2 KB5023706 in Windows 11, since at least January 5th
- Disabled Secure Boot—Turning off the secure boot can reset all UEFI and secure boot configurations resulting in disabled Local Security Authority Protection.
- Windows Policy— Windows might have disabled configurations Local Security Authority protection policy.
Whatever the reason, you must resolve any issues with LSA as soon as possible, as you become vulnerable to several attacks. Restarting the PC might help in such a situation, but what if the issue persists? Find out in the next section!
Part 2. What if Windows 11 Local Security Authority Protection is Off Even After Restart?
Although Microsoft has failed to address the issue, here are some workarounds that you can try if Local Security Authority protection is off even after restart:
Method 1: Use the Windows Security App
Windows Security Application has options using which you can fix the Windows 11 local Security Authority Protection is off error.
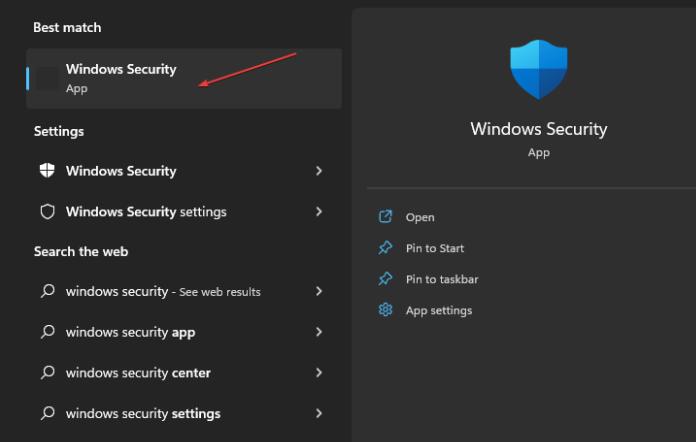
Step 1. Go to the Start menu, type Windows Security, and press Enter.
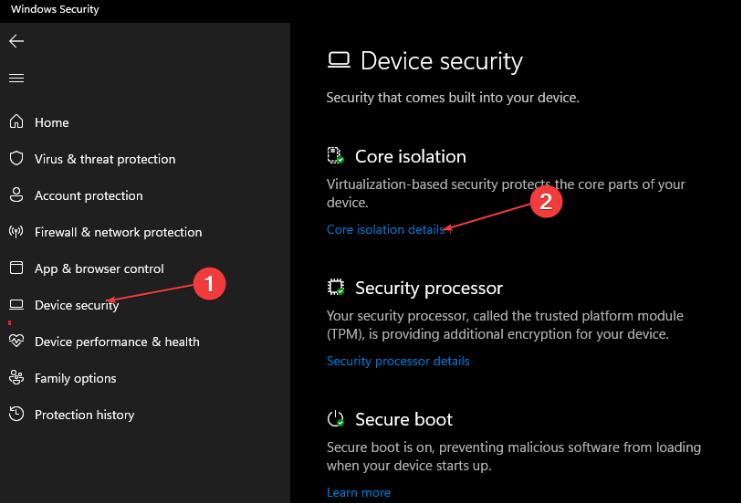
Step 2. Go to Device Security and click Core Isolation details link.
Step 3. Toggle the Local Security Authority protection button to Enable.
Step 4. Apply the changes by restarting the system.
Method 2: Use Windows Registry Editor
The Windows Registry is a collection of information, settings, and options for the software installed on a system. If, for some reason, the parameters in the registry get changed, they cause different issues. So, you can resolve issues with Windows local security authority by making changes in the Windows registry as follows:
Step 1. First, search "regedit" in the search bar and click Registry Editor.
Step 2. Now, navigate to "Computer\HKEY_LOCAL_MACHINE\SYSTEM\CurrentControlSet\Control\Lsa."
Step 3. Double-click RUNAsPPL -> set Value Data to 2 and repeat it for RunAsPPLboot.

Step 4. Click OK to save the changes and restart your PC.
Check if the issue is resolved when the computer starts up.
Method 3: Use Microsoft PowerShell
Microsoft PowerShell is a command-line tool that enables you to perform certain tasks by running commands. You can use it to fix the Local Security Protection is off even after restart issue as follows:
Step 1. Open Windows PowerShell by right-clicking the Start button and selecting Windows PowerShell(Admin).
Step 2. Once the PowerShell is launched, enter the following commands respectively and hit Enter button after each:
- “reg add HKLM\SYSTEM\CurrentControlSet\Control\Lsa /v RunAsPPL /t REG_DWORD /d 2 /f”
- “reg add HKLM\SYSTEM\CurrentControlSet\Control\Lsa /v RunAsPPLBoot /t REG_DWORD /d 2 /f”

Step 3. Now, restart the system and check if the issue is eliminated.
Method 4: Use Local Group Policy Editor
Editing the Local Group Policy can help resolve Windows 11 Local Security Authority protection is off, but only Pro and Enterprise users can access it. It is not available for Home Edition. Here are the steps that you can follow to edit the Local Group Policy:
Step 1. Search "group policy" in the search box and click on Edit Group Policy.
Step 2. Go to Local Computer Policy and then Computer Configuration.
Step 3. Navigate to Administrative Templates -> System -> Local Security Authority.
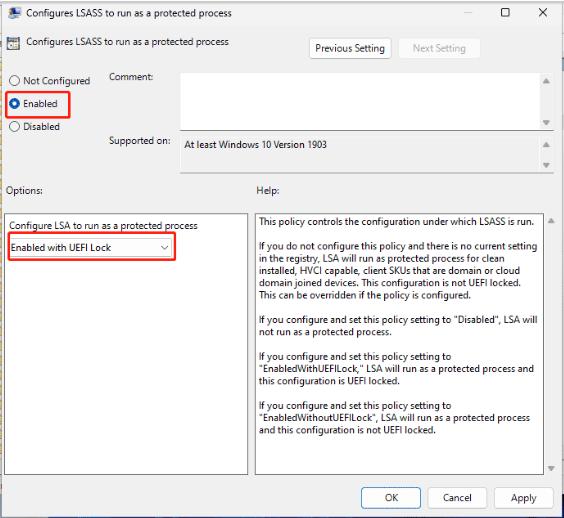
Step 4. Find Configure LSASS to run as a protected process, right-click on it, and choose Edit.
Step 5. Click on Enabled.
Step 6. Choose Enabled with UEFI Lock, then click Apply and Ok.
Method 5: Run SFC and DISM Commands
Local Security Authority Protection is off issue can also be caused by corrupted or damaged system files and Windows image files. Running SFC and DISM commands can help replace faulty files and resolve the problem.
Step 1. Initiate Command Prompt with Administrative privileges.
Step 2. Type sfc /scannow and press Enter to execute it.
Once the SFC scan is completed, run the DISM scan as follows:
Step 3. Type the following commands individually and press Enter to execute them:
- DISM /Online /Cleanup-Image /CheckHealth
- DISM /Online /Cleanup-Image /ScanHealth
- DISM /Online /Cleanup-Image /RestoreHealth
After the DISM scan completes, restart your system and go to settings to ensure the problem is solved.
Part 3: Extra Tips: How to Fix Computer Blue/Black Screen if your PC is Attacked by a Virus?
When Windows 11 Local Security Authority Protection is off, your computer can be attacked by a virus that can cause a blue/black screen on your PC. In such circumstances, many people panic and lose valuable data. If you are facing such a situation, you can mitigate that risk by using the best Windows repair tool, i.e., PassFab FixUWin.
PassFab FixUWin is an all-in-one tool that detects the problem by scanning your system and fixing it automatically. You can use it to fix any Windows problem, such as boot loop, restart loop, stuck Windows updates, and more. Compatible with all modern Windows versions, it helps you create a repair disk for an inaccessible PC. This outstanding tool is especially recommended for those with less experience with computers. Here are the steps to help you to resolve this blue/black screen issue:
Step 1. Install and launch the PassFab FixUWin on any working PC.
Step 2. Insert a prepared CD/DVD disk into the CD-ROM drive or attach a USB flash drive to the computer's USB port. Click on Create boot disk now.
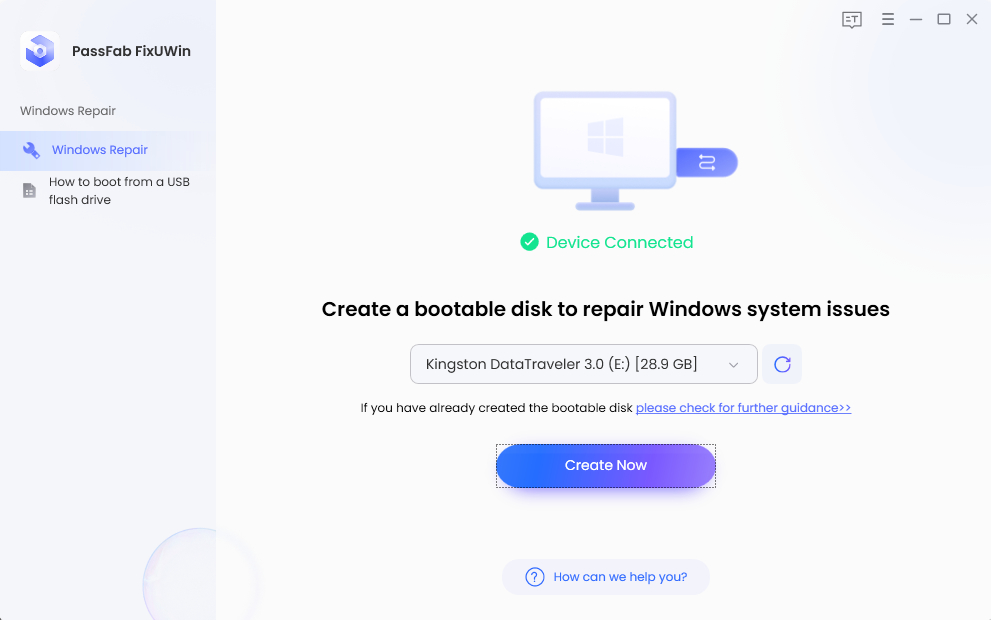
Note:
Do not forget to back up any data stored on your drive, as it will be formatted during the process.
Wait patiently while the bootable drive is being created.
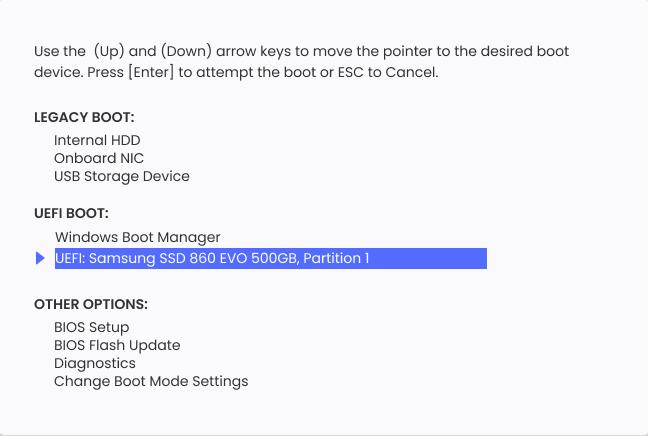
Step 3. Now, switch to the faulty PC, plug in the bootable drive, and restart it. Press the boot key upon startup and prioritize the bootable media once the boot menu launches.
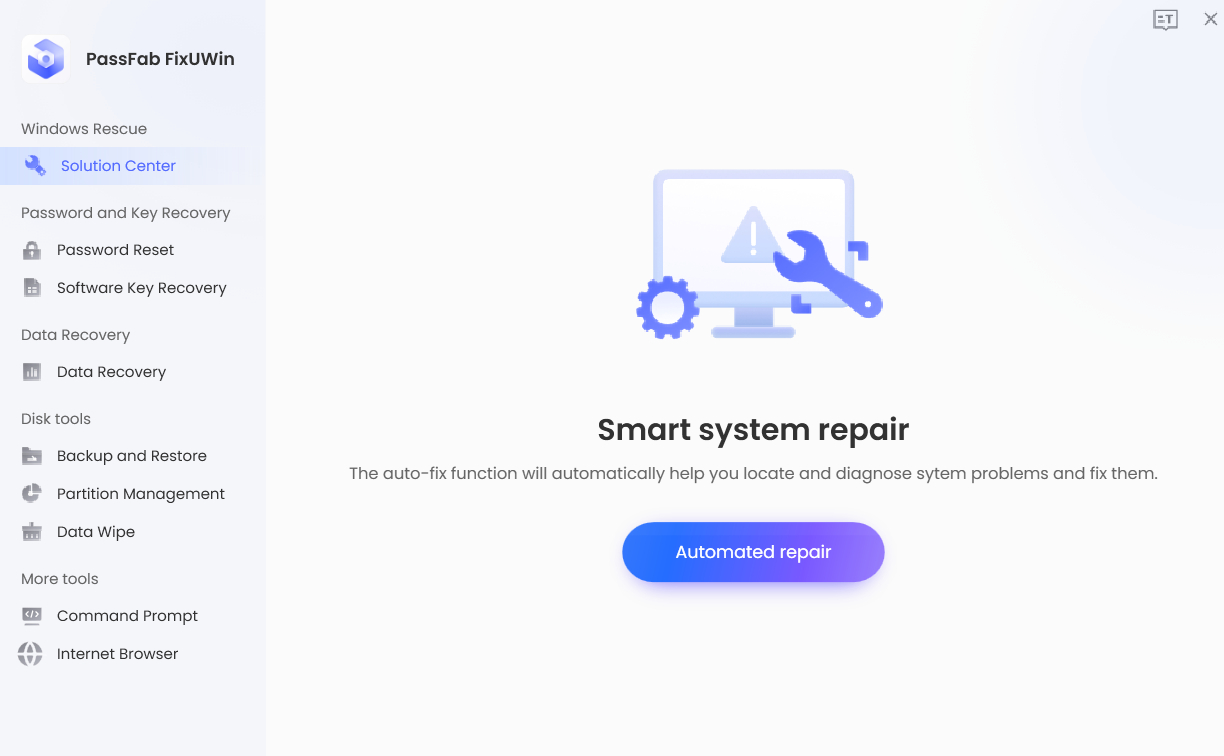
Step 4. Click Automated repair when the PassFab's interface appears. The pc will scan your pc and fix it automatically.
Step 5. Click Restart once PassFab FixUWin has done repairing.
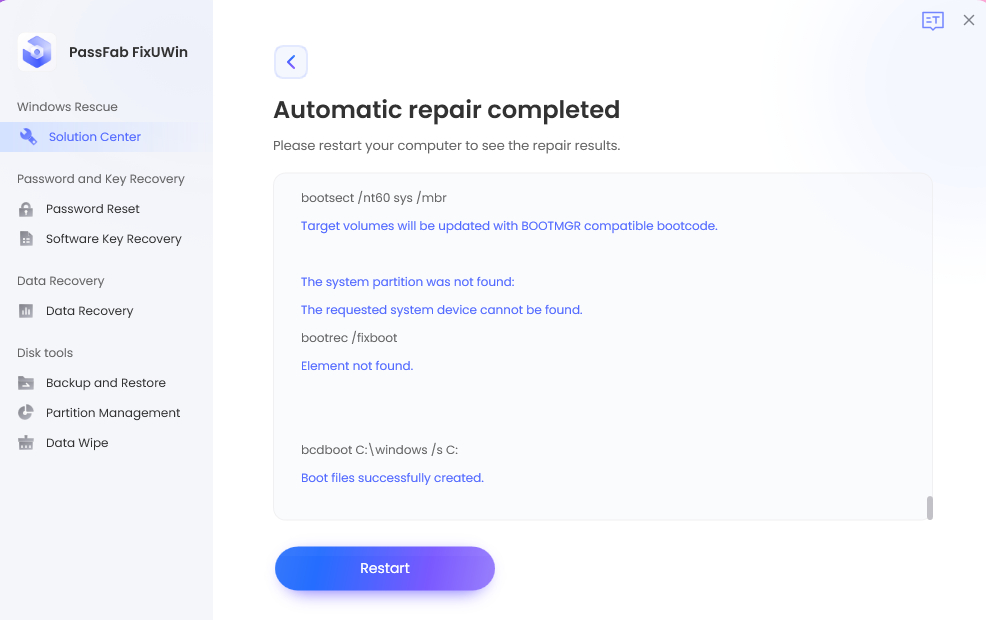
Upon startup, your PC will work normally, and you will no longer see the blue/black screen.
FAQs
1. Why is my Local Security Authority protection not working?
Your Local Security Authority Protection may stop working due to faulty Windows updates, a corrupted file, third-party antivirus, or a disabled secure boot feature.
2. How do you turn on Local Security Authority protection?
You can turn on the Local Security Authority Protection using the registry editor, Local Group Policy Editor, Windows Security app, by running SFC and DISM commands or PowerShell. All of these methods are described in the article.
3. Should I turn on local security protection?
Yes, you must turn on the Local Security Protection because it is essential to protect the OS from being tampered with by various malicious attacks.
Final Verdict
The Windows Local Security Authority Protection feature is built-into Windows to protect your system from unauthorized access. Sometimes, it gets turned off for some reason, and you face issues turning it back on. In this article, we have addressed Windows 11 Local Security Authority Protection is off issue by providing the best possible solutions. When the local security authority gets turned off, you may face a blue/black screen issue, as there is a high chance of a virus attack on your system. However, you can resolve it with one of the best Windows repair tools, i.e., PassFab FixUWin.